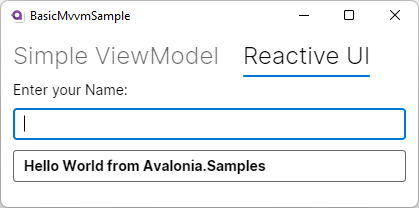
This sample will show you how you can use the MVVM-pattern to receive and process text input by the user. Our sample App will have one TextBox where the users can enter their name and another TextBox where we will present some personal greetings.
Please make sure you have setup your IDE according to the [docs]. Moreover you should have read the [Getting Started guide].
We will use the MVVM-pattern in this sample. MVVM is short for Model - View - ViewModel and describes a software architectural pattern that will split the code base into three pieces:.
- Model
-
The
Modelwill store and handle your data. The model doesn’t know anything about yourVieworViewModel. - View
-
The
Viewcan be thought as the User Interface and will interact with yourViewModel. - ViewModel
-
The
ViewModelcan be seen as a mediator between theViewand theModel. It will know about theModeland is known by theView, but it doesn’t know anything about theView. It can transform and convert the data provided by theModel, if needed.
The MVVM pattern helps us to focus on either of the three parts. If we get new values in our Model, the ViewModel will notify the View about it and the View can update itself. We don’t have to do it manually. If you want to read more about it, here is a collection of useful links:
C# uses Interfaces to define contracts that Classes can satisfy by providing an implementation for the Members defined in the specific Interface. Members of a Class are comprised of Fields and Methods. Methods are code blocks that can be executed. Fields are simply variables that can hold data. Properties are used to read, write, or compute the value of private Fields.
-
More on Interfaces: [Microsoft Docs]
-
More on Classes: [Microsoft Docs]
-
More on Members: [Microsoft Docs]
-
More on Methods: [Microsoft Docs]
-
More on Fields: [Microsoft Docs]
-
More on Properties: [Microsoft Docs]
Our View needs a way to know when a Property has changed and that the View should update itself. To achieve this there is an Interface called INotifyPropertyChanged which implements the event PropertyChanged. If our ViewModel implements this interface, we can send update notifications to our View or any other class listening to that event.
More: [Microsoft Docs]
Avalonia uses Controls to represent functional components of a GUI Layout. Example Controls include [ScrollBar], [[Button], and [TextBox]. Properties (like the Text-property of a TextBox) describe and allow interaction with the Controls.
We need a way to connect the Properties of our controls with the Properties in our ViewModel. Luckily we have [Bindings] which will do this for us. The Binding will update the View whenever the ViewModel reports changes and will also update the ViewModel whenever the user interacts with the View.
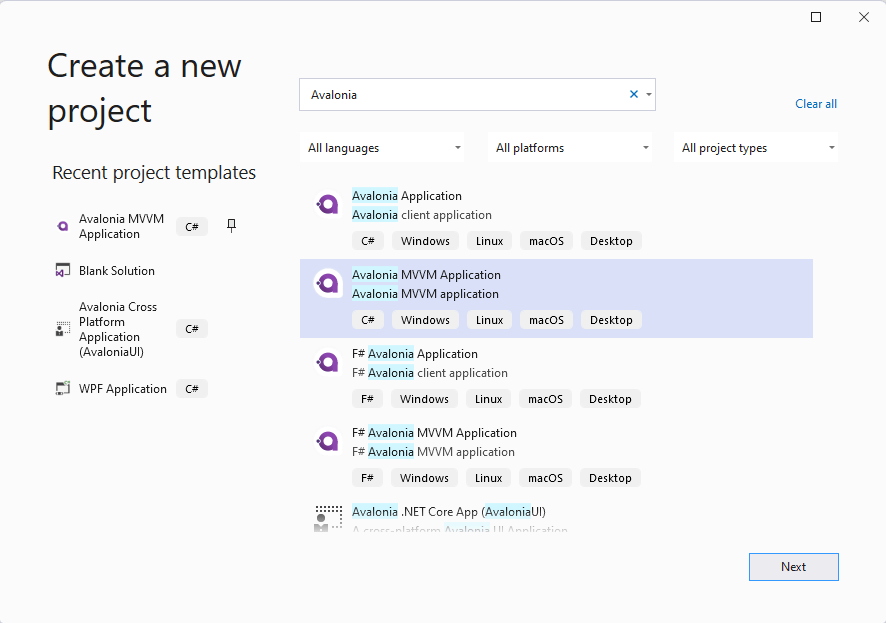
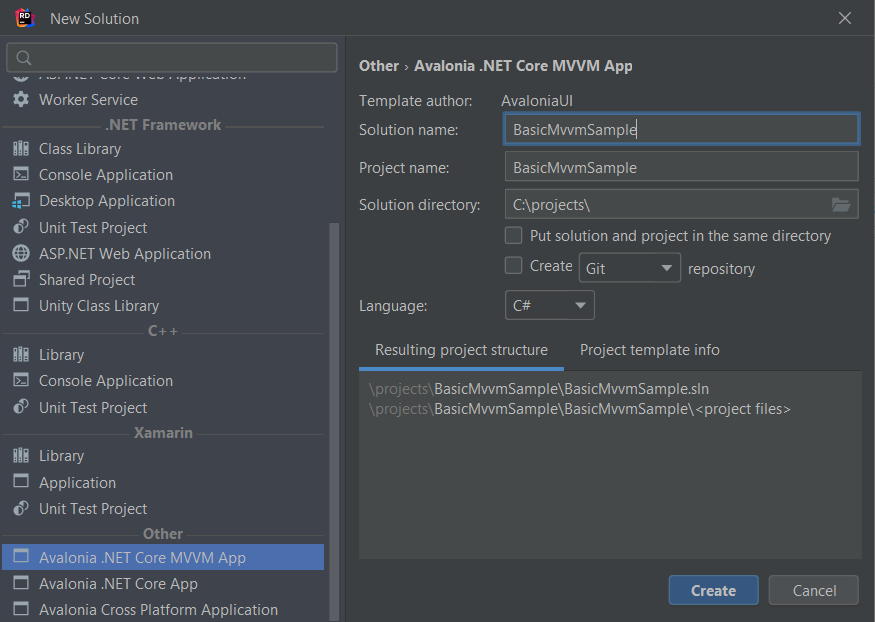
Create a new Avalonia MVVM Application using one of the following procedures, depending on your preferred development environment.
Create a new "Avalonia MVVM Application" Project via File ► New Project ► Avalonia MVVM Project:
Create a new "Avalonia .NET Core MVVM App" Project via File ► New… ► Avalonia .NET Core MVVM App:
In this sample we will show you how you can implement and use the interface INotifyPropertyChanged on your own.
Add a new class called "SimpleViewModel" to the ViewModels project folder. This class should implement INotifyPropertyChanged as shown below:
// Remember to add this to your usings
using System.ComponentModel;

namespace BasicMvvmSample.ViewModels
{
    // This is our simple ViewModel. We need to implement the interface "INotifyPropertyChanged"
    // in order to notify the View if any of our properties changed.
    public class SimpleViewModel : INotifyPropertyChanged
    {
        // This event is implemented by "INotifyPropertyChanged" and is all we need to inform
        // our view about changes.
        public event PropertyChangedEventHandler? PropertyChanged;
    }
}
For convenience we will now add a method to our class, which will raise the event for us. We need to provide the name of the property which has changed. If we add [CallerMemberName] to the method argument, the compiler will add the property name for us. Add the using statement to the top of SimpleViewModel.cs and the method inside the SimpleViewModel class.
// Remember to add this to your usings
using System.Runtime.CompilerServices;

[...]

private void RaisePropertyChanged([CallerMemberName] string? propertyName = null)
{
    PropertyChanged?.Invoke(this, new PropertyChangedEventArgs(propertyName));
}We want the user to be able to enter their name. This text will later be used to greet the user. So let’s add the properties Name and Greeting to our ViewModel. Add the following code inside the SimpleViewModel class.
private string? _Name; // This is our backing field for Name

public string? Name
{
    get
    {
        return _Name;
    }
    set
    {
        // We only want to update the UI if the Name actually changed, so we check if the value is actually new
        if (_Name != value)
        {
            // 1. update our backing field
            _Name = value;

            // 2. We call RaisePropertyChanged() to notify the UI about changes.
            // We can omit the property name here because [CallerMemberName] will provide it for us.
            RaisePropertyChanged();

            // 3. Greeting also changed. So let's notify the UI about it.
            RaisePropertyChanged(nameof(Greeting));
        }
    }
}

// Greeting will change based on a Name.
public string Greeting
{
    get
    {
        if (string.IsNullOrEmpty(Name))
        {
            // If no Name is provided, use a default Greeting
            return "Hello World from Avalonia.Samples";
        }
        else
        {
            // else greet the User.
            return $"Hello {Name}";
        }
    }
}Remember that the View implements the User Interface. Our view will only consist of one [Window] called MainWindow. Its [DataContext], which describes the default location where controls should look values when binding, is the class MainWindowViewModel which was already added by the template when we first created our project. We will just add an instance of our SimpleViewModel to it. Add the following code to the MainWindowViewlModel class in MainWindowViewModel.cs.
// Add our SimpleViewModel.
// Note: We need at least a get-accessor for our Properties.
public SimpleViewModel SimpleViewModel { get; } = new SimpleViewModel();- NOTE
-
Depending on the template and setting used to create your project you may find a class called
MainViewModelinstead ofMainWindowViewModel. In this case please make sure the correct name.
Now we can start with the UI layout. Our View will be written in [XAML] which is an XML-based markup language that is used by many UI frameworks. The code modifications shown below will be applied to MainWindow.axaml.
Replace the content of MainWindow.axaml with the following code.
<Window xmlns="https://github.com/avaloniaui"
        xmlns:x="http://schemas.microsoft.com/winfx/2006/xaml"
        xmlns:vm="using:BasicMvvmSample.ViewModels"
        xmlns:d="http://schemas.microsoft.com/expression/blend/2008"
        xmlns:mc="http://schemas.openxmlformats.org/markup-compatibility/2006"
        mc:Ignorable="d" d:DesignWidth="800" d:DesignHeight="450"
        x:CompileBindings="True"
        x:DataType="vm:MainWindowViewModel"
        x:Class="BasicMvvmSample.Views.MainWindow"
        Icon="/Assets/avalonia-logo.ico"
        Title="BasicMvvmSample">
</Window>|
ℹ️
|
Note that the lines x:CompileBindings="True" and x:DataType="vm:MainWindowViewModel" enables [CompiledBindings] in our Window. Enabling CompiledBindings is completely optional but has many benefits such as better performance and a better debugging experience.
|
Our View will be built using two [TextBoxes]: one for the user to enter their name and another one to present the greeting. As a Window can only have one child, we need to wrap our controls in a [Panel]. We will choose a [StackPanel], but you can use any other Panel variant to give you greater control over the layout.
The StackPanel’s `DataContext will [bind] to our SimpleViewModel. As the DataContext is inherited from the parent control, our TextBoxes will have the same DataContext. Therefore we can just bind TextBox.Text to Name and Greeting respectively. The complete MainWindow.axaml code is shown below:
<Window xmlns="https://github.com/avaloniaui"
        xmlns:x="http://schemas.microsoft.com/winfx/2006/xaml"
        xmlns:vm="using:BasicMvvmSample.ViewModels"
        xmlns:d="http://schemas.microsoft.com/expression/blend/2008"
        xmlns:mc="http://schemas.openxmlformats.org/markup-compatibility/2006"
        mc:Ignorable="d" d:DesignWidth="800" d:DesignHeight="450"
        x:CompileBindings="True"
        x:DataType="vm:MainWindowViewModel"
        x:Class="BasicMvvmSample.Views.MainWindow"
        Icon="/Assets/avalonia-logo.ico"
        Title="BasicMvvmSample">

	<!-- This is just used by the designer / previewer -->
	<Design.DataContext>
        	<vm:MainWindowViewModel/>
    	</Design.DataContext>

	<!-- Our Simple ViewModel-->
	<StackPanel DataContext="{Binding SimpleViewModel}" Spacing="10">
		<TextBlock>Enter your Name:</TextBlock>
		<TextBox Text="{Binding Name}" />
		<TextBox Text="{Binding Greeting, Mode=OneWay}"
				 IsReadOnly="True"
				 FontWeight="Bold" />
	</StackPanel>
</Window>
Please note that we use Mode=OneWay in the Binding for Greeting, because Greeting is read-only and the default Mode of TextBox.Text is TwoWay. Moreover we made this TextBox read-only, so the user will not be able to change the Text by accident.
We don’t need to implement all the boilerplate code on our own over and over again. Instead, we can use any existing MVVM framework out there. [ReactiveUI] is a popular MVVM framework designed for .NET. If you create a new Avalonia MVVM Project, you will have ReactiveUI (or CommunityToolkit.Mvvm based on your choice) installed by default. So let’s see how we can use ReactiveUI to achieve the same results as Approach 1 above.
As before, we start by adding a new class called "ReactiveViewModel" into the ViewModels folder. This time we will use ReactiveObject as our base class. This base class already implements INotifyPropertyChanged, so we don’t need to implement it again. Make sure your ReactiveViewModel.cs file looks like the code below:
using ReactiveUI;
using System;

namespace BasicMvvmSample.ViewModels
{
    // Instead of implementing "INotifyPropertyChanged" on our own we use "ReactiveObject" as
    // our base class. Read more about it here: https://www.reactiveui.net
    public class ReactiveViewModel : ReactiveObject
    {
    }
}Our Name-property now has less boilerplate code in the setter, as we can use ReactiveUI’s RaiseAndSetIfChanged method. Add the code below to the ReactiveViewModel class in ReactiveViewModel.cs
private string? _Name; // This is our backing field for Name

public string? Name
{
    get
    {
        return _Name;
    }
    set
    {
        // We can use "RaiseAndSetIfChanged" to check if the value changed and automatically notify the UI
        this.RaiseAndSetIfChanged(ref _Name, value);
    }
}
Greeting does not need to be modified and can be copied from SimpleViewModel. So either copy the code below or copy the same code from SimpleViewModel and place it in the ReactiveViewModel class in ReactiveViewModel.cs.
// Greeting will change based on a Name.
public string Greeting
{
    get
    {
        if (string.IsNullOrEmpty(Name))
        {
            // If no Name is provided, use a default Greeting
            return "Hello World from Avalonia.Samples";
        }
        else
        {
            // else greet the User.
            return $"Hello {Name}";
        }
    }
}
But wait, how do we notify the View that Greeting should update? In ReactiveUI we can use [WhenAnyValue] to listen and react to property changes. We will setup that listener in the constructor of our ReactiveViewModel. Add the construtor code shown below to the ReactiveViewModel class.
public ReactiveViewModel()
{
    // We can listen to any property changes with "WhenAnyValue" and do whatever we want in "Subscribe".
    this.WhenAnyValue(o => o.Name)
        .Subscribe(o => this.RaisePropertyChanged(nameof(Greeting)));
}
To explain the above code in short: WhenAnyValue will listen to changes of the property specified in the [lambda]. In Subscribe we define what should happen if the value has changed. In our case, we want to RaisePropertyChanged for Greeting.
Similarly to how we added SimpleViewModel we can add ReactiveViewModel to MainWindowViewModel. Add the code below to the MainWindowViewModel class in MainWindowViewModel.cs
// Add our RactiveViewModel
public ReactiveViewModel ReactiveViewModel { get; } = new ReactiveViewModel();We can use both ViewModels side by side. To demonstrate this, we will wrap both Views in a TabControl. As our properties have the same names, we can just copy & paste the view we have and modify the DataContext. Modify MainWindow.axaml to add the ReactiveUI view and to wrap both the ReactiveUI and SimpleViewModel controls in a TabControl as shown below:
<Window xmlns="https://github.com/avaloniaui"
        xmlns:x="http://schemas.microsoft.com/winfx/2006/xaml"
        xmlns:vm="using:BasicMvvmSample.ViewModels"
        xmlns:d="http://schemas.microsoft.com/expression/blend/2008"
        xmlns:mc="http://schemas.openxmlformats.org/markup-compatibility/2006"
        mc:Ignorable="d" d:DesignWidth="800" d:DesignHeight="450"
        x:CompileBindings="True"
        x:DataType="vm:MainWindowViewModel"
        x:Class="BasicMvvmSample.Views.MainWindow"
        Icon="/Assets/avalonia-logo.ico"
        Title="BasicMvvmSample">

	<!-- This is just used by the designer / previewer -->
    	<Design.DataContext>
        	<vm:MainWindowViewModel/>
    	</Design.DataContext>

	<TabControl>

		<!-- Our Simple ViewModel -->
		<TabItem Header="Simple ViewModel" >
			<StackPanel DataContext="{Binding SimpleViewModel}" Spacing="10">
				<TextBlock>Enter your Name:</TextBlock>
				<TextBox Text="{Binding Name}" />
				<TextBox Text="{Binding Greeting, Mode=OneWay}"
						 IsReadOnly="True"
						 FontWeight="Bold" />
			</StackPanel>
		</TabItem>

		<!-- Our ReactiveViewModel -->
		<TabItem Header="Reactive UI" >
			<StackPanel DataContext="{Binding ReactiveViewModel}" Spacing="10">
				<TextBlock>Enter your Name:</TextBlock>
				<TextBox Text="{Binding Name}" />
				<TextBox Text="{Binding Greeting, Mode=OneWay}"
						 IsReadOnly="True"
						 FontWeight="Bold" />
			</StackPanel>
		</TabItem>

	</TabControl>
</Window>Even though Avalonia ships ReactiveUI by default, you are not tied to it. You can use it side by side with other MVVM Frameworks or can completely replace it. Among others here is a short list of popular MVVM Frameworks for your consideration:
-
… And many more.
Are you looking for more advanced tutorials? Find them here:


