-
Notifications
You must be signed in to change notification settings - Fork 3
Entando plugin: RSS
Installation and configuration of the plugin jprss
The purpose of this guide is to provide a complete description of the Entando RSS plugin whose code is jprss for the Entando platform.
This guide is intended for both administrators and developers who wish to explore the capabilities of the Entando Plugin RSS and are considering a possible integration into a running production environment or in a Development Environment.
In order to take maximum advantage from the present guide, it is necessary to have basic knowledge of the Java platform, the servlet engine Apache Tomcat, PostgreSQL (or MySQL) DBMS and the Entando platform.
Moreover, it's necessary to have read the Plugin Pattern for the installation procedure and an explanation of the standard directory layout.
The jprss plugin allows to serve the portal contents through RSS channels. This plugin offers:
-
a backend interface used by the administrator to create and manage the contents served through RSS channel. This interface adheres strictly to the preexisting back-end graphics and settings.
-
the RSS Channels Widget for the front-end designed to serve the list of the links of the active channels. The link to RSS contents served in the portal always follows this pattern: http://ipaddress:8080/myportal/do/jprss/Rss/Feed/show.action?id where ipaddress is the ip of the myportal portal and the id is the ID of the served content.
Though the plugin installation is not difficult at all, we are going to modify the system tables, so a backup of your database is highly recommended. Furthermore, you may be required to customize the scripts to your needs before installation.
For the purpose of the current guide, a few Maven and Ant commands are shown: your IDE has probably the ability to execute those command for you in background.
jprss is a pure plugin, thus it neither affects the core of the system nor the existing functionality.
jprss directories are organized following the Maven Standard Directory Layout as shown in the Plugin Pattern.
It is worth noting that the plugin installation is greatly changed from the previous releases (thank you, Maven!).
As always when it comes down to install new things, stop your servlet container before moving on.
Open the pom.xml of your project: locate the <dependencies> tag toward the end of the file, after the <build> tag; if the tag dependencies doesn't exist just create a new one just after the closure of the build tag.
Add the following snippet inside the dependencies:
            <dependency>
                <groupId>org.entando.entando.plugins</groupId>
                <artifactId>entando-plugin-jprss</artifactId>
                <version>${entando.version}</version><!-- version. Don't remove this comment. -->
                <type>war</type>
            </dependency>
You are done! You can verify the correct installation of the plugin going to the administration area and checking for the new item in the Plugins menu.
From now we will use the name myportal when referring to your deployed Entando application or, in other words, to the artifact ID of the deployed portal.
All Entando plugins can be downloaded from the Maven Central repository, just filter by code and by version.
To install jprss in a production environment the file entando-plugin-jprss-3.2.0.war is needed; we will refer to this file as WAR package.
The WAR package might contain the dependencies of other plugins; when performing copy operations you may accidentally overwrite your previous customizations of the JSP files, so you are warmly recommended to create a backup of your installation.
The integration activity must be performed after the servlet container has been stopped.
-
copy the content of
WEB-INF/libdirectory of the WAR package, tomyportal/WEB-INF/lib/directory. -
create the directory
myportal/WEB-INF/plugins/if it does not exist. Copy the content ofWEB-INF/plugins/directory of the WAR package, tomyportal/WEB-INF/plugins/ -
copy the content of the directory
resources/pluginsof the WAR package tomyportal/resources/plugins/
Now the servlet container can be restarted.
The RSS plugin takes advantage of one of the key core features of the Entando, the attributes roles.
Before configuring the RSS channels you must decide what kind of contents are suitable for publishing. Now that the configuration item in the database does not exist anymore the role is used to decide whether attribute is suitable to become the title or the description of the RSS feed.
To do so you have to assign the two new roles added by this plugin, namely jprss:title and jprss:description, to two of the content attributes chosen to be the title and the description of the RSS feed, respectively.


Confirm clicking the Add button, then proceed with the attribute configuration eventually pressing the Save button.
In the picture above an example of a correctly configured content type is given. The name of the attribute doesn't matter, is the role that triggers the RSS plugin: in the picture above the attribute title and descr are associated to the respective jprss roles.
Once that you have saved you can access the RSS plugin administration from the left menu Plugins → RSS

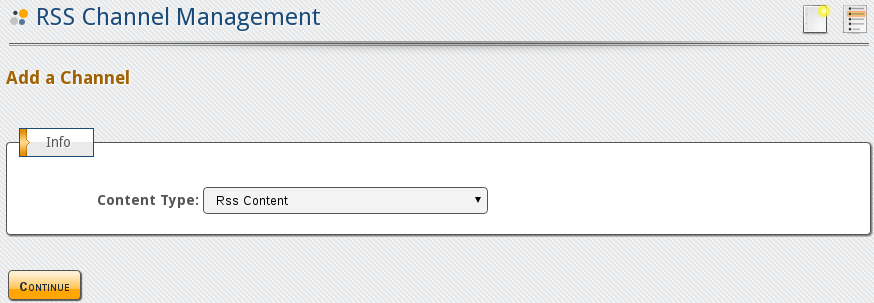
The two administration icons are shown in the top right of the picture above; the left one is to create a new channel, the right for the channel list management.

When adding a new channel the first thing that you are prompted for is the Content Type to use. In the drop down menu selection are listed all those content types that are properly configured.

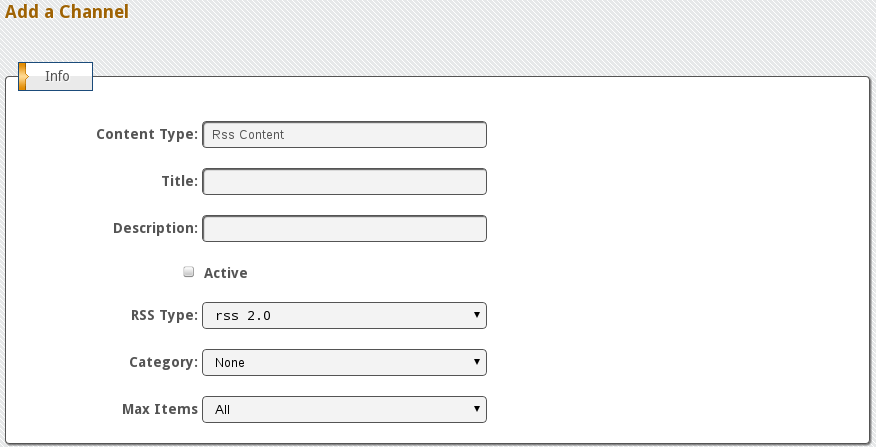
The following information must be provided to complete the creation of the new channel (Info section):
-
the Title of the RSS channel
-
a brief Description of the RSS channel
-
choose if the channel must be immediately served checking the Active box
-
RSS compliance (RSS type) standard of the channel
-
definition of the Category this channel belongs to
-
the Max Items to be published at once
In the Filters section we find the list of the current flters; once the form is properly filled the RSS channel is ready to be published. Pressing the Save button with the Active checkbox checked will result in an immediate channel exposition in the portal.

Clicking on the Add button you begin with the new filter configuration: each attribute has a different configuration.
Depending of the attributes of the content type, you have different filter options, however it is always possible to filter by Creation Date, last edit/modification date and by title and description. By title and description we mean the attributes with the jprss roles assigned.
In the picture below there is a possible channel configuration:

As always the search filters are applied with the order they appear in the list; you can delete a filter with a click on the minus sign or arrange its position using the arrows icons.
Once that you have saved the configuration (the Save button was omitted in the picture above) you return to the Channel Management list:

You find two separate lists:
-
Channel List lets the administrator to edit the channel settings by clicking on the title link, gives immediate information such as activity status, the content type which carries the RSS feed and the RSS standard used. You can also delete a channel with a click on the remove icon.
-
Content types gives the list of all contents types of the system. Those suitable for publication in a RSS feed have the attributes shown in the Info column. You can click on the description of the content type in order to edit it and make it suitable for RSS publication.
This plugin offers a Widget that makes a list of the channel in the various languages of the portal. However this is seldom used because the nowadays practice wants a simple link placed in the page that lands the feeder directly to the channel.
In the Entando platform this is achieved by placing a link in the page model e.g. of the home page.
All the material here contained is published under the GNU Free Documentation License v1.3
The Entando trademark and logo are registered trademarks of Entando, srl. All
Rights Reserved.
All other trademarks are the property of their respective owners.