-
Notifications
You must be signed in to change notification settings - Fork 3
/
Copy pathindex.html
891 lines (697 loc) · 39.9 KB
/
index.html
1
2
3
4
5
6
7
8
9
10
11
12
13
14
15
16
17
18
19
20
21
22
23
24
25
26
27
28
29
30
31
32
33
34
35
36
37
38
39
40
41
42
43
44
45
46
47
48
49
50
51
52
53
54
55
56
57
58
59
60
61
62
63
64
65
66
67
68
69
70
71
72
73
74
75
76
77
78
79
80
81
82
83
84
85
86
87
88
89
90
91
92
93
94
95
96
97
98
99
100
101
102
103
104
105
106
107
108
109
110
111
112
113
114
115
116
117
118
119
120
121
122
123
124
125
126
127
128
129
130
131
132
133
134
135
136
137
138
139
140
141
142
143
144
145
146
147
148
149
150
151
152
153
154
155
156
157
158
159
160
161
162
163
164
165
166
167
168
169
170
171
172
173
174
175
176
177
178
179
180
181
182
183
184
185
186
187
188
189
190
191
192
193
194
195
196
197
198
199
200
201
202
203
204
205
206
207
208
209
210
211
212
213
214
215
216
217
218
219
220
221
222
223
224
225
226
227
228
229
230
231
232
233
234
235
236
237
238
239
240
241
242
243
244
245
246
247
248
249
250
251
252
253
254
255
256
257
258
259
260
261
262
263
264
265
266
267
268
269
270
271
272
273
274
275
276
277
278
279
280
281
282
283
284
285
286
287
288
289
290
291
292
293
294
295
296
297
298
299
300
301
302
303
304
305
306
307
308
309
310
311
312
313
314
315
316
317
318
319
320
321
322
323
324
325
326
327
328
329
330
331
332
333
334
335
336
337
338
339
340
341
342
343
344
345
346
347
348
349
350
351
352
353
354
355
356
357
358
359
360
361
362
363
364
365
366
367
368
369
370
371
372
373
374
375
376
377
378
379
380
381
382
383
384
385
386
387
388
389
390
391
392
393
394
395
396
397
398
399
400
401
402
403
404
405
406
407
408
409
410
411
412
413
414
415
416
417
418
419
420
421
422
423
424
425
426
427
428
429
430
431
432
433
434
435
436
437
438
439
440
441
442
443
444
445
446
447
448
449
450
451
452
453
454
455
456
457
458
459
460
461
462
463
464
465
466
467
468
469
470
471
472
473
474
475
476
477
478
479
480
481
482
483
484
485
486
487
488
489
490
491
492
493
494
495
496
497
498
499
500
501
502
503
504
505
506
507
508
509
510
511
512
513
514
515
516
517
518
519
520
521
522
523
524
525
526
527
528
529
530
531
532
533
534
535
536
537
538
539
540
541
542
543
544
545
546
547
548
549
550
551
552
553
554
555
556
557
558
559
560
561
562
563
564
565
566
567
568
569
570
571
572
573
574
575
576
577
578
579
580
581
582
583
584
585
586
587
588
589
590
591
592
593
594
595
596
597
598
599
600
601
602
603
604
605
606
607
608
609
610
611
612
613
614
615
616
617
618
619
620
621
622
623
624
625
626
627
628
629
630
631
632
633
634
635
636
637
638
639
640
641
642
643
644
645
646
647
648
649
650
651
652
653
654
655
656
657
658
659
660
661
662
663
664
665
666
667
668
669
670
671
672
673
674
675
676
677
678
679
680
681
682
683
684
685
686
687
688
689
690
691
692
693
694
695
696
697
698
699
700
701
702
703
704
705
706
707
708
709
710
711
712
713
714
715
716
717
718
719
720
721
722
723
724
725
726
727
728
729
730
731
732
733
734
735
736
737
738
739
740
741
742
743
744
745
746
747
748
749
750
751
752
753
754
755
756
757
758
759
760
761
762
763
764
765
766
767
768
769
770
771
772
773
774
775
776
777
778
779
780
781
782
783
784
785
786
787
788
789
790
791
792
793
794
795
796
797
798
799
800
801
802
803
804
805
806
807
808
809
810
811
812
813
814
815
816
817
818
819
820
821
822
823
824
825
826
827
828
829
830
831
832
833
834
835
836
837
838
839
840
841
842
843
844
845
846
847
848
849
850
851
852
853
854
855
856
857
858
859
860
861
862
863
864
865
866
867
868
869
870
871
872
873
874
875
876
877
878
879
880
881
882
883
884
885
886
887
888
889
890
891
<!doctype html>
<html lang="en-US">
<head>
<title>Super Mario Maker Modding Index</title>
<meta name="og:title" content="Super Mario Maker Modding Index" />
<meta property="og:title" content="Super Mario Maker Modding Index" />
<meta name="twitter:title" content="Super Mario Maker Modding Index" />
<meta http-equiv='Content-Type' content='text/html; charset=UTF-8'>
<meta http-equiv="X-UA-Compatible" content="IE=Edge" />
<meta charset="utf-8">
<meta name="viewport" id="meta-zoom" content="width=device-width, initial-scale=1.0, maximum-scale=5.0, minimum-scale=1.0">
<meta name="keywords" content="Super Mario Maker Modding Index" />
<meta name="description" content="The complete guide to modding the Super Mario Maker series" />
<meta name="og:description" content="The complete guide to modding the Super Mario Maker series" />
<meta property="og:description" content="The complete guide to modding the Super Mario Maker series" />
<meta name="twitter:description" content="The complete guide to modding the Super Mario Maker series" />
<link rel='icon' href='https://nightscript370.github.io/assets/images/projects/MMM.png'>
<link rel="shortcut icon" type="image/x-icon" href="https://nightscript370.github.io/assets/images/projects/MMM.png" />
<link rel="apple-touch-icon" sizes="192x192" href="https://nightscript370.github.io/assets/images/projects/MMM.png">
<meta name="og:image" content="https://nightscript370.github.io/assets/images/projects/MMM.png">
<meta property="og:image" content="https://nightscript370.github.io/assets/images/projects/MMM.png">
<meta name="twitter:image" content="https://nightscript370.github.io/assets/images/projects/MMM.png">
<meta name="theme-color" content="#1C9934" />
<meta name="msapplication-navbutton-color" content="#1C9934">
<meta name="twitter:widgets:link-color" content="#1C9934">
<meta name="twitter:widgets:border-color" content="#1C9934">
<meta name="apple-mobile-web-app-capable" content="yes">
<meta name="apple-mobile-web-app-status-bar-style" content="black-translucent">
<meta name="HandheldFriendly" content="true">
<meta name="og:url" content="https://mariomakingmods.github.io" />
<meta property="og:url" content="https://mariomakingmods.github.io" />
<meta name="og:site_name" content="Mario Making Mods" />
<meta property="og:site_name" content="Mario Making Mods" />
<meta name="og:type" content="website" />
<meta property="og:type" content="website" />
<meta name="twitter:card" content="summary" />
<meta name="twitter:site" content="@NightScript" />
<link rel="stylesheet" href="https://nightscript370.github.io/assets/css/themes/mario-yellow.css">
<link rel="stylesheet" href="https://nightscript370.github.io/assets/css/themes/mario-red.css">
<link rel="stylesheet" href="https://nightscript370.github.io/assets/css/themes/mario-blue.css">
<link rel="stylesheet" href="https://nightscript370.github.io/assets/css/themes/mario-green.css">
<link rel="stylesheet" href="https://nightscript370.github.io/assets/css/themes/light.css">
<link rel="stylesheet" href="https://nightscript370.github.io/assets/css/themes/dark.css">
<link rel="stylesheet" href="https://nightscript370.github.io/assets/css/themes/discord.css">
<link rel="stylesheet" href="https://nightscript370.github.io/assets/css/themes/default.css">
<script src="https://nightscript370.github.io/assets/js/sidebar/themeSwitch.js"></script>
<link rel="stylesheet" href="https://nightscript370.github.io/assets/bootstrap/css/bootstrap.min.css">
<link rel="stylesheet" href="https://nightscript370.github.io/assets/css/style.css">
<link rel="stylesheet" href="https://nightscript370.github.io/assets/css/syntax.css">
</head>
<body class="d-flex">
<div class="bg"></div>
<nav id="sidebar">
<div class="sidebar-contents">
<div id="sidebar-logo">
<button type="button" id="sidebarCollapse" class="btn" aria-label="Toggle Sidebar"></button>
<div id="logoImage"><img src="https://nightscript370.github.io/assets/images/projects/MMM.png"></div>
</div>
<ul class="list-unstyled mb-0" id="sidebarLinks">
<li><a href="/" class="proxim no-not-hover"><span class="sidebar-text">Home/Modding Index</span></a></li>
<li><a href="/localhost" class="proxim no-not-hover"><span class="sidebar-text">Forums Archive</span></a></li>
<li><a href="https://discord.gg/3KaAHCj" class="proxim no-not-hover"><span class="sidebar-text">Discord Server</span></a></li>
</ul>
<span class="bottomLinks text-center mb-2">
<div id="themesContainer"></div>
<ul class="list-unstyled">
<li><a href="/projects/ns-domain">Website Information</a></li>
<li><a href="https://github.com/NightScript370/nightscript370.github.io">Source Code</a></li>
</ul>
By NightScript, Icons8 & co.
</span>
</div>
</nav>
<!-- Page Content -->
<div id="content" class="page-padding">
<h1>Super Mario Maker Modding Index</h1>
<div class="d-xl-none" data-toc></div>
<div class="row">
<div class="col-xl-8" data-content id="moddingIndexContent">
Welcome to the Ultimate Super Mario Maker Modding Guide. This guide will teach you how to play and make mods for every entry in the Super Mario Maker series. Use the Table of Contents to navigate through the long list.
This guide was made possible by all the folks over at the [Mario Making Mods discord server](https://discord.gg/TfU8jZA), including NightScript, MarioPossamotto, bunten, hus & GRAnimated.
## Super Mario Maker (Wii U)
### Playing Mods (Wii U Hardware)
1. Download [SDCafiine](https://www.wiiubru.com/appstore/zips/SDcafiine.zip) and extract the contents of the archive to the root of your SD Card.
2. Make a new folder on the root of your SD card called sdcafiine. Inside it create another folder and name it one of the respective title IDs.
- **US**: `000500001018DC00`
- **EU**: `000500001018DD00`
- **JP**: `0005000E1018DB00`
3. Inside the Title ID folder, make yet another new folder. Name this folder the folder of the mod.
4. Make a folder called `content` inside it and extract the mod files into it.
- If your mod comes with a `content` folder, place the file of that folder in the new `content` folder
5. Boot the Homebrew Launcher using your preferred method, and then load SDCafiine.
- In order to get the Homebrew Launcher, please follow [the Wii U hacking Guide](https://wiiu.hacks.guide/).
6. Launch Super Mario Maker.
### Playing Mods (CEMU)
1. Open `cemu:/graphicspack` and create a new folder titled "SuperMarioMaker_" and the name of the mod following, **without spaces**
2. Create a file called `rules.txt` and copy the following inside (use any text editor to edit):
```ini
[Definition]
titleIds = 0x500001010ec00,0x5000e1010ed00,0x5000e1010eb00
version = 4
```
3. Add a new row to the file contents starting with `name = ` and then type the name of the mod, surrounded in double quotes
4. Save the `rules.txt` file
5. Create a new directory titled `content` and place the modified files there.
- If your mod comes with a `content` folder, merge it with the newly created one
6. The next time you launch CEMU, right click on your Super Mario Maker copy and hit "Open Graphics Pack".
7. Go through the path made above and enable your mod.
### Editing Sprites & Tilesets
#### Instructions
1. If you haven't gotten one already, please dump your copy of Super Mario Maker
2. Download and extract the latest version of [Switch Toolbox](https://github.com/KillzXGaming/Switch-Toolbox/releases)
3. If you're editing a sprite, open `StaticSkin.pack` in Switch Toolbox
- Here's a documentation of all the SZS files in [StaticSkin.pack](https://pastebin.com/hZmD8WUs)
4. Within Switch Toolbox, open the SZS file you'd like to edit.
5. Inside the SZS file, open `output.bfres`.
6. In the textures folder, you should see one or more images. Open the texture you'd like to edit.
7. On the toolbar on the top, hit "Edit" and hit "With External Program".
- Make your edits to the textures. You could use any image editor, but we recommend [Paint.NET](https://www.getpaint.net/).
8. Hit `CTRL + S` to save the image.
### Editing Music
#### Tools you will need
- [Audacity](https://www.audacityteam.org/download/)
- [Citric Composer](https://gota7.github.io/Citric-Composer/)
#### Creating a Single-Channeled BFSTM
1. Create a stereo music file in Audacity and export it as a .wav.

2. Inside Citric Composer, go to "Tools" and launch "Isabelle Sound Editor".
3. In the Sound Editor, go to "Edit", and click on "Import File".
* At this point, this is how it should look now:

4. If you want your music to loop, check the loop checkbox, then set the loop start and loop end in samples.

* If it's too difficult to do the above, you can set the loop start and loop end point in the track itself.
* The yellow line is the loop start point.
* The red line is the loop end point.
5. Set the BFSTM version to `4.0.0`.
6. Set the Output Encoding type to `DSP-ADPCM`.
7. Click on "Update Project Info".
* You can also save this as a project file
8. Export your BFSTM by going to "File" and clicking on "Export Binary".
9. Save your file as "Cafe Stream"
#### Creating a Multi-Channeled BFSTM
To make multichanneled BFSTSMS, all you have to do is making the MONO channels.
* To create a mono channel, go to "Tracks" and click "Add new".

SMW and NSMBU music have 4 channels:
* First Channel: Main theme (Left)
* Second Channel: Main theme (Right)
* Third Channel: Yoshi Beat (Left)
* Leave this blank if you do not want a Yoshi Beat. Do not remove this channel.
* Fourth Channel: Yoshi Beat (Right)
* Leave this blank if you do not want a Yoshi Beat. Do not remove this channel.

* Make sure to correctly set the Left and Right channels, by using the slider on the left.
1. Go to Edit -> "Preferences..."
2. In the "Import/Export" tab, make sure to use a custom mix is set for "When exporting tracks to an audio file".
3. Follow the Citric Composer steps in the Single Channeled BFSTM section.
### Adding new backgrounds (to themes that don't have one)
1. Make a copy of a background .szs file in that current directory
2. Export the output.bfres file from the .szs using Switch Toolbox.
* Right click `output.bfres` -> Archive -> Export Raw Data to File Location
3. Launch a hex editor application and open the output.bfres file you just exported.
4. Find every mention of the first two characters of the original file and replace them with any other two characters (except M1, M3, MW or WU).
5. Save your BFRES file
6. In Switch Toolbox, replace the output.bfres file in the new .szs with the new one you just edited
* Right click `output.bfres` -> Archive -> Replace Raw Data
7. At this point, make the edits to the background.
8. Rename the `.szs` file to the name you game it in the hex editor.
9. Within Switch Toolbox, open `/content/Static.pack`
10. Search for a file called "XX_SceneDB.byaml" (XX being your game style) and open it.
11. On the top bar, switch to the "Text Editor" tab.
12. Decompile the byaml file into a editable xml format.
13. Let's say I want to change the underground background. Where it says `<dv type="string">?????</dv>`, replace ????? with the name of your szs file. (????? can be M0_DV_black, MW_DV_plain, etc.)
14. Compile the xml back into a byaml, and then save the edits by hitting the button on the bottom right.
15. Save your Static.Pack file.
### Editing Levels
#### Requirements
- A PC capable of running Python 3.5
- (Python 3.4 works but not recommended. For anything lower, uninstall other versions or at least remove them from PATH)
- PyQt5 for your Python version and CPU: [32-bit for Python 3.5](https://sourceforge.net/projects/pyqt/files/PyQt5/PyQt-5.6/PyQt5-5.6-gpl-Py3.5-Qt5.6.0-x32-2.exe/download) -- [64-bit for Python 3.5](https://sourceforge.net/projects/pyqt/files/PyQt5/PyQt-5.6/PyQt5-5.6-gpl-Py3.5-Qt5.6.0-x64-2.exe/download)
- The latest codebase of [PointlessMaker](https://github.com/aboood40091/PointlessMaker/archive/master.zip)
- Your tilesets in PNG form
- Your extracted course
- You can use [saveMii](https://github.com/GabyPCgeeK/savemii/releases/latest) to export your course (as well as import it once you're done)
#### Instructions
1. Extract the `PointlessMaker-master.zip` archive somewhere.
2. Place all your tileset images in the `PointlessMaker-master/tilesets/` folder
3. Double-click the `main.py` excutable or open a terminal window in the PointlessMaker folder, and enter the following: `python main.py`
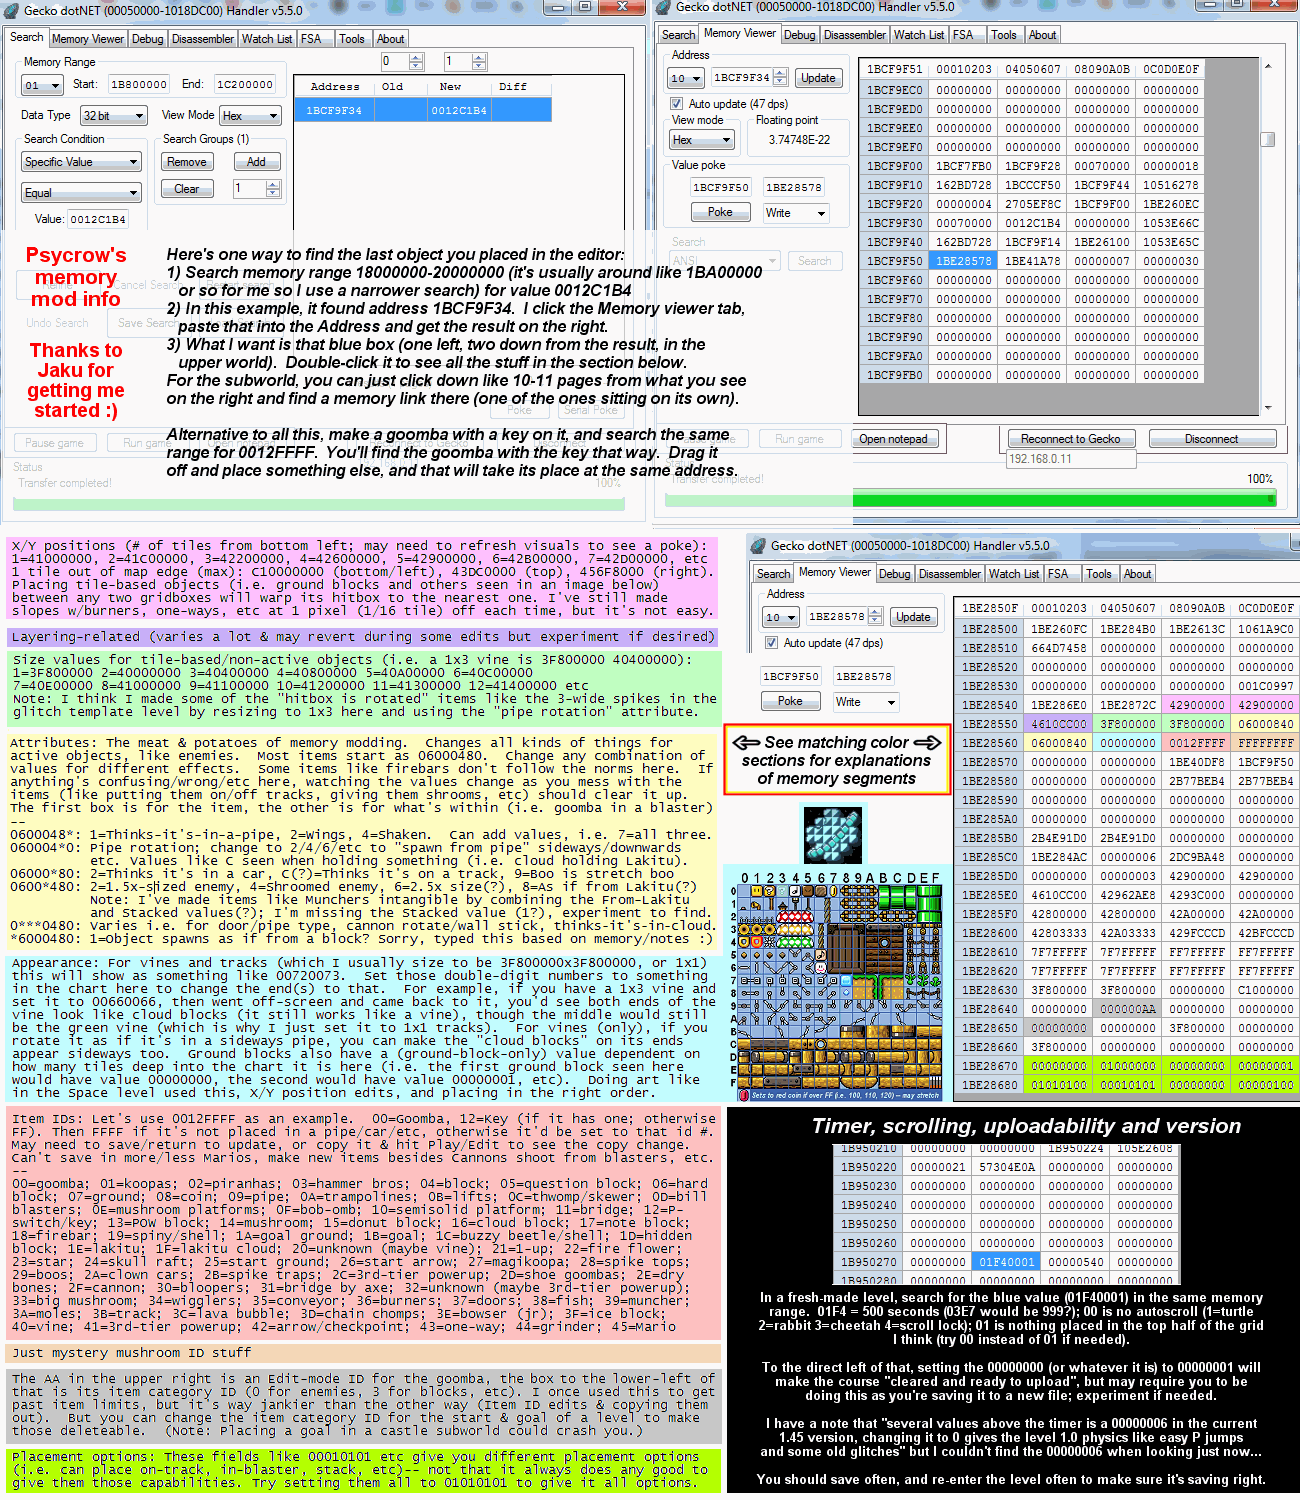
### Memory Modding (Credits to Psycrow)
### Custom Clapboard
This is a tutorial on how to make your own custom Super Mario Maker clapperboards.
#### Requirements
- An image editing program
- Layout.pack (Located inside your Pack folder)
- Images that you want to replace the clapperboard with
- [Wexos Toolbox](http://wiki.tockdom.com/wiki/Wexos%27s_Toolbox) (Download on the right-hand side)
- [Switch Toolbox](https://github.com/KillzXGaming/Switch-Toolbox/releases)
#### Instructions
1. Open `Layout.pack` with Wexos Toolbox
2. Search for `Layout/Cmn_ClapperboardBtn_00.szs`
- `Edit` on the Toolbar => `Search` => Type the above => `OK`
3. Right-click the file and press `Export`
4. Navigate to where you want to save your file.
- NOTE: Before you press "Save", find the "File name" on the save window, & delete "Layout/" from the name. Wexos will **not** let you save until you do this.
5. Open the exported file & export the `.arc` file.
6. Open the exported `.arc` file and export the following files:
- `timg/KachinkoAO_00^t.bflim`
- `timg/KachinkoBeauty_00^t.bflim`
- `timg/KachinkoAO_01^t.bflim`
- `timg/KachinkoBeauty_01^t.bflim`
AO = Ambient Occlusion (Tells the file which parts are light, and which parts are dark. (Like the Edges))
Beauty = The Base Color Maps
7. Open `KachinkoAO_00^t.bflim` with Switch Toolbox, you should see this:

8. Press `File` then `Export` on the Top, Left-Hand corner of the window.
- NOTE: There are two `File`s in Switch Toolbox, press this one:

9. Save it as a PNG to wherever location you want
- Make sure the ending of the filename is `.png` not `.bflim`
10. Edit it with GIMP (Or any other image editing program) & make the entire image black.

11. Overwrite the image.
12. Open `KachinkoBeauty_00^t.bflim` with Switch Toolbox & repeat step 8.
13. Open the file with your image editing program & change it to look how you want it to.

14. Save the image then repeat steps 7 - 11 but with "KachinkoAO_01^t.bflim"
15. Repeat steps 12 - 13 but with "KachinkoBeauty_01^t.bflim"

16. In Switch Toolbox open `KachinkoAO_00^t.bflim` & press "File" then "Replace".
17. Navigate to the PNG & double-click it.
18. Save it as the settings shown here:

19. Press "OK", then "File", "Save" & Replace the original BFLIM.
20. Repeat steps 16 - 19, but with "KachinkoAO_01^t.bflim", "KachinkoBeauty_00^t.bflim", & "KachinkoBeauty_01^t.bflim"
21. Replace all 4 BFLIM's in "Cmn_ClapperboardBtn_00.arc" in Wexos Toolbox.
22. In Wexos Toolbox, export "blyt/Cmn_ClapperboardBtn_00.bflyt"
23. Open the BFLYT in Wexos Toolbox & Delete "P_PlateAO_00" & "P_BarAO_00" (Right click, then Remove)

24. Save the BFLYT & Import into .arc
25. Save `.arc`
26. Replace `.arc` in `.szs`
27. Save `.szs`
28. Replace `.szs` in `Layout.pack` & Save `Layout.pack`
Done! You have successfully made your own Clapperboard.

### File System Documentation
- Sample Courses can be found at `content:/Course/`
- Thumbnails for these sample courses can be found at `content:/CourseThumbnail/`
- Data for these sample courses can be found at `content/Pack/CourseData.pack`
- The fonts are packed in the `szs` format and can found at `content:/Font`
- `[game-style]_NumberFont.bffnt` - The font used for game styles HUD elements
- `SpecialFont.bffnt`, `CountMario.bffnt`, `Block_NumberFont.bffnt` & `CountRanking.bffnt` - The Super Mario Maker Font
- `MessageFont.bffnt` - Used for messages
- `FontInfo.byml` - Has info telling the game what the font is and other info (to change definition)
- The layouts are in the szs format and can be found at `content/Layout` (Most of the layouts here are unused)
- `Boot_BootSceneXXX_00.szs` - Boot layouts for when you load into the game, depending on the day of the week.
- `Cursor.szs` - Wiimote Cursor (Unused).
- `E3_DebugMenuNormalBtn_00.szs` - Leftover button from the E3 2014 demo, back when the game was called Mario Maker.
- `E3_DebugMenuSelectBtn_00.szs` - Leftover (selected) button from the E3 2014 demo, back when the game was called Mario Maker.
- `image.jpg` - Image of Nikki from Swapnote (Leftover from SDK).
- `ItemIcon_00.szs` - Early Splatoon Weapon design
- Message files can be found at `content/Messages`
- The `content/Model` folder contains backgrounds, tilsets and amiibo costumes
- Tilesets follow a name structure of game style (M1/M3/MW/WU) + '\_field\_' + theme
- Backgrounds follow a name structure of game style (M1/M3/MW/WU) + '\_DV\_' + theme
- The `content/Pack` folder contains `.pack` files (a `.sarc` with a bunch of `.szs` files inside it) for a variety of things (springs, byamls, etc)
- `Edit.pack` - Contains layouts and graphics for the editor
- `Env.pack` - Lighting files
- `Layout.pack` - Misc. layouts that aren't included in other packs (including Splatoon layouts)
- `Lcl.pack` - Random Course World layouts.
- `NormalPlay.pack` - Contains everything needed during playing a course, beating a course, the course splash screen, and the title screen.
- `Nwk.pack` - Course World layout files.
- `Sound.pack` - Contains sound effects and sounds pertaining to music files.
- `Static.pack` - Pack containing Byaml (Enemy behaviors, tileset and background paths, etc..) files
- `StaticSkin.pack` - Pack containing sprites.
## Super Mario Maker for Nintendo 3DS
### Playing Mods (Nintendo 3DS Hardware)
1. Setup Luma3DS as your CFW of choice.
- If you have not yet modded your 3DS, follow [3ds.hacks.guide](https://3ds.hacks.guide)
2. On your SD card, place the modified files at `sdmc:/luma/titles/titleid/romfs`. The title ID used will depend on which version of Super Mario Maker you own.
* **JP**: 00040000001A0300
* **US**: 00040000001A0400
* **EU**: 00040000001A0500
3. Compare your file browser to the following:

4. When you boot your Nintendo 3DS, hold SELECT.
5. Be sure that "Game Patching" is enabled.
6. Hit START to save the modified configuration.
7. Launch Super Mario Maker for Nintendo 3DS.
### Playing Mods (Citra)
1. Within Citra, right click "Super Mario Maker for Nintendo 3DS" and hit "Open Mod Location"
2. In the window that just opened, make a new directory titled "romfs"
3. Place all the mod files inside.
### Editing Sprites & Tilesets
1. Dump your copy of Super Mario Maker for Nintendo 3DS.
- [For game cartridges](https://3ds.hacks.guide/godmode9-usage.html#dumping-a-game-cartridge)
- [For installed titles](https://3ds.hacks.guide/godmode9-usage.html#dumping-a-title)
2. Download the latest release of [Kuriimu](https://github.com/IcySon55/Kuriimu/releases/latest)
3. To edit sprites, launch `Karameru.exe`, select your `.bin` file and extract the `.ctpk` files from it.
4. Launch `Kukkii.exe` and select your CTPK file
5. Extract the textures and edit them using an image editor of your choice.
6. Hit the save icon on the top.
7. For editing sprites, launch `Karameru.exe`, select your `.bin` file and replace the `.ctpk` file inside the `.bin` file.
### Editing Music
#### Tools you will need
- [Audacity](https://www.audacityteam.org/download/)
- [Citric Composer](https://gota7.github.io/Citric-Composer/)
#### Creating a Single-Channeled BCSTM
1. Create a stereo music file in Audacity and export it as a .wav.

2. Inside Citric Composer, go to "Tools" and launch "Isabelle Sound Editor".
3. In the Sound Editor, go to "Edit", and click on "Import File".
* At this point, this is how it should look now:

4. If you want your music to loop, check the loop checkbox, then set the loop start and loop end in samples.

* If it's too difficult to do the above, you can set the loop start and loop end point in the track itself.
* The yellow line is the loop start point.
* The red line is the loop end point.
5. Set the BCSTM version to `2.3.1`.
6. Set the Output Encoding type to `DSP-ADPCM`.
7. Click on "Update Project Info".
* You can also save this as a project file
8. Export your BFSTM by going to "File" and clicking on "Export Binary".
9. Save your file as "CTR Stream"
#### Creating a Multi-Channeled BCSTM
To make multichanneled BCSTSMS, all you have to do is making the MONO channels.
* To create a mono channel, go to "Tracks" and click "Add new".

SMW and NSMBU music have 4 channels:
* First Channel: Main theme (Left)
* Second Channel: Main theme (Right)
* Third Channel: Yoshi Beat (Left)
* Leave this blank if you do not want a Yoshi Beat. Do not remove this channel.
* Fourth Channel: Yoshi Beat (Right)
* Leave this blank if you do not want a Yoshi Beat. Do not remove this channel.

* Make sure to correctly set the Left and Right channels, by using the slider on the left.
1. Go to Edit -> "Preferences..."
2. In the "Import/Export" tab, make sure to use a custom mix is set for "When exporting tracks to an audio file".
3. Follow the Citric Composer steps in the Single Channeled BCSTM section.
### Filesystem Documentation
- The UI code is written in Lua 5.0.3, and can be found here: `romfs:/UIX/Final/UIX/scripts`
- The Lua basic functions were found by Sono and are [documented](https://pastebin.com/Gu4X7AsP)
- Editor icons can be found at `romfs:/Palette/Icon/Textures`
- BFRES files can be found at `romfs:/Mush/`
- Use [Switch Toolbox](https://github.com/KillzXGaming/Switch-Toolbox/releases) to edit them
- Enemy Parameters can be found at `romfs:/Parameters`
- You could use any text editor to edit it.
- Sprite models can be found here: `romfs:/Models/[game-style]_DV_[theme].szs`
- Tileset Textures can be found here: `romfs:/Tiledata/[game-style]_field_[theme]_textures.ctpk`
- Background Textures can be found here: `romfs:/Textures/[game-style]_dv_[theme]_textures.ctpk`
- Messages are in the MSBT format and can be found here: `romfs:/MessagesC/[Region]/[Language]`
- Use [Kuriimu.exe](https://github.com/IcySon55/Kuriimu/releases/latest) to edit them.
- Fonts can be found over at `romfs:/Font`
- Sound Effects can be found over at `romfs:/Sound/sound_data.bcsar`
- Background Music can be found over at `romfs:/Sound/stream/[musicname].bcstm`
- Sprites textures can be found over at `romfs:/A2D`
- Layout Files can be found over at `romfs:/UIX/Final/UIX/Layouts/[layoutname].arc`
- Lighting for the New Super Mario Bros. U game style can be found over at `romfs:/A3D`
### Editing Levels
#### Requirements
- A PC capable of running Python 3.5
- (Python 3.4 works but not recommended. For anything lower, uninstall other versions or at least remove them from PATH)
- PyQt5 for your Python version and CPU: [32-bit for Python 3.5](https://sourceforge.net/projects/pyqt/files/PyQt5/PyQt-5.6/PyQt5-5.6-gpl-Py3.5-Qt5.6.0-x32-2.exe/download) -- [64-bit for Python 3.5](https://sourceforge.net/projects/pyqt/files/PyQt5/PyQt-5.6/PyQt5-5.6-gpl-Py3.5-Qt5.6.0-x64-2.exe/download)
- The latest codebase of [PointlessMaker](https://github.com/aboood40091/PointlessMaker/archive/master.zip)
- Your tilesets in PNG form
- Your extracted course
- You can use [OCDM](https://puu.sh/Cmtk5/09c496d6b7.cia) to export your course (as well as import it once you're done)
#### Instructions
1. Extract the `PointlessMaker-master.zip` archive somewhere.
2. Place all your tileset images in the `PointlessMaker-master/tilesets/` folder
3. Double-click the main.py excutable or open a cmd window in the PointlessMaker-master/ folder, and enter the following: `python main.py`
## Super Mario Maker 2 (Nintendo Switch)
### Playing Mods (Nintendo Switch Hardware)
1. Set up your switch for Custom Firmware with atmosphere.
- If you have not done so already, follow [the Nintendo Homebrew guide](https://nh-server.github.io/switch-guide/).
2. Create a folder titled `01009B90006DC000` at `sd:/atmosphere/contents/`.
3. Place all your modified files there.
4. Load up atmosphere and then launch Super Mario Maker 2!
### Playing Mods (Yuzu)
1. Within Yuzu, right click Super Mario Maker 2 and select "Open Mod Data Location".
2. In the new folder that appeared, make a folder with the title of your mod.
3. Inside the newly created folder, make another folder titled "romfs"
4. Place your modified files inside this romfs folder
5. Within Yuzu, right click on the game and hit Properties
6. Make sure your mod is enabled by hitting the checkbox.
### Editing Sprites & Tilesets
#### Instructions
1. If you haven't gotten one already, please dump your copy of Super Mario Maker 2
2. Download and extract the latest version of [Switch Toolbox](https://github.com/KillzXGaming/Switch-Toolbox/releases)
3. If you're editing a sprite, open `XX_Model.pack` in Switch Toolbox, where XX is the game style
- Here's a documentation of all the ZS files in [StaticSkin.pack](https://pastebin.com/hZmD8WUs) (not updated for SMM2 yet)
4. Within Switch Toolbox, open the ZS file you'd like to edit.
5. Inside the ZS file, open `output.bfres`.
6. In the textures folder, you should see one or more images. Open the texture you'd like to edit.
7. On the toolbar on the top, hit "Edit" and hit "With External Program".
- Make your edits to the textures. You could use any image editor, but we recommend [Paint.NET](https://www.getpaint.net/).
8. Hit `CTRL + S` to save the image.
#### Notes
- Tilesets & Backgrounds are in `romfs/model`
- Tilesets follow a name structure like `M1_field_plain.Nin_NX_NVN.zs`
- Backgrounds follow a name structure like `M1_DV_plain.Nin_NX_NVN.zs`
- ZS files for sprites are in `romfs/Pack/XX_Model.pack/StaticSkin`, where XX is the game style
### Editing Music
Different game styles have a different number of tracks and channels. Refer to this list to see how many tracks and channels the game style you're trying to edit has.
<table>
<thead><tr style="text-align: center;">
<th>Number of Tracks<br>(Each Track contains 2 mono channels, left + right)</th>
<th>Where this plays</th>
</tr></thead>
<tbody>
<tr>
<td style="text-align: center;">7 tracks<br>14 mono channels</td>
<td><b>Edit Themes</b><ul>
<li>Super Mario Bros. (M1)</li>
<li>Super Mario Bros. 3 (M3)</li>
<li>Super Mario World (MW)</li>
<li>New Super Mario Bros. U (WU)</li>
<li>Super Mario 3D World (3W)</li>
</ul></td>
</tr>
<tr>
<td style="text-align: center;">1 track<br>2 mono channels</td>
<td><b>Play Themes</b><ul>
<li>Super Mario Bros. (M1)</li>
<li>Super Mario Bros. 3 (M3)</li>
<li>Super Mario 3D World (3W)</li>
</ul></td>
</tr>
<tr>
<td style="text-align: center;">2 tracks<br>4 mono channels<br><br>2<sup>nd</sup> track/3<sup>rd</sup> and 4<sup>th</sup> channels is for the Yoshi beats</td>
<td><b>Play Themes</b><ul>
<li>Super Mario World (MW)</li>
<li>New Super Mario Bros. U (WU)</li>
</ul></td>
</tr>
</tbody>
</table>
1. Load up the music in [Audacity](https://www.audacityteam.org/download/).
2. Refer to the table above for what to do based on the game style you're editing for
- If the original `.bwav` uses 2 channels (has 1 track) add your music file to the current scene 1 time.
- If the original `.bwav` uses 4 channels (has 2 tracks) add your music file to the current scene 2 times.
- If the original `.bwav` uses 14 channels (has 7 tracks) add your music file to the current scene 7 times.
3. Select each channel ("Select" -> "All").
4. Normalize every selected track to a dB of -16.0 ("Effect" -> "Normalize")
5. Set the "Project Rate (Hz)" to 48000
6. Export your music as a "WAV (Microsoft) signed 16-bit PCM" ("File" -> "Export")
7. Inside [Citric Composer](https://gota7.github.io/Citric-Composer/), launch "Isabelle Sound Editor" ("Tools" -> "Isabelle Sound Editor")
8. Inside Isabelle Sound Editor, select the "WAV (Microsoft) signed 16-bit PCM" file we created earlier from Audacity.
9. Expand the "Channels" tree, and make sure that the amount of channels that exist are correct to the number of channels that should exist.
10. Check the loop checkbox, then copy the "Loop Start" value replace the "Original Loop Start" value with it.
11. Set the BWAV version to `1.1.0`.
12. Set the Output Encoding type to `DSP-ADPCM`.
13. Click on "Update Project Info".
- You can also save this as a project file
14. Export your BWAV by going to "File" and clicking on "Export Binary".
15. Save your file as "NX Stream"
#### Making Prefetch Files
<div class="alert alert-warning alert-dismissible fade show" role="alert"> A Windows machine is required to run this tool. <button type="button" class="btn-close" data-bs-dismiss="alert" aria-label="Close"><span aria-hidden="true">×</span></button> </div>
1. Drag your file onto [`BWAVPrefetchGen.exe`](https://github.com/Gota7/BWAV-Prefetch-Generator/releases/latest/download/BWAVPrefetchGen.exe) to create the prefetch file.
2. Within [Switch Toolbox](https://github.com/KillzXGaming/Switch-Toolbox/releases), open the `romfs:/Pack/StaticHighFreqSound.pack` file.
3. Dock the search list ("View" -> "Dock Search List")
4. Search for `CourseSceneBGM_XX.bars`, where XX is the game style (Refer to the table above)
5. Expand the file, then search for the name of the original .bwav file.
6. Right-click the file and press `Replace`, then choose the prefetch file.
7. Hit `CTRL + S` to save the file.
#### Creating Custom SFX Without Looping
1. Open the converted `.bwav` in a hex editor.
- We recommend using HxD.
2. Move to the 0x4C offset in the `bwav`.
3. Fill in 4 bytes with `FF`.
### Editing mRideCloudScale & mRideClownScale For Enemies, Items & Objects
<table>
<thead><tr style="text-align: center;">
<th>Node</th>
<th>What it represents</th>
<th>Value Explainations + Options</th>
</tr></thead>
<tbody>
<tr>
<td style="text-align: center;">1b7484e8</td>
<td>mRideCloudScale</td>
<td>Changes the enemy scale when inserted into a Cloud<br>
Default: 1.00000</td>
</tr>
<tr>
<td style="text-align: center;">543aade0</td>
<td>mRideClownScale</td>
<td>Changes the enemy scale when inserted into a Clown Car<br>
Default: 1.00000</td>
</tr>
<tr>
<td style="text-align: center;">bc95a216</td>
<td>mFlag</td>
<td>This changes the behavior of the enemy's texture when they collide with a wall:<ul>
<li><code>0</code> makes the enemy's texture flip when they collide with a wall</li>
<li><code>1</code> makes the enemy's texture <b>not</b> flip when they collide with a wall</li>
</ul>The default value depends on the enemy.</td>
</tr>
</tbody>
</table>
1. Within [Switch Toolbox](https://github.com/KillzXGaming/Switch-Toolbox/releases), open the `romfs:/Pack/Static.pack` file.
2. Dock the search list ("View" -> "Dock Search List")
3. Search for the file you want to edit (Example: `M1_Enemy_kutsu_kuriboA.byml`)
4. Select the file, and you should see the contents appear in the `File Editor` display on the right of the window.
- Here is an example of the decoded byml file `M1_Enemy_Kuribo.byml`:
```yaml
Version: 4
IsBigEndian: False
SupportPaths: False
HasReferenceNodes: False
root:
!h dcbddcb8:
!h 1b7484e8: 1.00000
!h 274c6a81: -21.00000
!h 293d2c07: false
!h 46c0e8be: -34.00000
!h 543aade0: 1.00000
!h 5fa7149a: 8.00000
!h 6471ed6b: -8.00000
!h 7f5697d3: 1.00000
!h 910f99b: 1.00000
!h b896b6e2:
!h 2da3d56b: {!h 1ed5694: 1.00000, !h 6404e56c: walk, !h 808d2d72: 1.00000}
!h 2e7ecc8e: {!h 1ed5694: 1.00000, !h 6404e56c: swim, !h 808d2d72: 1.00000}
!h b09697d: {!h 1ed5694: 1.00000, !h 6404e56c: kutsu, !h 808d2d72: 1.00000}
!h b43cbec2: {!h 1ed5694: 1.00000, !h 6404e56c: edit_drag, !h 808d2d72: 1.00000}
!h d675fc4d: {!h 1ed5694: 1.00000, !h 6404e56c: walk, !h 808d2d72: 1.00000}
!h dc4fc3b0: {!h 1ed5694: 1.00000, !h 6404e56c: damage, !h 808d2d72: 1.00000}
!h dddc2cdb: {!h 1ed5694: 1.00000, !h 6404e56c: walk, !h 808d2d72: 1.00000}
!h bc95a216: !l 1
!h bdbeaf8d: 2.00000
!h db47d925: -24.00000
!h e534b05e: -36.00000
!h f677511e: -50.00000
!h fea17fb7: 8.00000
```
5. Expand the tree once and click the "`dcbddcb8 : <Dictionary> 0`" node.
6. Right-click on the node you want to edit, then click "Edit".
7. Edit the value as you like, then hit Ok.
8. Click the "Save" button in the `File Editor` display to save the byml file, then hit `CTRL + S` to save the archive.
## Old Wii U FS Doc
(More detailed documentation coming soon.)
CourseThumbnail - Contains the thumbnail files for the courses.
Font - Contains the szs file that contains font files.
M1_NumberFont.bffnt - SMB1 font
M3_NumberFont.bffnt - SMB3 font
MW_NumberFont.bffnt - SMW font
WU_NumberFont.bffnt - NSMBU font
SpecialFont.bffnt - SMM font
CountMario.bffnt - SMM font, again.
Block_NumberFont.bffnt - SMM font, yet again.
CountRanking.bffnt Yet another SMM font.
MessageFont.bffnt - message font.
FontInfo.byml - Has info telling the game what the font is and other info.
Layout - Contains layout files. (Mainly unused, though.)
Boot_BootSceneXXX_00.szs (XXX is Sun-Sat) - Boot layouts for when you load into the game.
Cursor.szs - Wiimote cursor (Presumed to be unused)
E3_DebugMenuNormalBtn_00.szs - Leftover button from the E3 2014 demo.
E3_DebugMenuSelectBtn_00.szs - Leftover (selected) button from the E3 2014 demo.
image.jpg - Leftover from SDK (Image of someone from Swapnote.)
ItemIcon_00.szs - Early splatoon weapons (Almost every one of them have differences from their final version)
LEnd_WorldClearTelop_00.szs - Likely unused and from E3 2014\. If not, it's a layout for finishing the 10/100 Mario Challenge.
LWM_PlayBtn_01.szs - A start button for the 10/100 Mario Challenge.
LWM_WorldMap_00.szs - Used for the 10/100 Mario Challenge.
LWM_WorldMapCastle_00.szs - Used for the 10/100 Mario Challenge.
LWM_WorldMapCourse_00.szs - Used for the 10/100 Mario Challenge.
LWM_WorldMapKuribo_00.szs - Used for the 10/100 Mario Challenge.
LWM_WorldMapMario_00.szs - Used for the 10/100 Mario Challenge.
MessageTest_00.szs - Leftover message (Likely from Splatoon, images aren't there however).
MessageTest_01.szs - Leftover message (Likely from Splatoon, images aren't there however).
PauseBtn_00.szs - Leftover pause button from Splatoon (Might be an early version).
Test_ActorBtn_00.szs - Leftover asset from the E3 2014 demo.
Test_PointGet_00.szs - Leftover asset for getting points/1 up from the E3 2014 demo.
Message - Contains the message files.
Model - Contains backgrounds, tilesets, and amiibo costumes.
DV - Background
Field - Tileset
Pack - Contains pack files with different types of files.
CourseData - Contains info about the sample courses.
Edit - Contains layouts and graphics for the editor.
Env - Contains files related to lighting.
Layout - Misc. layouts that aren't included in other packs (Some Splatoon layouts are in here!).
Lcl - Random layouts for Course World.
NormalPlay - Contains everything needed during playing a course, beating a course, the screen to get to the course, and the title screen.
Nwk - Layout files for Course World.
Sound - Contains sound effects and sounds pertaining to music files.
Static - Contains byaml files.
StaticSkin - Contains sprites for enemies, items, objects, and the player.
System - Contains files related to interpreting shaders and layouts. (Possibly unused?)
UI_Boot_Sound - Contains all the UI sounds (including the editor), boot sounds, and some course world sounds.
FieldEnv_Normal - Contains blocks for the ground themes.
FieldEnv_Dark - Contains blocks for the underground themes.
FieldEnv_Water - Contains blocks for underwater themes.
FieldEnv_Yogan - Contains blocks for castle themes.
Sound - Contains music and amiibo costume SFX.
(More detailed documentation coming soon.)
Important Notes :
_A means variation acc. to mega mario.
_mega means the item has mushroom applied to it.
_mini means if they have a smaller version (blooper,etc).
_jr means essentially the same thing as _mini.
_fire means it has fire flower applied to it.
_D will be applied to the name if the item/enemy has an another variant.
black = Black Tile
tutorial = Tutorial Background
XX_Enemy :
blackpakkun = Muncher
bombhei = Bob-omb
bros = Hammer Bros.
bubble = Podoboo
choropoo = Monty Mole
dossun = Thwomp
firepakkun = Venus Fire Trap
fishbone = Fish Bone
gesso = Blooper
hanachan = Wiggler
jugem = Lakitu
kameck = Magikoopa
karon = Dry Bones
killer = Bullet Bill
killer_houdai = Bill Blaster
koopa = Bowser
koopa_clown = Clown Car
kuribo = Goomba
kutsu_kuribo = Goomba's Shoe (A = Normal & B = Heel)
met = Buzzy Beetle
necchi = Stretch (Boo Appearing from the floor )
nokonoko = Koopa Troopa (A = Green & B = Red)
paipo = Falling Spiny
pakkun = Pirhana Plant
poo = Rocky Wrench
pukupuku = Cheep Cheep (A = Green & B = Red)
senkan houdai = Cannon
teresa = Boo
togemet = Spiketop (A = Red & B = Blue)
togezo = Spiny
wanwan = Chain Chomp
XX_Item :
Charakinoko = Mystery Mushroom
kinoko = Mushroom
flower = Fire Flower
flower2 = Fire Flower & Mushroom
kinokofunny = Weird Mushroom
Mega kinoko = Classic Mega Mushroom
Mega kinoko2 = Modern Mega Mushroom
star = Super Star
XX_Object_block :
chikuwa = Donut Block
hatena = Question Block
kara = Used Question Block
katai = Breakable Block
kori = Ice Block
kumo = Cloud Platform
block_onpu = Note Block (White)
pow = Pow Block
renga = Brick Block
toumei = Winged Invisible Block
tuta = Vine emerging from block
XX_Object :
burner = Burner
coinrotate = Rotating Coins
daikonbou = Skewer
door = Door
firebar = Firebar Block & Fireball
Goalpole = Goal Pole
hanatari = One Way Wall
jumpstep = Springboard
key = Key
lift = Independent Platforms (Orange & Blue) {"_rail = On track" ; "_fall = falling"}
liftyougan = Skull Platforms (1 = White ; 2 = Blue)
magma = Castle Lava
middleflag = Checkpoint
ono = Ending Castle in Castle Theme
peach = Princess Peach
pswitch = P-Switch
saw = Saw
startblock = Temporary Editor Block Sprites
tower = Ending Castle
yajirushi = Arrow
</div>
<div class="col-xl-4 d-none d-xl-block">
<div class="sticky-top" data-toc=""><iframe src="https://ptb.discordapp.com/widget?id=318882333312679936&theme=dark" height="500" allowtransparency="true" frameborder="0"></iframe></div>
</div>
</div>
<script src="https://cdn.jsdelivr.net/npm/marked/marked.min.js"></script>
<script>document.getElementById('moddingIndexContent').innerHTML = marked.parse(document.getElementById('moddingIndexContent').innerHTML);</script>
<a href="#" id="bttbtn" aria-label="Back to top"><img src="https://nightscript370.github.io/assets/images/icons/arrow.png"></a>
</div>
<script src="https://nightscript370.github.io/assets/bootstrap/js/bootstrap.min.js"></script>
<script src="https://nightscript370.github.io/assets/index.js" type="module"></script>
<script src="//instant.page/5.1.0" type="module" integrity="sha384-by67kQnR+pyfy8yWP4kPO12fHKRLHZPfEsiSXR8u2IKcTdxD805MGUXBzVPnkLHw"></script>
</body>
</html>