forked from adrianmihalko/raspberrypiwireguard
-
Notifications
You must be signed in to change notification settings - Fork 0
/
Copy pathREADME.md.OLD
136 lines (95 loc) · 4.59 KB
/
README.md.OLD
1
2
3
4
5
6
7
8
9
10
11
12
13
14
15
16
17
18
19
20
21
22
23
24
25
26
27
28
29
30
31
32
33
34
35
36
37
38
39
40
41
42
43
44
45
46
47
48
49
50
51
52
53
54
55
56
57
58
59
60
61
62
63
64
65
66
67
68
69
70
71
72
73
74
75
76
77
78
79
80
81
82
83
84
85
86
87
88
89
90
91
92
93
94
95
96
97
98
99
100
101
102
103
104
105
106
107
108
109
110
111
112
113
114
115
116
117
118
119
120
121
122
123
124
125
126
127
128
129
130
131
132
133
134
135
136
!!!PROBABLY OUTDATED!!!
Install WireGuard on Raspberry Pi
---------------------------------
[WireGuard](https://www.wireguard.com) is an extremely simple yet fast and modern VPN that utilizes state-of-the-art cryptography. It aims to be faster, simpler, leaner, and more useful than IPSec, while avoiding the massive headache. It intends to be considerably more performant than OpenVPN. WireGuard is designed as a general purpose VPN for running on embedded interfaces and super computers alike, fit for many different circumstances. Initially released for the Linux kernel, it plans to be cross-platform and widely deployable. It is currently under heavy development, but already it might be regarded as the most secure, easiest to use, and simplest VPN solution in the industry.

This is not a step by step guide for absolute beginners. I'll show you the relevant parts of my config files.
**0, Install required packages for rpi-source**
sudo apt-get install bc libncurses5-dev
**1, Install kernel headers via rpi-source**
https://github.com/notro/rpi-source
**2, Install required packages**
sudo apt-get install libmnl-dev build-essential git
**3, Install Wireguard**
git clone https://git.zx2c4.com/WireGuard
cd WireGuard/
cd src/
make
sudo make install
Done.
**Now let's connect two Raspberry Pi's remotely:**
The hard part. No. I am just joking. WireGuard is easy as pie.
**1, First, generate private and public keys.**
$ wg genkey > rpia_private.key
$ wg pubkey > rpia_public.key < rpia_private.key
$ wg genkey > rpib_private.key
$ wg pubkey > rpib_public.key < rpib_private.key
**2, Raspberry Pi A:**
pi@rpia:~ $ sudo cat /etc/wireguard/wg0.conf
[Interface]
ListenPort = 1500
PrivateKey = PASTEHERE_rpia_private.key_CONTENT
[Peer]
Endpoint = ip.or.hostname:1500
PublicKey = PASTEHERE_rpib_public.key_CONTENT
AllowedIPs = 0.0.0.0/0
Raspberry Pi B:
pi@rpia:~ $ sudo cat /etc/wireguard/wg0.conf
[Interface]
ListenPort = 1500
PrivateKey = PASTEHERE_rpib_private.key_CONTENT
[Peer]
Endpoint = ip.or.hostname:1500
PublicKey = PASTEHERE_rpia_public.key_CONTENT
AllowedIPs = 0.0.0.0/0
**3, Enable ipv4 forwarding on both Pi's:**
pi@:~ $ cat /etc/sysctl.conf
#Uncomment the next line to enable packet forwarding for IPv4
net.ipv4.ip_forward=1
Reboot for sure.
**4, Configure WireGuard interfaces:**
Raspberry Pi A:
pi@rpia:~ $ cat /etc/network/interfaces
auto wg0
iface wg0 inet static
pre-up ip link add dev wg0 type wireguard
post-up wg setconf wg0 /etc/wireguard/wireguard.conf
post-up ip link set dev wg0 up
#READ THIS
#enable access to remote subnet 192.168.2.x via remote wg0 interface:
#change this according to your config
post-up ip route add 192.168.2.0/24 via 192.168.5.2 dev wg0
#change eth0 to your primary interface, if needed
post-up iptables -t nat -A POSTROUTING -o eth0 -j MASQUERADE
address 192.168.5.1
netmask 255.255.255.0
Raspberry Pi B:
pi@rpib:~ $ cat /etc/network/interfaces
auto wg0
iface wg0 inet static
pre-up ip link add dev wg0 type wireguard
post-up wg setconf wg0 /etc/wireguard/wireguard.conf
post-up ip link set dev wg0 up
#READ THIS
#enable access to remote subnet 192.168.1.x via remote wg0 interface:
#change this according to your config
post-up ip route add 192.168.1.0/24 via 192.168.5.1 dev wg0
#change eth0 to your primary interface, if needed
post-up iptables -t nat -A POSTROUTING -o eth0 -j MASQUERADE
address 192.168.5.2
netmask 255.255.255.0
If on your Raspberry Pi WiFi is the primary connection, remove auto wg0. It is trying to connect WireGuard before WiFi is active, and it's not working. Quick fix is to manually enable WireGuard interface after boot: sudo ifup wg0. I'll check for solution later.
Reboot and check if it's working:
pi@:~ $ sudo wg
interface: zzzwg0
public key:
private key: (hidden)
listening port: 1500
peer:
endpoint: xxx.xxx.xxx.xxx:1
allowed ips: 0.0.0.0/0
latest handshake: 2 minutes, 43 seconds ago
transfer: 16.40 KiB received, 28.68 KiB sent
Done.
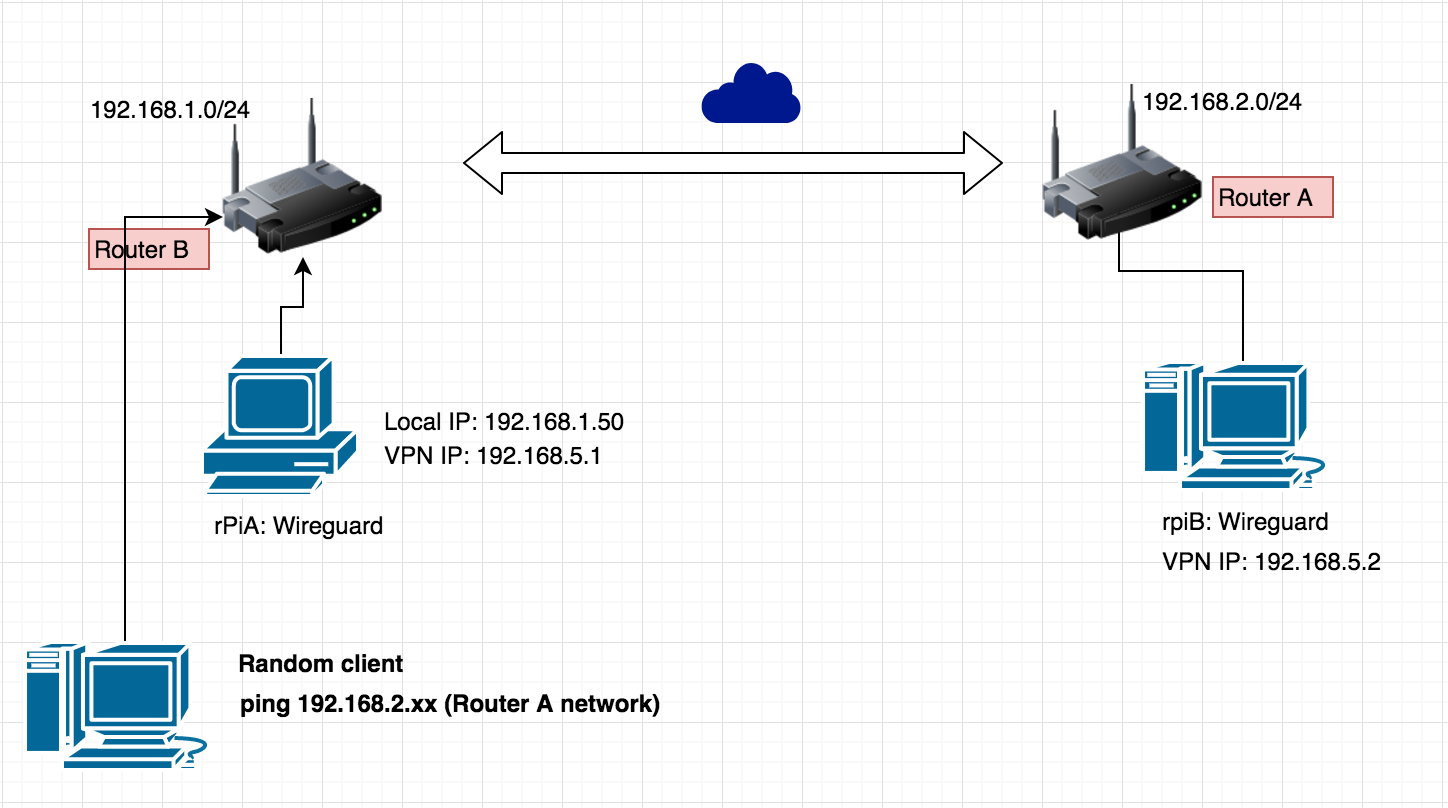
You can even enable to access remote network for all your local devices if you add a static route on your router pointing to the Raspberry Pi.
Do you have question? Ask these great guys at [#wireguard](http://webchat.freenode.net?randomnick=1&channels=%23wireguard&uio=d4) on Freenode.