LangGraph backend using FastAPI and WebSockets to communicate with React frontend, showing model generating
responses and streaming them, made easy as a template. Run via pip install -r requirements.txt then
./start-local.sh --backend. Check out more info below!
- 🏛 Background
- 🔍 Project Overview
- 📡 Communication
- 🖥️ Frontend
- 🛠️ Backend
- 🚀 Let's Run It
- 🎥 Demo
- 🚢 Deployment
- 💡 Thoughts and Future Improvements
As LangGraph develops, there will be a need to establish the optimal way to approach a seamless interaction between LangGraph and any frontend framework. A key aspect of UI in a chat setting with LLMs is ensuring that the bot is Actively working on the response you sent it. Acknowledgment can take various forms, such as a visual aid like a spinner, a toast, a status/progress bar, or streaming the tokens as they are being generated. This is a template designed to merge core concepts between frontend and backend to provide a great user experience for someone who doesn't have technical knowledge of LLMs and their limitations.
I found great success with the streaming approach to indicate that the LLM acknowledged my message and
is generating a response. I used WebSockets to handle the connection and communication between the frontend
and backend, which allowed for easy integration of LangChain's asynchronous streaming events
and React's useEffect hook. This setup allows the application to wait for responses from the bot while
simultaneously streaming the tokens as they are generated. I aimed to make it as simple and well-documented
as possible for anyone to clone, start, and get going on this project, including a drop-in replacement
for your LangGraph runnable in graph.py, and only needing the useWebSocket.ts implementation for any frontend.
Project Tree
.
├── Dockerfile             # Shipable blueprint Dockerfile
├── Procfile               # web command to run on servers (PaaS eg. Heroku)
├── README.md
├── cust_logger.py         # Custom logger utility for logging for backend serving
├── frontend
│   ├── package.json       # Contains metadata and dependencies for React project
│   ├── public             # Default Create-React-App Public assets
│   │   ├── favicon.ico
│   │   ├── index.html
│   │   ├── logo192.png
│   │   ├── logo512.png
│   │   ├── manifest.json
│   │   └── robots.txt
│   ├── src                # Source code for the React frontend
│   │   ├── App.css
│   │   ├── App.tsx        # Main App component in TypeScript
│   │   ├── components     # Demo components used in App.tsx
│   │   │   └── easter_egg # ssshhhh... try chatting "LangChain"
│   │   │       ├── ee.css
│   │   │       └── ee.tsx
│   │   ├── index.tsx      # Entry point for the React app
│   │   ├── react-app-env.d.ts # Default from Create-React-App
│   │   └── services
│   │       └── useWebSocket.ts # WebSocket hook for real-time communication via WebSocket
│   └── tsconfig.json      # TypeScript configuration for the frontend
├── graph.py               # Simple LangGraph implementation
├── requirements.txt       # Python dependencies required for the backend project
├── server.py              # FastAPI implementation
└── start-local.sh         # Shell script to start the application locally (backend or frontend)
The WebSocket connection allows real-time, bidirectional communication between the React frontend
and the FastAPI backend server, continuously receiving messages without having to reload or make repeated requests.
There are many ways to handle the data being sent across. It could be the message itself, a chunk of messages
(msg_history), or a structured format. I chose to go with the structured format since it allows the client
and server to expect certain keys in a specific order and provides flexibility for future additions to the payload.
I opted to use JSON since it's the easiest to read and work with, but you're free to use other formats such as XML,
YAML, CSV, Protocol Buffers (Protobuff), or BSON. In short, there is a predefined JSON structure that both sides
are looking for. If certain criteria are met during the exchange from either side, Front/Backend, it will trigger
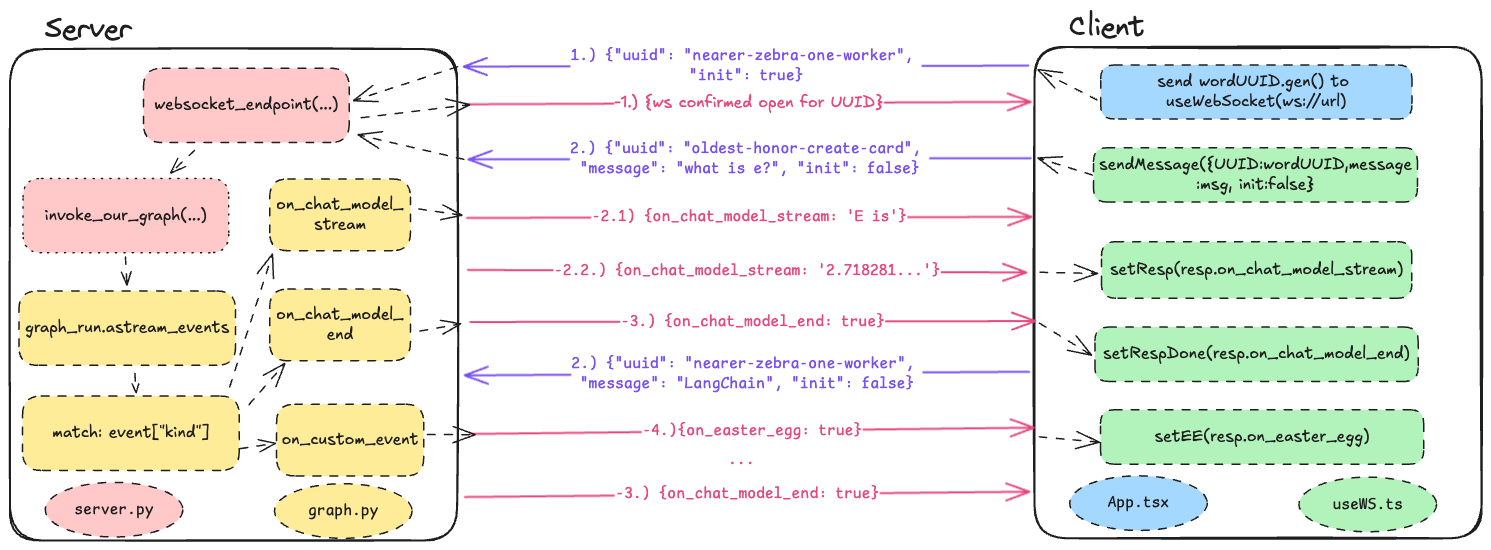
actions within that specific side. For example, if the event kind is on_chat_model_stream, it should stream
the response to the client. Or if the client receives any changes in the socket connection, it will adjust and
render or log accordingly.
Our communication exchange:
 Find out more about what each function does from the comments in the codebase, or see the exchange in action in the demo.
The frontend has a few features to get the ball rolling:
- You can tell that you're connected to the server via an indicator.
- There is multi-line typing using (
Shift + Enter) and the normalEnterkey to send messages. - Automatic scrolling occurs as responses are generated.
- The WebSocket has an automatic retry for reconnection and message delivery if the server is down.
- The frontend is stateless, meaning messages are not stored on the frontend side and are sent as
msg_history; only a single message is sent. - An explanation of how to use custom LangGraph events to trigger a component on the frontend:
- Try asking the model about LangChain or LangGraph! :D
I tried to keep the backend very slim while still being functional. It uses FastAPI and Uvicorn to handle asynchronous requests. Some features include:
-
Simple FastAPI Implementation
- Serves static web files generated from
npm build. - Allows flexibility for
React Router. - Provides a simple WebSocket connection.
- Serves static web files generated from
-
Expressive Logging
- Matches Uvicorn's logging format.
- Uses the
file_name:line_numformat for easy log tracing. - Supports custom logging colors, allowing you to set a respective color in any file.
- Example Log:
INFO: server.py:34 - {"timestamp": "YYYY-MM-DDTHH:MM:SS.MS", "uuid": "nearer-zebra-one-worker", "received": {"uuid": "oldest-honor-create-card", "message": "what is e?", "init": false}} INFO: graph.py:86 - {"timestamp": "YYYY-MM-DDTHH:MM:SS.MS", "uuid": "nearer-zebra-one-worker", "llm_method": "on_chat_model_end", "sent": "2.718281828459045"} - Consistent logging format and output in JSON allow easy import into any observability system, designated by timestamp in time-series, conversational UUID, or LLM function call.
- Logging demo
-
Simple Graph
- This graph example is a generic call model without tool calling but can easily be replaced with your own graph.
- For simplicity, it currently uses conversational UUIDs to designate threads for memory persistence using MemorySaver.
- This allows conversational history to be maintained within a WebSocket channel on the backend, ensuring the client isn't bespoke to rendering and storing in case of data loss or refresh.
-
Event Handler
- Sends WebSocket responses back to designated clients.
- Currently handles chat streaming and custom events within your graph, e.g., to trigger frontend components or flags, using
adispatch_custom_eventandastream_events.
I tried to make setup and running as simple as possible locally This script is used to start the frontend and backend of the application. It accepts various command-line options to control which components to run and their respective configurations.
before you begin please make sure you pip install -r requirements.txt, I recommend using your personal flavor of virtual env, I didn't automate pip setup due to user assumption.
# required libraries
fastapi              # Fast web framework to handle our APIs
uvicorn              # ASGI server for serving FastAPI applications
websockets           # core WebSocket server and client library
python-dotenv        # reads key-value pairs from a `.env` file and sets them as environment variables
langchain-openai     # LangChain x OpenAI's implementation to use OpenAI's ChatModel within Langchain ecosystem
langgraph            # An awesome talking parrot that shoots webs :D
colorama             # used for coloring logs
Please read the start-local.sh to understand what alias commands are running under the hood.
Important: You cannot use --frontend and --backend at the same time.
-
--frontend:- Starts the frontend application.
- Example:
./start-local.sh --frontend
-
--backend:- Starts the backend application and builds the frontend by default before starting the backend.
- Example:
./start-local.sh --backend
-
--nobuildoptional flag:- Skips building the frontend before starting the backend. This option is only relevant when starting the backend.
- Example:
./start-local.sh --backend --nobuild
-
--frontend-port <port>optional flag:- Specifies the port on which the frontend application should run. The default port is
3000. - Example:
./start-local.sh --frontend --frontend-port 4000
- Specifies the port on which the frontend application should run. The default port is
-
--backend-port <port>optional flag:- Specifies the port on which the backend application should run. The default port is
8000. - Example:
./start-local.sh --backend --backend-port 9000
- Specifies the port on which the backend application should run. The default port is
-
Usage Restrictions:
- The
--frontendand--backendoptions cannot be used together. - Please choose one and then open a new terminal to run the script with the other one.
- This is due to overlapping blocking client and server consoles, you could put them in background, but it becomes a hassle to
kill $PIDin dev workflow.
- The
If you prefer not to use the start-local.sh script, you can manually start the frontend and backend components using the following steps.
I would recommend using 2 different terminal tabs.
- For the frontend, navigate to the
frontenddirectory and install the required packages and run with your flavor of node package manager:cd frontend npm install npm run - For the backend, in root of project folder.
pip install -r requirements.txt
cd frontend
npm install
npm build
cd ..
uvicorn server:app --host 0.0.0.0 --port 8000 --reload
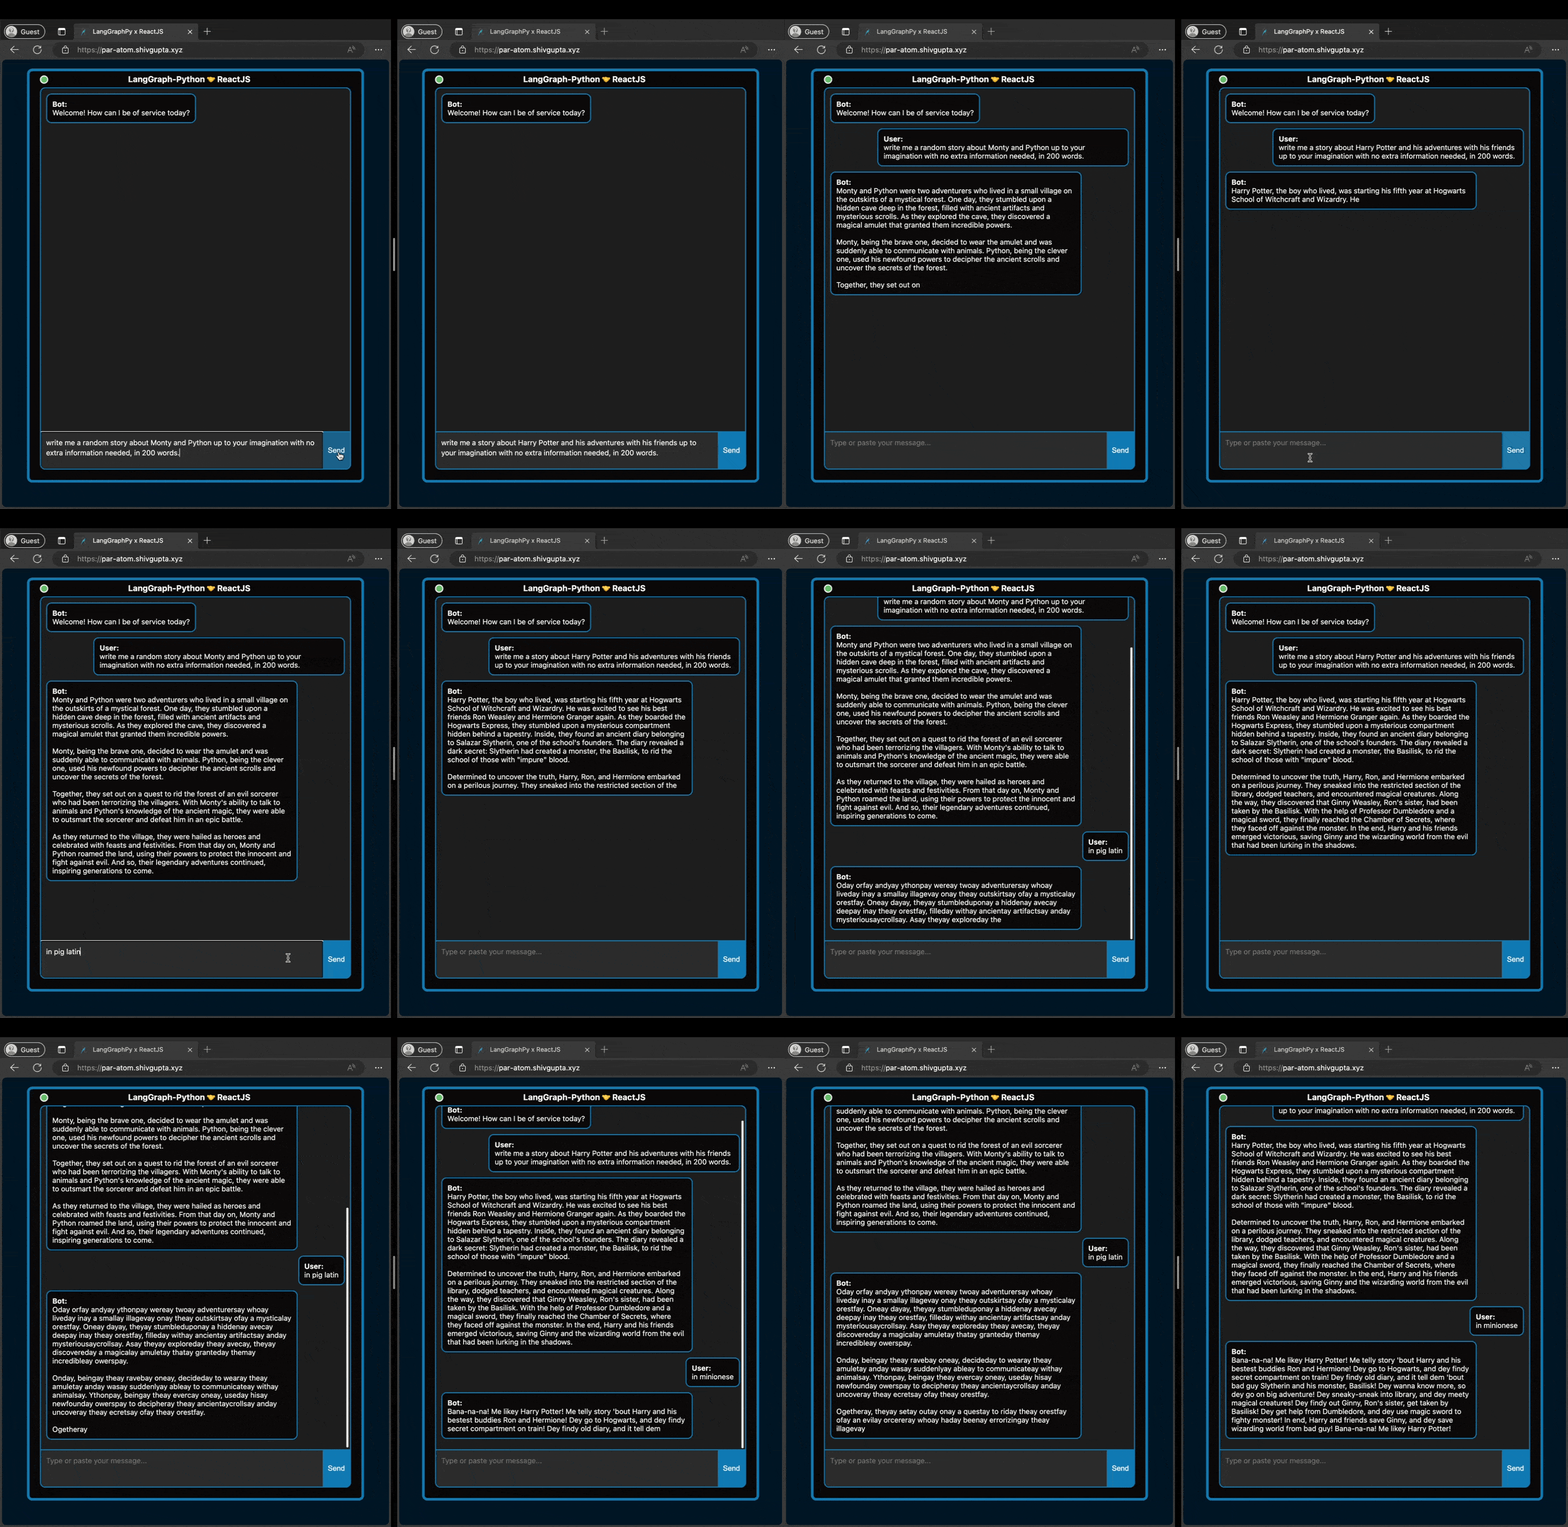
 As we can see above, even if two people are typing to the hosted server, it can handle it in a non-blocking fashion
and serve both clients with no loss in response throughput.
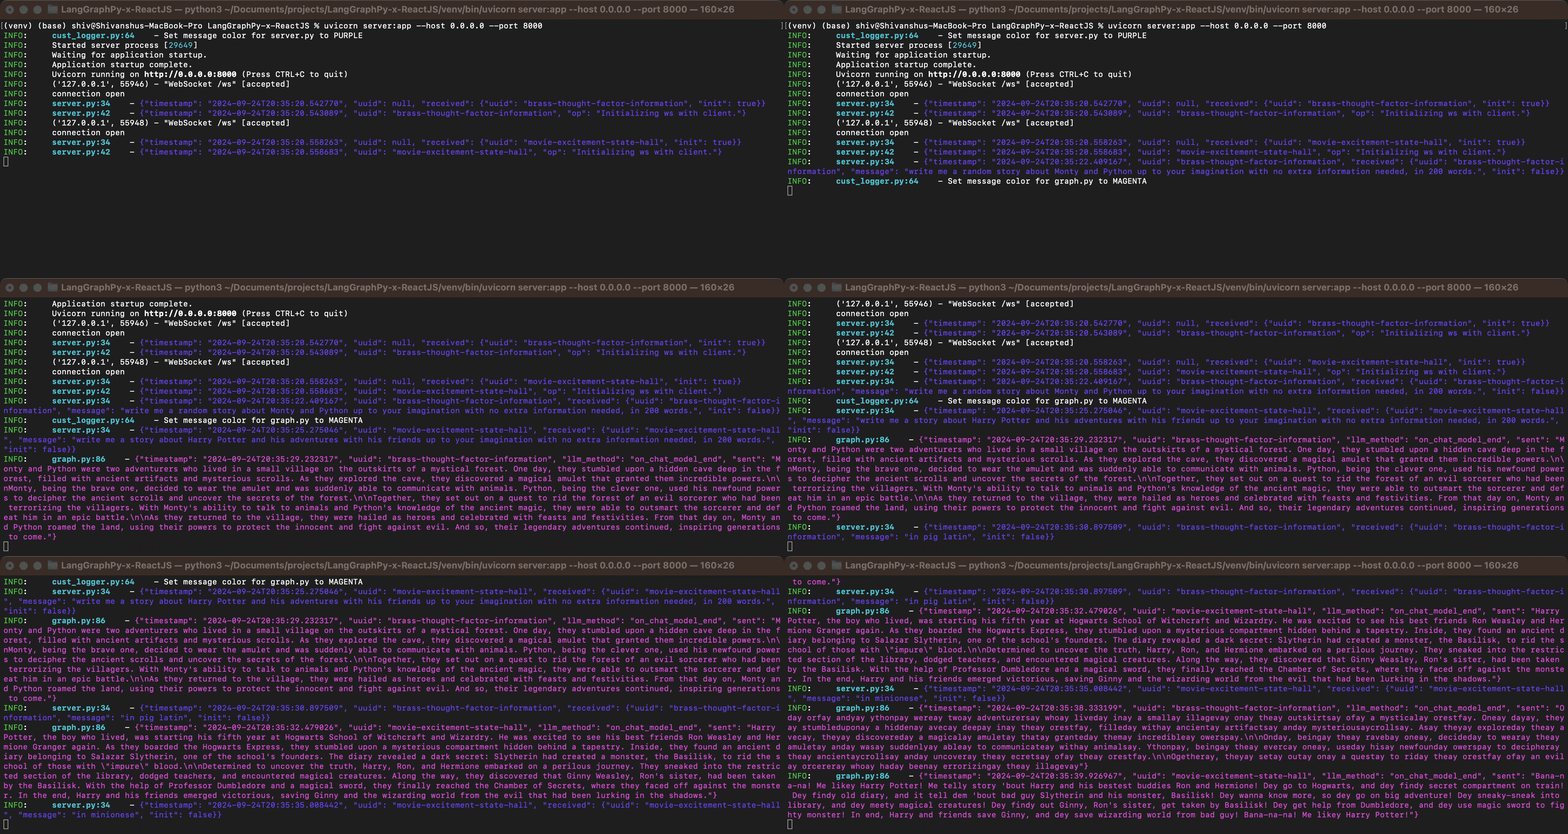
Below is what it would look like from the server, probably not in RGB :D

There is a Dockerfile and a Procfile; both can be used to run the server as a standalone Docker container or within your solution. I would recommend using Docker Compose for easy deployment on Kubernetes via Helm charts, as well as for creating easy replicas with VTCL/HZTL scaling. Remember to handle ports and SSL if your solution requires it.
NOTE: This server's backend is not secure. It currently isn't using WebSocket Secure due to localhost being HTTP and a lack of core security features for ease of local running.
I recommend adding something like this to the frontend:
const wsProtocol = window.location.protocol === 'https:' ? 'wss' : 'ws';
const wsUrl = `${wsProtocol}://${window.location.hostname}/ws`;
Additionally, I advise implementing origin checking for incoming server requests and securing your API using JWT tokens, OAuth's Bearer Tokens, API Keys, etc. Consider also implementing rate limiting for WebSocket connections and handling reconnections securely as preventive measures against DDoS attacks.
This was a fun implementation, mixing two technologies that you want to use together but are not clearly defined, especially in a scenario where both can be utilized well without limitations on each other.
There are many improvements that could be made, but they are not implemented to maintain simplicity and avoid potential lockout for future users. I would be willing to create a new template for different use cases or add to this repository, possibly including:
- Tool calling is viable through any graph in LangGraph, but it is not handled as a frontend visual update.
- Conversations stored in-memory could benefit from a dedicated network database solution.
- Sharing conversations or looking them up by conversation ID.
- Handling grouping of conversations by user would require some form of distinction between users.
These are improvements I do want to make in the future:
- testing for both frontend and backend
- A Kubernetes (K8s) Docker Compose setup
- if the backend gets too big, probably put it in a folder
- move to vite template as that's the direction FE is heading