Usage
The UGS Platform is the next generation of Universal Gcode Sender. It is built ontop of the Netbeans Platform which allows us to leverage its mature modular framework. This platform allows more features to be added without compromising on code quality, or being bogged down by a home grown framework. The Classic GUI is used as a library, so core features benefit both interfaces.
The first thing you will do after powering up your machine is connecting to your controller using the toolbar at the top of the program.
Select the correct hardware in the firmware combo box:

Refresh the serial ports list and select the correct port for your hardware. If you can't find the correct port in the list, make sure you have the drivers installed.

The ports are usually named like this:
- MacOSX: /dev/tty.usbmodem* or /dev/tty.usbserial*
- Linux: /dev/ttyUSB* or /dev/ttyACM*
- Windows: COM1, COM2 and so on.
Select the correct baud rate for your controller.
- GRBL - version 0.9 or later are using 115200, earlier versions are using 9600.
- TinyG/g2core will adapt to the baud rate you are connecting with so it really doesn't matter.
Actions are small commands that can be either sent to the controller or for controlling specific parts of a loaded gcode program. Most actions can be assigned to a keyboard short cut or be added to the toolbar or Toolbox.
Machine actions are used for sending specific commands to the controller. This could be for resetting alarms or setting the controller work position. These actions will be enabled/disabled depending on the state of the controller. For instance most actions will be disabled when running a gcode program or some actions will not be available when in an alarm state. Below are some of the most important actions to know about.
This will set the current machine position as the new zeroed work coordinate. It will get a work coordinate reference point [X0, Y0, Z0].
An action that will move the machine to the zero location [X0, Y0, Z0] in the current work coordinates.
If the current Z position is equal to or below a safe height it will first be moved to the Z safe height to avoid scratching the work piece. The safe height can be set in the "Sender settings".

An action that will reset the controller without switching off its power. This can be needed on some controllers to resolve a specific alarm.
An action that will resolve a specific alarm state, for instance if the machine has been triggered with a hard limit which would indicate that the controller no longer know its current position and it would be unsafe to continue further movement. In this case it needs the user intervention.
An action that will perform a homing sequence by moving the machine to its absolute zero position, triggering the homing/hard limit switches. After this the machine reference coordinates are zeroed.
Program actions is generally only available when there is an loaded gcode file and allows for basic manipulation of the program.
This will move the machine around the currently loaded model outlining the work to be done. This can be useful if you want to check if the material is correctly positioned or if the tool will clear the fixtures. This action will only move the machine in X and Y coordinates at the current set Z height.

The toolbox is a window with common actions needed to operate the machine. The actions displayed are customizable so that only the buttons you use are available. If an action can't be used at the moment it will be greyed out, ie when no machine is connected or a file loaded.

The toolbar can be configured by right clicking in the toolbar and choose Customize. From there new actions can be added and removed by dragging them out the desired position. New toolbars can be added or hidden.

The Digital read-out (or Controller state) panel displays the current status of your machine such as the work/machine coordinates, machine/spindle speeds and gcode states.
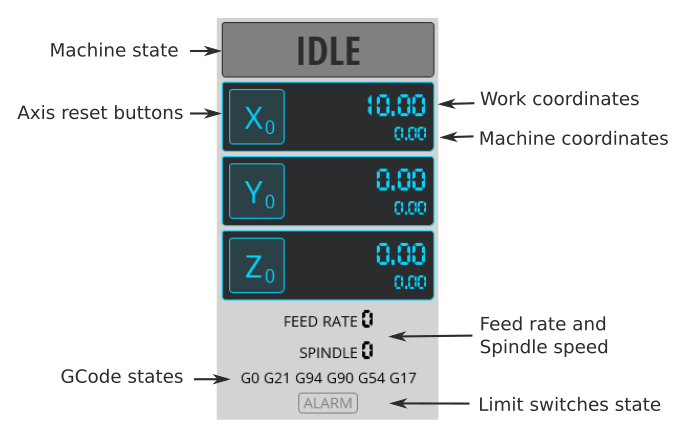
- Shows both the machine and work coordinates
- It has buttons for zeroing the work coordinates for each axis
- Changeable work coordinates using simple mathematical expressions
You can either set an exact coordinate or, as an example, use the following # / 2 to divide the current position in half. The #-character will be replaced with current position. If you start your expression with * or / the current position is prepended. - Shows the current machine state (Idle, Run, Jog, Alarm, etc.)
- Shows the current feed rate and spindle speed
- Shows the current GCode state (eg. the units currently being used G20/G21)
- Shows a alarm with the triggered limit switches
All windows and modules can be resized and moved to different locations.

UGS has a built in editor that allows you to open and edit a GCode files.

The editor window can be moved around and changes to the gcode file can be viewed directly in the visualizer window. The selected lines in the editor will also be highlighted.

When connected to a controller it can also highlight and display warnings for gcode commands that may not be compatible with the current controller. It will also highlight commands that contains errors.

If a job has failed or needs to be rerun from a certain point in the gcode file you can simply select the line in the gcode file and choose "Run From...". The gcode model will be rerendered excluding the skipped lines.

The editor will be shown by default when opening gcode files, this behavior can be disabled in the settings by unchecking the option Show editor when opening g-code files:

The designer allows you to draw simple vector graphics and/or import SVG or DXF-files where you can also assign toolpath operations to each shape. The designer is intended to be a quick way to generate gcode and to get started with your machine.

Gamepads and joysticks are supported in UGS Platform. Note that in MacOSX you need a special driver to use a gamepad: https://github.com/360Controller/360Controller.
Connect your controller device and go to Preferences -> UGS -> Joystick and choose Activate joystick. If you now press your controller device inputs they will light up green in the settings screen. You can change any input mapping to an action in UGS:

For the analog controls there is a setting which will allow you to set a zero offset threshold. This is useful when you have a controller device input that doesn't return a zero value when not being touched. For some controllers the axises are inverted which can be fixed by enabling the Reverse-checkbox.

Different gamepads have slightly different layouts. This is an example of how the buttons are placed and a table with the buttons and their default mapping. Please test your controller in the settings dialog before using.

| Button | Description | Default mapping |
|---|---|---|
| A | Z- | |
| B | ||
| X | ||
| Y | Z+ | |
| Back | Stop | |
| Select | ||
| Start | Start | |
| L1 | Divide jog feed rate | |
| L2 | Analog button | |
| L3 | Digital button | |
| R1 | Multiply jog feed rate | |
| R2 | Analog button | |
| R3 | Digital button | |
| Pad up | Y+ | |
| Pad down | Y- | |
| Pad left | X- | |
| Pad right | X+ | |
| Left stick X | Analog button | Analog jog X |
| Left stick Y | Analog button | Analog jog Y |
| Right stick X | Analog button | |
| Right stick Y | Analog button | Analog jog Z |
There is a web based pendant which allows you to control the machine via a web browser.
It is normally accessible through http://localhost:8080/ and looks like this:

We do not activate the feature by default and you need to start it by either pressing the pendant button each time you start UGS.

You can also make it auto start each time you start UGS by activating it in the settings:
