REST server
- End-to-end Demo With REST Server
This page gives a full-cycle description on how to build the REST server from a Dockerfile, set it up, and use it to create a group, add new members, create sample signatures, and verify them. As of now, the only scheme supported by the REST server is GL19, so besides the previous operations, we will only perform a convert operation to link signatures originating from same users.
Since some operations are inherently client-side, they do not have an endpoint in the REST server. To run them, we will leverage Python scripts (note that GL19 is implemented in all languages supported by the library, so we could use any other language for this -- yet, Python scripts are much more succinct.) Note, however, that these scripts are just illustrative examples and are by no means production-ready.
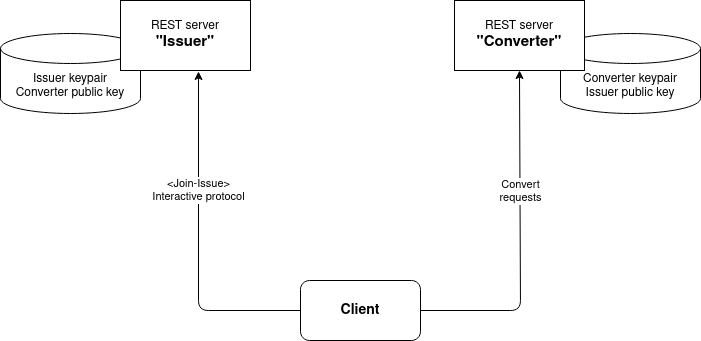
In a nutshell, in this tutorial, we will launch two servers. Each of them will be running in its own Docker container, in localhost, but on different ports. Whenever we need to run a client side operation, we will do it from a different Docker container, that already contains all the scripts we need, and has been provisioned with pygroupsig. The scenario is schematized in the following figure:
First, lets build the REST server Docker image. For this, go to the
src/wrappers/nodejs/server
folder in your clone of libgroupsig, where you should find a Dockerfile, and
run:
$ docker build -t libgroupsig-rest .
The previous command builds a Docker image which is provisioned with
libgroupsig, a configured postgresql database, and a sample NodeJS server
exposing the REST interface for libgroupsig described here.
The database will be used to store the keys of the issuers or converters
(depending on the instance) of all GL19 groups that are created. If you
now run $ docker images, you should see an entry like:
REPOSITORY                           TAG               IMAGE ID       CREATED          SIZE
libgroupsig-rest                     latest            e2673c6b1bda   2 minutes ago    964MB
Next, lets build the Docker image for the client-side Python scripts. Go to the
src/wrappers/python folder in your clone of libgroupsig, where you
should find another Dockerfile, and run:
$ docker build -t pygroupsig-cli .
The previous command builds a Docker image which is provisioned with a Python3-8 installation, pygroupsig, and the following Python command-line scripts:
- join-mem-seq1.py: Executes the first client-side step of the interactive join-issue protocol of GL19 (this protocol consists of a total of 4 message exchanges between the issuer and the prospective member). See the original paper for details on this process.
- join-mem-seq3.py: Executes the last client-side step of the interactive join-issue protocol of GL19. As a result, a new member key is produced.
- sign.py: Creates a (GL19) group signature of the given message.
- blind.py: Blinds a (GL19) group signature so that it can be sent to the converter. Internally, an ElGamal encryption keypair is created, which is also exported to a file.
- unblind.py: Unblinds a blinded and converted (GL19) group signature.
As before, after running the previous command, if you run $ docker images, you
should see the new image in your machine:
REPOSITORY                           TAG               IMAGE ID       CREATED         SIZE
pygroupsig-cli                       latest            475e0b66f6d2   3 seconds ago   133MB
Once the Docker images are built, we can launch the corresponding containers. As described in the Scenario section, we will be launching three containers, as follows:
-
libgroupsig-rest-issuer: Listening on port 3000 for calls to the REST API, will be acting as the issuer of a GL19 group. -
libgroupsig-rest-converter: Listening on port 3001 for calls to the REST API, will be acting as the converter of the same group as the previous issuer. -
pygroupsig-cli: We will use it to execute the previously described Python scripts, for client-side operations.
To launch the previous containers, run the following commands (each in a different console):
$ docker run -p 3000:3000 libgroupsig-rest   #Launches the Issuer's container
$ docker run -p 3001:3000 libgroupsig-rest   #Launches the Converter's container
$ docker run -ti pygroupsig-cli /bin/bash    #Launches the client tools
For both the issuer and converter servers, that's it. You don't need to do anything else -- they will just respond to the requests we make to them. Note however the differences in the ports. The command for the issuer is redirecting the host's 3000 port to the same port in the issuer's container. The command for the converter is redirecting the host's 3001 port to the port number 3000 in the converter's container. That is, by default, the containers listen at port 3000. You can change this default port by adding the one you want at the end of the command.
For the client container, you will need to interact with it to launch the appropriate tools for each step.
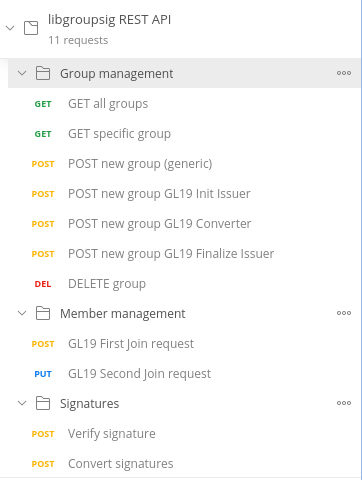
To interact with the REST servers, we will leverage the Postman collection available here. Please, import it into your Postman application. After importing, you should see a collection like the following:
The previous collection makes use of several variables defined in a Postman environment, available here. Please, import it too. It will work directly with the previous configuration of Docker containers. (Basically, it defines the issuer port to be 3000, the converter port to be 3001, as well as some versioning and other helper variables.)
Note: The next steps also give curl commands equivalent to the Postman collection calls.
With the previous setup, we are ready to run the full demo. (Remember, you need to have all the three previous containers running!)
First, just as a warm-up, check that the issuer is not aware of the existance of
any GL19 group. To do so, query the GET all groups endpoint from Postman.
With curl, run:
curl --location --request GET 'http://localhost:3000/v1/group'
In any case, the query should return:
1 []
Let's create a GL19 group. This is a three-step process. In the first step,
we initialize the public parameters of the scheme (this corresponds to the
Setup process in the GL19 paper) and the issuer's keypair (this corresponds
to the IKGen process in the paper). To do so, we run the POST new group GL19 Init Issuer query in Postman; or with curl:
curl --location --request POST 'http://localhost:3000/v1/group' \
--header 'Content-Type: application/json' \
--data-raw '{
    "code": 3,
    "seq": 1
}'
Note that, in curl, we specify the code for the group signature scheme (3
is the code for GL19 groups), and the sequence number of the initialization
process. In Postman, this is already filled up (you can check it in the
Body tab of the request).
In both cases, the result should be something like:
{
    "id": 1,
    "code": 3,
    "grpkey": "AwAwAAAAjyjAr79T2DXWaVChahMhZw3CEloHCYuhtcFCMfk4hbC6NAT8vrw2X7ib+tvOB4WQYAAAABBfPrfi6BM0rTFkOaR5ytCDhOBBc7DX177LDYmsZPa7AzT2bZ699UvjvF1dNLvfF7XNF9LgHbgOXwnt/SGpzdy77XhQoJr0tJ9bKE5ivAUzwR36fRYkFnZs3XH1NfTtBjAAAAB6N455Etk+1snwqbHwcyLm/4eUXkOHZRlxfsGNOTpEWqPcjnRiAjuqbj5AsCc0WJAwAAAAUPnmTfUFEoYdYYxgZZpBdACxkb+b3eO8oAKG4GzpWbZjW9KdBWDRDFqNY3Oa1QgRMAAAADizjMX5CbbbV0DY1kZGbX6pf/3EvWiWKfFDNG8tHJDbLq0YQ33Cx8usX9vmy0BEEzAAAADk15iXxu3Yyltqf71R5/OuCKa2jQVbSZhYqK/nTF4aELLZ1FP0zXOaQhyUVNMCpAAwAAAAaGd9oYKPAC+I2axzu881JN1UdFPahPfK7CN4DTEig4Pym3+c2nd0Vh2tHP12HskEYAAAAHBZLSK5d1RMkWFaSKwLcdT3vtJWeBJinEXTzAyHkwhQtRsVY+azp0tOlnaDuUUvDSeykYPLFyVN+UyTWNPjNUw2pVcKwkqLLciO8PvlsAJk4J2FV7JYVxrzva23E26jgwAAAAAAAAAA"
}
Where the grpkey field is a "temporary" group key, which only contains the
public parameters, and the issuers public key. At this point, the database in
the libgroupsig-rest-issuer container already has an entry for the newly
created group (check it by running again the GET all groups call!)
The next step in the process is to complete the group public key, by asking the
converter to generate its keypair. This is done by running the POST new group GL19 Converter call. In this case, however, you need to change the body of
the request to specify the "temporary" group key generated in the previous step.
In our case (your's will be a bit different), we have to set the body of the
request to:
{
    "code": 3,
    "seq": 2,
    "grpkey": "AwAwAAAAjyjAr79T2DXWaVChahMhZw3CEloHCYuhtcFCMfk4hbC6NAT8vrw2X7ib+tvOB4WQYAAAABBfPrfi6BM0rTFkOaR5ytCDhOBBc7DX177LDYmsZPa7AzT2bZ699UvjvF1dNLvfF7XNF9LgHbgOXwnt/SGpzdy77XhQoJr0tJ9bKE5ivAUzwR36fRYkFnZs3XH1NfTtBjAAAAB6N455Etk+1snwqbHwcyLm/4eUXkOHZRlxfsGNOTpEWqPcjnRiAjuqbj5AsCc0WJAwAAAAUPnmTfUFEoYdYYxgZZpBdACxkb+b3eO8oAKG4GzpWbZjW9KdBWDRDFqNY3Oa1QgRMAAAADizjMX5CbbbV0DY1kZGbX6pf/3EvWiWKfFDNG8tHJDbLq0YQ33Cx8usX9vmy0BEEzAAAADk15iXxu3Yyltqf71R5/OuCKa2jQVbSZhYqK/nTF4aELLZ1FP0zXOaQhyUVNMCpAAwAAAAaGd9oYKPAC+I2axzu881JN1UdFPahPfK7CN4DTEig4Pym3+c2nd0Vh2tHP12HskEYAAAAHBZLSK5d1RMkWFaSKwLcdT3vtJWeBJinEXTzAyHkwhQtRsVY+azp0tOlnaDuUUvDSeykYPLFyVN+UyTWNPjNUw2pVcKwkqLLciO8PvlsAJk4J2FV7JYVxrzva23E26jgwAAAAAAAAAA"
}
So: code is still 3 (GL19), seq is now 2 (this is the second call in the
group setup process), and the grpkey is the one we generated before. In curl,
your command should be like:
curl --location --request POST 'http://localhost:3001/v1/group' \
--header 'Content-Type: application/json' \
--data-raw '{
    "code": 3,
    "seq": 2,
    "grpkey": "AwAwAAAAjyjAr79T2DXWaVChahMhZw3CEloHCYuhtcFCMfk4hbC6NAT8vrw2X7ib+tvOB4WQYAAAABBfPrfi6BM0rTFkOaR5ytCDhOBBc7DX177LDYmsZPa7AzT2bZ699UvjvF1dNLvfF7XNF9LgHbgOXwnt/SGpzdy77XhQoJr0tJ9bKE5ivAUzwR36fRYkFnZs3XH1NfTtBjAAAAB6N455Etk+1snwqbHwcyLm/4eUXkOHZRlxfsGNOTpEWqPcjnRiAjuqbj5AsCc0WJAwAAAAUPnmTfUFEoYdYYxgZZpBdACxkb+b3eO8oAKG4GzpWbZjW9KdBWDRDFqNY3Oa1QgRMAAAADizjMX5CbbbV0DY1kZGbX6pf/3EvWiWKfFDNG8tHJDbLq0YQ33Cx8usX9vmy0BEEzAAAADk15iXxu3Yyltqf71R5/OuCKa2jQVbSZhYqK/nTF4aELLZ1FP0zXOaQhyUVNMCpAAwAAAAaGd9oYKPAC+I2axzu881JN1UdFPahPfK7CN4DTEig4Pym3+c2nd0Vh2tHP12HskEYAAAAHBZLSK5d1RMkWFaSKwLcdT3vtJWeBJinEXTzAyHkwhQtRsVY+azp0tOlnaDuUUvDSeykYPLFyVN+UyTWNPjNUw2pVcKwkqLLciO8PvlsAJk4J2FV7JYVxrzva23E26jgwAAAAAAAAAA"
}'
Note that the port also changes: in the first call, it was 3000; whereas now,
it is 3001.
The result of this second call should be something like the following:
{
    "id": 1,
    "code": 3,
    "grpkeyfull": "AwAwAAAAjyjAr79T2DXWaVChahMhZw3CEloHCYuhtcFCMfk4hbC6NAT8vrw2X7ib+tvOB4WQYAAAABBfPrfi6BM0rTFkOaR5ytCDhOBBc7DX177LDYmsZPa7AzT2bZ699UvjvF1dNLvfF7XNF9LgHbgOXwnt/SGpzdy77XhQoJr0tJ9bKE5ivAUzwR36fRYkFnZs3XH1NfTtBjAAAAB6N455Etk+1snwqbHwcyLm/4eUXkOHZRlxfsGNOTpEWqPcjnRiAjuqbj5AsCc0WJAwAAAAUPnmTfUFEoYdYYxgZZpBdACxkb+b3eO8oAKG4GzpWbZjW9KdBWDRDFqNY3Oa1QgRMAAAADizjMX5CbbbV0DY1kZGbX6pf/3EvWiWKfFDNG8tHJDbLq0YQ33Cx8usX9vmy0BEEzAAAADk15iXxu3Yyltqf71R5/OuCKa2jQVbSZhYqK/nTF4aELLZ1FP0zXOaQhyUVNMCpAAwAAAAaGd9oYKPAC+I2axzu881JN1UdFPahPfK7CN4DTEig4Pym3+c2nd0Vh2tHP12HskEYAAAAHBZLSK5d1RMkWFaSKwLcdT3vtJWeBJinEXTzAyHkwhQtRsVY+azp0tOlnaDuUUvDSeykYPLFyVN+UyTWNPjNUw2pVcKwkqLLciO8PvlsAJk4J2FV7JYVxrzva23E26jgzAAAACBrx292/KvLHokTr0rDuorjkzYa7i+LObQYfFoNLZPeBFusPlJ97mE953ZHkbssgkwAAAAe1JE6X0IGDp6iXlv46RzfTK1sq8aOIGe/6N0nMPGxoJ3DHfMIW6kdDpcFcceN7QK",
    "grpkeytmp": "AwAwAAAAjyjAr79T2DXWaVChahMhZw3CEloHCYuhtcFCMfk4hbC6NAT8vrw2X7ib+tvOB4WQYAAAABBfPrfi6BM0rTFkOaR5ytCDhOBBc7DX177LDYmsZPa7AzT2bZ699UvjvF1dNLvfF7XNF9LgHbgOXwnt/SGpzdy77XhQoJr0tJ9bKE5ivAUzwR36fRYkFnZs3XH1NfTtBjAAAAB6N455Etk+1snwqbHwcyLm/4eUXkOHZRlxfsGNOTpEWqPcjnRiAjuqbj5AsCc0WJAwAAAAUPnmTfUFEoYdYYxgZZpBdACxkb+b3eO8oAKG4GzpWbZjW9KdBWDRDFqNY3Oa1QgRMAAAADizjMX5CbbbV0DY1kZGbX6pf/3EvWiWKfFDNG8tHJDbLq0YQ33Cx8usX9vmy0BEEzAAAADk15iXxu3Yyltqf71R5/OuCKa2jQVbSZhYqK/nTF4aELLZ1FP0zXOaQhyUVNMCpAAwAAAAaGd9oYKPAC+I2axzu881JN1UdFPahPfK7CN4DTEig4Pym3+c2nd0Vh2tHP12HskEYAAAAHBZLSK5d1RMkWFaSKwLcdT3vtJWeBJinEXTzAyHkwhQtRsVY+azp0tOlnaDuUUvDSeykYPLFyVN+UyTWNPjNUw2pVcKwkqLLciO8PvlsAJk4J2FV7JYVxrzva23E26jgwAAAAAAAAAA"
}
Note that two group keys are received back. The grpkeytmp should be the same
as the one you specified in your request. The grpkeyfull is the fully
functional group key, which now also includes the converter's public key.
At this point, the internal database in the converter's container already
includes a full description of the newly created group (check it!). There is
one catch, though: we have to update the database in the issuer container with
the full group key. To do so, we run the third -- and last -- command in the
setup sequence, which corresponds with the POST new group GL19 Finalize issuer
call in Postman. In this case, we also have to update the body with the grpkeytmp
and grpkeyfull to the values obtained in the second step. Thus, the request
body should look something like:
{
    "code": 3,
    "seq": 3,
    "grpkeyfull": "AwAwAAAAjyjAr79T2DXWaVChahMhZw3CEloHCYuhtcFCMfk4hbC6NAT8vrw2X7ib+tvOB4WQYAAAABBfPrfi6BM0rTFkOaR5ytCDhOBBc7DX177LDYmsZPa7AzT2bZ699UvjvF1dNLvfF7XNF9LgHbgOXwnt/SGpzdy77XhQoJr0tJ9bKE5ivAUzwR36fRYkFnZs3XH1NfTtBjAAAAB6N455Etk+1snwqbHwcyLm/4eUXkOHZRlxfsGNOTpEWqPcjnRiAjuqbj5AsCc0WJAwAAAAUPnmTfUFEoYdYYxgZZpBdACxkb+b3eO8oAKG4GzpWbZjW9KdBWDRDFqNY3Oa1QgRMAAAADizjMX5CbbbV0DY1kZGbX6pf/3EvWiWKfFDNG8tHJDbLq0YQ33Cx8usX9vmy0BEEzAAAADk15iXxu3Yyltqf71R5/OuCKa2jQVbSZhYqK/nTF4aELLZ1FP0zXOaQhyUVNMCpAAwAAAAaGd9oYKPAC+I2axzu881JN1UdFPahPfK7CN4DTEig4Pym3+c2nd0Vh2tHP12HskEYAAAAHBZLSK5d1RMkWFaSKwLcdT3vtJWeBJinEXTzAyHkwhQtRsVY+azp0tOlnaDuUUvDSeykYPLFyVN+UyTWNPjNUw2pVcKwkqLLciO8PvlsAJk4J2FV7JYVxrzva23E26jgzAAAACBrx292/KvLHokTr0rDuorjkzYa7i+LObQYfFoNLZPeBFusPlJ97mE953ZHkbssgkwAAAAe1JE6X0IGDp6iXlv46RzfTK1sq8aOIGe/6N0nMPGxoJ3DHfMIW6kdDpcFcceN7QK",
    "grpkeytmp": "AwAwAAAAjyjAr79T2DXWaVChahMhZw3CEloHCYuhtcFCMfk4hbC6NAT8vrw2X7ib+tvOB4WQYAAAABBfPrfi6BM0rTFkOaR5ytCDhOBBc7DX177LDYmsZPa7AzT2bZ699UvjvF1dNLvfF7XNF9LgHbgOXwnt/SGpzdy77XhQoJr0tJ9bKE5ivAUzwR36fRYkFnZs3XH1NfTtBjAAAAB6N455Etk+1snwqbHwcyLm/4eUXkOHZRlxfsGNOTpEWqPcjnRiAjuqbj5AsCc0WJAwAAAAUPnmTfUFEoYdYYxgZZpBdACxkb+b3eO8oAKG4GzpWbZjW9KdBWDRDFqNY3Oa1QgRMAAAADizjMX5CbbbV0DY1kZGbX6pf/3EvWiWKfFDNG8tHJDbLq0YQ33Cx8usX9vmy0BEEzAAAADk15iXxu3Yyltqf71R5/OuCKa2jQVbSZhYqK/nTF4aELLZ1FP0zXOaQhyUVNMCpAAwAAAAaGd9oYKPAC+I2axzu881JN1UdFPahPfK7CN4DTEig4Pym3+c2nd0Vh2tHP12HskEYAAAAHBZLSK5d1RMkWFaSKwLcdT3vtJWeBJinEXTzAyHkwhQtRsVY+azp0tOlnaDuUUvDSeykYPLFyVN+UyTWNPjNUw2pVcKwkqLLciO8PvlsAJk4J2FV7JYVxrzva23E26jgwAAAAAAAAAA"
}
(Again, note that seq has value 3, indicating that this is the third step in
the setup process.)
The curl command for this should look like this:
curl --location --request POST 'http://localhost:3000/v1/group' \
--header 'Content-Type: application/json' \
--data-raw '{
    "code": 3,
    "seq": 3,
    "grpkeyfull": "AwAwAAAAjyjAr79T2DXWaVChahMhZw3CEloHCYuhtcFCMfk4hbC6NAT8vrw2X7ib+tvOB4WQYAAAABBfPrfi6BM0rTFkOaR5ytCDhOBBc7DX177LDYmsZPa7AzT2bZ699UvjvF1dNLvfF7XNF9LgHbgOXwnt/SGpzdy77XhQoJr0tJ9bKE5ivAUzwR36fRYkFnZs3XH1NfTtBjAAAAB6N455Etk+1snwqbHwcyLm/4eUXkOHZRlxfsGNOTpEWqPcjnRiAjuqbj5AsCc0WJAwAAAAUPnmTfUFEoYdYYxgZZpBdACxkb+b3eO8oAKG4GzpWbZjW9KdBWDRDFqNY3Oa1QgRMAAAADizjMX5CbbbV0DY1kZGbX6pf/3EvWiWKfFDNG8tHJDbLq0YQ33Cx8usX9vmy0BEEzAAAADk15iXxu3Yyltqf71R5/OuCKa2jQVbSZhYqK/nTF4aELLZ1FP0zXOaQhyUVNMCpAAwAAAAaGd9oYKPAC+I2axzu881JN1UdFPahPfK7CN4DTEig4Pym3+c2nd0Vh2tHP12HskEYAAAAHBZLSK5d1RMkWFaSKwLcdT3vtJWeBJinEXTzAyHkwhQtRsVY+azp0tOlnaDuUUvDSeykYPLFyVN+UyTWNPjNUw2pVcKwkqLLciO8PvlsAJk4J2FV7JYVxrzva23E26jgzAAAACBrx292/KvLHokTr0rDuorjkzYa7i+LObQYfFoNLZPeBFusPlJ97mE953ZHkbssgkwAAAAe1JE6X0IGDp6iXlv46RzfTK1sq8aOIGe/6N0nMPGxoJ3DHfMIW6kdDpcFcceN7QK",
    "grpkeytmp": "AwAwAAAAjyjAr79T2DXWaVChahMhZw3CEloHCYuhtcFCMfk4hbC6NAT8vrw2X7ib+tvOB4WQYAAAABBfPrfi6BM0rTFkOaR5ytCDhOBBc7DX177LDYmsZPa7AzT2bZ699UvjvF1dNLvfF7XNF9LgHbgOXwnt/SGpzdy77XhQoJr0tJ9bKE5ivAUzwR36fRYkFnZs3XH1NfTtBjAAAAB6N455Etk+1snwqbHwcyLm/4eUXkOHZRlxfsGNOTpEWqPcjnRiAjuqbj5AsCc0WJAwAAAAUPnmTfUFEoYdYYxgZZpBdACxkb+b3eO8oAKG4GzpWbZjW9KdBWDRDFqNY3Oa1QgRMAAAADizjMX5CbbbV0DY1kZGbX6pf/3EvWiWKfFDNG8tHJDbLq0YQ33Cx8usX9vmy0BEEzAAAADk15iXxu3Yyltqf71R5/OuCKa2jQVbSZhYqK/nTF4aELLZ1FP0zXOaQhyUVNMCpAAwAAAAaGd9oYKPAC+I2axzu881JN1UdFPahPfK7CN4DTEig4Pym3+c2nd0Vh2tHP12HskEYAAAAHBZLSK5d1RMkWFaSKwLcdT3vtJWeBJinEXTzAyHkwhQtRsVY+azp0tOlnaDuUUvDSeykYPLFyVN+UyTWNPjNUw2pVcKwkqLLciO8PvlsAJk4J2FV7JYVxrzva23E26jgwAAAAAAAAAA"
}'
(Also, note the port: it is the issuer's 3000.)
The result of the query essentially returns the final group key (which should be
the same as the provided grpkeyfull):
{
    "id": 1,
    "code": 3,
    "grpkey": "AwAwAAAAjyjAr79T2DXWaVChahMhZw3CEloHCYuhtcFCMfk4hbC6NAT8vrw2X7ib+tvOB4WQYAAAABBfPrfi6BM0rTFkOaR5ytCDhOBBc7DX177LDYmsZPa7AzT2bZ699UvjvF1dNLvfF7XNF9LgHbgOXwnt/SGpzdy77XhQoJr0tJ9bKE5ivAUzwR36fRYkFnZs3XH1NfTtBjAAAAB6N455Etk+1snwqbHwcyLm/4eUXkOHZRlxfsGNOTpEWqPcjnRiAjuqbj5AsCc0WJAwAAAAUPnmTfUFEoYdYYxgZZpBdACxkb+b3eO8oAKG4GzpWbZjW9KdBWDRDFqNY3Oa1QgRMAAAADizjMX5CbbbV0DY1kZGbX6pf/3EvWiWKfFDNG8tHJDbLq0YQ33Cx8usX9vmy0BEEzAAAADk15iXxu3Yyltqf71R5/OuCKa2jQVbSZhYqK/nTF4aELLZ1FP0zXOaQhyUVNMCpAAwAAAAaGd9oYKPAC+I2axzu881JN1UdFPahPfK7CN4DTEig4Pym3+c2nd0Vh2tHP12HskEYAAAAHBZLSK5d1RMkWFaSKwLcdT3vtJWeBJinEXTzAyHkwhQtRsVY+azp0tOlnaDuUUvDSeykYPLFyVN+UyTWNPjNUw2pVcKwkqLLciO8PvlsAJk4J2FV7JYVxrzva23E26jgzAAAACBrx292/KvLHokTr0rDuorjkzYa7i+LObQYfFoNLZPeBFusPlJ97mE953ZHkbssgkwAAAAe1JE6X0IGDp6iXlv46RzfTK1sq8aOIGe/6N0nMPGxoJ3DHfMIW6kdDpcFcceN7QK"
}
At this point, both the issuer and the converter have a new, fully functional, GL19 group.
This is a four-message interactive protocol. By means of which the prospective member responds a fresh challenge received from the issuer, and gets in return a blindly signed credential that constitutes its membership certificate.
In the first step, the client just has to send a message indicating the issuer
that she wishes to join the group. This is done through the GL19 First Join Request endpoint in Postman. Note that there is a query-param: groupId.
It indicates the group to which the member wishes to join -- by default, it is
set to 1, so if you only created one group, there is no need to change it.
The corresponding curl command is:
curl --location --request POST 'http://localhost:3000/v1/group/1/member' \
--data-raw ''
The server's response is just a challenge, in the shape of a random value generated by the issuer. Something like:
{
    "challenge": "MAAAAH0nzP+ibB8IAXfHDFwHRtB7UxMnWS9+0GjkASNaiwh9Eyeltx/EFDw3ohJT8ndRkQ=="
}
Internally, the issuer is storing this challenge in its database.
Now, it is turn for the requesting member to create a response to the challenge.
Basically, it creates a Signature Proof of Knowledge (SPK) of an exponent (which
will be the member's secret key), over the given challenge. To do so, we need to
use the join-mem-seq1.py tool in our pygroupsig-cli container (that we
launched in a previous section).
Go to the container -- upon launching the container, you should be in the
/root/pygroupsig directory, which contains all the scripts we need.
There, run $ python join-mem-seq1.py. It prints a brief help string,
as follows:
Usage: $python join-mem-seq1.py <grpkey str> <challenge str>
(The same pattern of calling a script without arguments, for all other scripts in this tutorial, will print out a help string.)
That line is telling that the first argument the script expects, is a string representing the group key, and the second, is the challenge string. Set them to the data you produced in previous steps. For us, it is:
$ python join-mem-seq1.py AwAwAAAAjyjAr79T2DXWaVChahMhZw3CEloHCYuhtcFCMfk4hbC6NAT8vrw2X7ib+tvOB4WQYAAAABBfPrfi6BM0rTFkOaR5ytCDhOBBc7DX177LDYmsZPa7AzT2bZ699UvjvF1dNLvfF7XNF9LgHbgOXwnt/SGpzdy77XhQoJr0tJ9bKE5ivAUzwR36fRYkFnZs3XH1NfTtBjAAAAB6N455Etk+1snwqbHwcyLm/4eUXkOHZRlxfsGNOTpEWqPcjnRiAjuqbj5AsCc0WJAwAAAAUPnmTfUFEoYdYYxgZZpBdACxkb+b3eO8oAKG4GzpWbZjW9KdBWDRDFqNY3Oa1QgRMAAAADizjMX5CbbbV0DY1kZGbX6pf/3EvWiWKfFDNG8tHJDbLq0YQ33Cx8usX9vmy0BEEzAAAADk15iXxu3Yyltqf71R5/OuCKa2jQVbSZhYqK/nTF4aELLZ1FP0zXOaQhyUVNMCpAAwAAAAaGd9oYKPAC+I2axzu881JN1UdFPahPfK7CN4DTEig4Pym3+c2nd0Vh2tHP12HskEYAAAAHBZLSK5d1RMkWFaSKwLcdT3vtJWeBJinEXTzAyHkwhQtRsVY+azp0tOlnaDuUUvDSeykYPLFyVN+UyTWNPjNUw2pVcKwkqLLciO8PvlsAJk4J2FV7JYVxrzva23E26jgzAAAACBrx292/KvLHokTr0rDuorjkzYa7i+LObQYfFoNLZPeBFusPlJ97mE953ZHkbssgkwAAAAe1JE6X0IGDp6iXlv46RzfTK1sq8aOIGe/6N0nMPGxoJ3DHfMIW6kdDpcFcceN7QK MAAAAH0nzP+ibB8IAXfHDFwHRtB7UxMnWS9+0GjkASNaiwh9Eyeltx/EFDw3ohJT8ndRkQ==
(Yes, it is not user-friendly. But again, this is just a demo...)
The result of running this command should be somethin like the following:
Response: MAAAAH0nzP+ibB8IAXfHDFwHRtB7UxMnWS9+0GjkASNaiwh9Eyeltx/EFDw3ohJT8ndRkTAAAACyCV+u2nKIU+2uYspWXpkdvyJSlfkcqj0eMxW6V3/RIPZlEngkZHq4z74claIa1BYgAAAAmSFH+SDE/y7MwEuUxNcZwHJihgl8d7aFe/Q/pK97aSUgAAAARJMcf6sBoLji0PmnVJv1zHhivppR/lE9Qe2wCzOR3WY=
Temporary member key: AwIAAAAAAAAAACAAAADM3Uw1FzLxOO7BLRgi6xa3lp0ldIYEZwO984EcvSDLNgAAAAAAAAAAAAAAAAAAAAAwAAAAsglfrtpyiFPtrmLKVl6ZHb8iUpX5HKo9HjMVuld/0SD2ZRJ4JGR6uM++HJWiGtQWAAAAAAAAAAA=
The first line is the response we need to give back to the issuer. The second
line is a representation of the (partial) member key. With this, we can use the
GL19 Second Join Request call. The body of the request needs to be filled
appropriately, in our case, as follows:
{
    "challenge": "MAAAAH0nzP+ibB8IAXfHDFwHRtB7UxMnWS9+0GjkASNaiwh9Eyeltx/EFDw3ohJT8ndRkQ==",
    "response": "MAAAAH0nzP+ibB8IAXfHDFwHRtB7UxMnWS9+0GjkASNaiwh9Eyeltx/EFDw3ohJT8ndRkTAAAACyCV+u2nKIU+2uYspWXpkdvyJSlfkcqj0eMxW6V3/RIPZlEngkZHq4z74claIa1BYgAAAAmSFH+SDE/y7MwEuUxNcZwHJihgl8d7aFe/Q/pK97aSUgAAAARJMcf6sBoLji0PmnVJv1zHhivppR/lE9Qe2wCzOR3WY=",
    "certificate": "sample-cert",
    "signature": "sample-signature"
}
Where the challenge is the one received from the server, and the response is
the one generated in the previous step. Note that there are also two other
fields, certificate, and signature. They are aimed at passing a public
key certificate (e.g., an X.509) and a signature, that must be verifiable
with the public key in that certificate, of the challenge. In the default
configuration of the server, these values are ignored. However, you can change
that easily, by changing appropriately the PKI_* values
here.
The curl command for the previous request is:
curl --location --request PUT 'http://localhost:3000/v1/group/1/member/2' \
--header 'Content-Type: application/json' \
--data-raw '{
    "challenge": "MAAAAH0nzP+ibB8IAXfHDFwHRtB7UxMnWS9+0GjkASNaiwh9Eyeltx/EFDw3ohJT8ndRkQ==",
    "response": "MAAAAH0nzP+ibB8IAXfHDFwHRtB7UxMnWS9+0GjkASNaiwh9Eyeltx/EFDw3ohJT8ndRkTAAAACyCV+u2nKIU+2uYspWXpkdvyJSlfkcqj0eMxW6V3/RIPZlEngkZHq4z74claIa1BYgAAAAmSFH+SDE/y7MwEuUxNcZwHJihgl8d7aFe/Q/pK97aSUgAAAARJMcf6sBoLji0PmnVJv1zHhivppR/lE9Qe2wCzOR3WY=",
    "certificate": "sample-cert",
    "signature": "sample-signature"
}'
The response of this request should be something like:
{
    "seq": 3,
    "result": "AwIwAAAAEA+uD/ps21pZS1npK1zMm3x3YMFUB6ifLzujl5LliKF0qO80oS3yly94hmSkMPyLIAAAAIKG0X3TgwXh72auDVRHyYP+ZmWTPzmXrH85vlYg/287AAAAACAAAAC/4SHzOPmat106oSt1ztiTtfQG7oRROuRW4/f94N+ZS9MSJWEAAAAAAAAAAAAAAAAAAAAAAAAAAA=="
}
The value in result is the last piece we need to compose the final group member
key. For this, we need to go back to the pygroupsig-cli container, and run:
$ python join-mem-seq3.py <grpkey str> <memkey str> <cert str>
Where <grpkey str> is the group key of the generated group, <memkey str>
is the "temporary member key" we obtained after running join-mem-seq1.py above,
and <cert str> is the result field of the last response received from
the issuer. Running this command (with the appropriate values) should return
something like:
Member key: AwIwAAAAEA+uD/ps21pZS1npK1zMm3x3YMFUB6ifLzujl5LliKF0qO80oS3yly94hmSkMPyLIAAAAIKG0X3TgwXh72auDVRHyYP+ZmWTPzmXrH85vlYg/287IAAAAJ6CWj8cabF1L41PvagHkOi5ryhit4z/DWfe0iEV7ScCIAAAAL/hIfM4+Zq3XTqhK3XO2JO19AbuhFE65Fbj9/3g35lL0xIlYQAAAAAgAAAAFeB79+tf23AEvx2fZ0Am8mRh2o+Cplo/5TcQhUre1T8wAAAAa/haC+NOiSNwBbNEv/b66ktuhGMx+Pit2kVFafT2yvuhGRu26uHa1ktPqwGV2WOEMAAAANhGHunt0jraOivpZoQlcYXMddZkBWK5T/wKgVswBLLj08OP3TcApubMlOBwV+oqgTAAAADaBzpOh/yKb7JqxZvnVcaHy2l7fq+KlLqvh2YdU7lalTEpXAmUN8Iva9crmOBo9w4=
Which is the actuall (full) member key of a newly added group member.
With the member key we just obtained, we can already sign messages. Again, this
can be done with the sign.py script in the pygroupsig-cli container. It
expects three arguments, a group key string, the signing member key, and the
message to be signed (note: beware of blank spaces in the message, in this test
script where all arguments are passed via the command line, they can cause
problems, so better just avoid using them for this test, or make sure you
escape them correctly.) For instance, to sign the string "HelloWorld!" with
the previously generated keys, run:
python sign.py AwAwAAAAjyjAr79T2DXWaVChahMhZw3CEloHCYuhtcFCMfk4hbC6NAT8vrw2X7ib+tvOB4WQYAAAABBfPrfi6BM0rTFkOaR5ytCDhOBBc7DX177LDYmsZPa7AzT2bZ699UvjvF1dNLvfF7XNF9LgHbgOXwnt/SGpzdy77XhQoJr0tJ9bKE5ivAUzwR36fRYkFnZs3XH1NfTtBjAAAAB6N455Etk+1snwqbHwcyLm/4eUXkOHZRlxfsGNOTpEWqPcjnRiAjuqbj5AsCc0WJAwAAAAUPnmTfUFEoYdYYxgZZpBdACxkb+b3eO8oAKG4GzpWbZjW9KdBWDRDFqNY3Oa1QgRMAAAADizjMX5CbbbV0DY1kZGbX6pf/3EvWiWKfFDNG8tHJDbLq0YQ33Cx8usX9vmy0BEEzAAAADk15iXxu3Yyltqf71R5/OuCKa2jQVbSZhYqK/nTF4aELLZ1FP0zXOaQhyUVNMCpAAwAAAAaGd9oYKPAC+I2axzu881JN1UdFPahPfK7CN4DTEig4Pym3+c2nd0Vh2tHP12HskEYAAAAHBZLSK5d1RMkWFaSKwLcdT3vtJWeBJinEXTzAyHkwhQtRsVY+azp0tOlnaDuUUvDSeykYPLFyVN+UyTWNPjNUw2pVcKwkqLLciO8PvlsAJk4J2FV7JYVxrzva23E26jgzAAAACBrx292/KvLHokTr0rDuorjkzYa7i+LObQYfFoNLZPeBFusPlJ97mE953ZHkbssgkwAAAAe1JE6X0IGDp6iXlv46RzfTK1sq8aOIGe/6N0nMPGxoJ3DHfMIW6kdDpcFcceN7QK AwIwAAAAEA+uD/ps21pZS1npK1zMm3x3YMFUB6ifLzujl5LliKF0qO80oS3yly94hmSkMPyLIAAAAIKG0X3TgwXh72auDVRHyYP+ZmWTPzmXrH85vlYg/287IAAAAJ6CWj8cabF1L41PvagHkOi5ryhit4z/DWfe0iEV7ScCIAAAAL/hIfM4+Zq3XTqhK3XO2JO19AbuhFE65Fbj9/3g35lL0xIlYQAAAAAgAAAAFeB79+tf23AEvx2fZ0Am8mRh2o+Cplo/5TcQhUre1T8wAAAAa/haC+NOiSNwBbNEv/b66ktuhGMx+Pit2kVFafT2yvuhGRu26uHa1ktPqwGV2WOEMAAAANhGHunt0jraOivpZoQlcYXMddZkBWK5T/wKgVswBLLj08OP3TcApubMlOBwV+oqgTAAAADaBzpOh/yKb7JqxZvnVcaHy2l7fq+KlLqvh2YdU7lalTEpXAmUN8Iva9crmOBo9w4= HelloWorld!
The result of the previous command should look like:
Signature: AzAAAAChmjea5ftrkXpzP13pTKuKWbJBhUoIMW+PW0JioaEer+qT4umU8VZRf0v/PXeZsAwwAAAAx/tI/3l1qaryKaueM7nDPWRcUuI59WY8U2gx8fjoToFmI1RaArtVzAzhK1Ib+YUOMAAAANDO6sCX8NECtYx1K5J4eZhEz2grQcTliIImHYzcoymjxDLGKDp/zF0w02PRJdGFhSAAAACXRP0u+rWfkI/NWCxcqhSo/mbUxo0oBR3C+lz8rxLdNyAAAAAZasRjj5kiu0rDZcTxMUYJTGrAsNjCOHf61a/mGX0mSCAAAAAmOlqOJKCJXIKyT1mOcJ244CMl5J9gIWioIY77zfjgVyAAAABr/BMg7444dgZhEXrFdTA6drJgtdLxenx/9/e1c29+NCAAAAA049zhcAj+XZFHjt1SaA3SGg0MVLXIItbr5/zgar5XQCAAAAApjQhdzFptFfkb47geK0ju+M9iQnfiP+CuftITDFR9ACAAAADV9cQVV8cVxkUs1CEdzzHDyDLaC9u3V5+J3rtBlr0XZyAAAAD7yxu25D2vhQpwDb81rT0zFS8PYVwv7O9djKcbeZytFSAAAAC/0QTxMIYY1kka2bo3XkbhkXqS/8A6dsTYz3QsOlyMJjAAAAC+vMK5IKixbedGVdGKtgo1p6uZ0xHQB0FqHMycvnMSscp0rh0/S2eFL308KiCf9RIwAAAA1cmQcWetrmSMqOHJPDQ71ZFWTEFDNzVWhT/24MtZs3ZQoCZDvSc8TgeTRWOEzioSMAAAALPwbbBRCKlzGo4RWM8iOOTTLASoWI8U9FRrq4Idh0GPFD47oPfX2rowTIkHAtwBlzAAAACH9odhN/xYAe8pUwB4jESUtAlxY/9ymRz4XvKnkniKf/lsNptK9aAyKLI+x9xd1AHTEiVhAAAAAA==
Now, we can verify the previously produced signature with any of our REST servers.
This can be done with the Verify Signature call. Make sure to set the
message and signature values in the body to the correct values. Our sample
request body with the previous values is:
{
    "message": "HelloWorld!",
    "signature": "AzAAAAChmjea5ftrkXpzP13pTKuKWbJBhUoIMW+PW0JioaEer+qT4umU8VZRf0v/PXeZsAwwAAAAx/tI/3l1qaryKaueM7nDPWRcUuI59WY8U2gx8fjoToFmI1RaArtVzAzhK1Ib+YUOMAAAANDO6sCX8NECtYx1K5J4eZhEz2grQcTliIImHYzcoymjxDLGKDp/zF0w02PRJdGFhSAAAACXRP0u+rWfkI/NWCxcqhSo/mbUxo0oBR3C+lz8rxLdNyAAAAAZasRjj5kiu0rDZcTxMUYJTGrAsNjCOHf61a/mGX0mSCAAAAAmOlqOJKCJXIKyT1mOcJ244CMl5J9gIWioIY77zfjgVyAAAABr/BMg7444dgZhEXrFdTA6drJgtdLxenx/9/e1c29+NCAAAAA049zhcAj+XZFHjt1SaA3SGg0MVLXIItbr5/zgar5XQCAAAAApjQhdzFptFfkb47geK0ju+M9iQnfiP+CuftITDFR9ACAAAADV9cQVV8cVxkUs1CEdzzHDyDLaC9u3V5+J3rtBlr0XZyAAAAD7yxu25D2vhQpwDb81rT0zFS8PYVwv7O9djKcbeZytFSAAAAC/0QTxMIYY1kka2bo3XkbhkXqS/8A6dsTYz3QsOlyMJjAAAAC+vMK5IKixbedGVdGKtgo1p6uZ0xHQB0FqHMycvnMSscp0rh0/S2eFL308KiCf9RIwAAAA1cmQcWetrmSMqOHJPDQ71ZFWTEFDNzVWhT/24MtZs3ZQoCZDvSc8TgeTRWOEzioSMAAAALPwbbBRCKlzGo4RWM8iOOTTLASoWI8U9FRrq4Idh0GPFD47oPfX2rowTIkHAtwBlzAAAACH9odhN/xYAe8pUwB4jESUtAlxY/9ymRz4XvKnkniKf/lsNptK9aAyKLI+x9xd1AHTEiVhAAAAAA=="
}
Note that the group identifier is given as a parameter in the querystring. Thus, there is no need to specify it. The produced result is:
{
    "result": true
}
Feel free to play with the arguments and check that a wrong message-signature
pair produces a false result.
GL19 allows converting signatures, which is the term chosen to refer to the action of passing a set of signatures (potentially by different signers) to the converter, who process them in a manner that lets the requestor know which subsets of signatures were issued by the same signer.
However, in order to prevent the converter from learning the contents of the signatures and messages, they are blinded first (specifically, encrypted using ElGamal). Now, we'll show how to do this blinding.
The blind.py script (available in the pygroupsig-cli container, does precisely
that, albeit for only two signatures (it is trivial to extend to an arbitrary
number of signatures!). It also generates a fresh random ElGamal encryption
keypair. It expects 5 arguments, in the following order:
-
<grpkey str>: The string corresponding to the group key. -
<sig1 str>: The string corresponding to the first signature to blind. -
<msg1 str>: The message that corresponds to sig1. -
<sig2 str>: The string corresponding to the second signature to blind. -
<msg2 str>: The message that corresponds to sig2.
Generate a second signature, like we did before, and run the command. It should look something like this:
python blind.py AwAwAAAA9Iv8Op9GGVzWj1RE7pK8BJuZVoaNj7QhM6HYAkw9BF5Lq4WTyxpdZv1qeXEN9kSTYAAAAASRj/1QVvVjhm7YPrqdC1jDfF9OEp7ljgQnm/w3WGTa/P+kFAru0/ID4cDVRu2kCNrxV5QAdBCb04U+Up0rdsqnvqYd503/293WKGKuGHPoNaea708g/umuNHLek+WvATAAAACW2lrKYC1zizZ/wbQAQ4q//+vxRiIDpiBCmtEAOB6biDA1SgMEgrMWnJ22pg0VZI0wAAAAA3rhn+L0OF5kXdwA/FWMDy5R8ohxiL2eSKx/JG/7NSYZdLY/O4CUN5nejhYxphcSMAAAAHZ5lUhBCbqabcSB9G0FQVVgt9gonP2NyUALraWXs7Ad2eT7ewmEp+hDdRgFedfmCzAAAAAkYpDFSj4udQpbDAjPMHhsQ0rHMiIDGDAI1Bj52qTlFmIp40717QY2qc90h4bUEwIwAAAAyedIK14aWUp3WCgoYRIy3I/1ajO2ntf0RZpl7u1Jt8+4ssRzFuEnZ9essao3drQNYAAAAHoBXxV4D+Hmunr+iLOTehod+f0osMsHGuWbZF1l+/bkyEOo1BV1dnEbmxaZTVtSGaMsbtxh5f3WtF1cjlwOt7Is4RMfhLT4aCc10QWTPOa5TlnEWkrK59YbxpQbwDAHCzAAAADpNq0gNdbNCO32Ce/WQvsoOIuU305OzSn0MlXNELm0031KYFUNAGYnAgSL2DYmO4owAAAAAPwyzkgXjHqU4uGFL902uIW7QlozCugZE5i3i1pfHUaBUgR7dIMW8e9sRKAOycSR AzAAAAChmjea5ftrkXpzP13pTKuKWbJBhUoIMW+PW0JioaEer+qT4umU8VZRf0v/PXeZsAwwAAAAx/tI/3l1qaryKaueM7nDPWRcUuI59WY8U2gx8fjoToFmI1RaArtVzAzhK1Ib+YUOMAAAANDO6sCX8NECtYx1K5J4eZhEz2grQcTliIImHYzcoymjxDLGKDp/zF0w02PRJdGFhSAAAACXRP0u+rWfkI/NWCxcqhSo/mbUxo0oBR3C+lz8rxLdNyAAAAAZasRjj5kiu0rDZcTxMUYJTGrAsNjCOHf61a/mGX0mSCAAAAAmOlqOJKCJXIKyT1mOcJ244CMl5J9gIWioIY77zfjgVyAAAABr/BMg7444dgZhEXrFdTA6drJgtdLxenx/9/e1c29+NCAAAAA049zhcAj+XZFHjt1SaA3SGg0MVLXIItbr5/zgar5XQCAAAAApjQhdzFptFfkb47geK0ju+M9iQnfiP+CuftITDFR9ACAAAADV9cQVV8cVxkUs1CEdzzHDyDLaC9u3V5+J3rtBlr0XZyAAAAD7yxu25D2vhQpwDb81rT0zFS8PYVwv7O9djKcbeZytFSAAAAC/0QTxMIYY1kka2bo3XkbhkXqS/8A6dsTYz3QsOlyMJjAAAAC+vMK5IKixbedGVdGKtgo1p6uZ0xHQB0FqHMycvnMSscp0rh0/S2eFL308KiCf9RIwAAAA1cmQcWetrmSMqOHJPDQ71ZFWTEFDNzVWhT/24MtZs3ZQoCZDvSc8TgeTRWOEzioSMAAAALPwbbBRCKlzGo4RWM8iOOTTLASoWI8U9FRrq4Idh0GPFD47oPfX2rowTIkHAtwBlzAAAACH9odhN/xYAe8pUwB4jESUtAlxY/9ymRz4XvKnkniKf/lsNptK9aAyKLI+x9xd1AHTEiVhAAAAAA== HelloWorld! AzAAAABPPe//6rZMqEre5h0/3hU3eJc9ESENRO0jLcEidih0LRuHqF5uPzPYi5wc8T5xg4QwAAAAJIsDtwdqRRN7Vzf3GTEvpvlY2BQxqCWobC3d2DLE2Mkb9du2Fh36vUjV90IJ69WTMAAAANBU07vBPHJ4KKaS7KGlcmIjNAsBrnYmKTAnbLSQOc0VAs0AlBXdW8MUIk4XNWNGGCAAAAAKBVFO0lIPDhi7vaqZE4SrvoYgb6m/Wh56GtHz3UpmZyAAAAALtKv3lAJvOXh5xPusjgEPAapqzh6PDi004ExkuXC1PiAAAADU0lPfWT20oQm9omMwNfPA4Oj1B3Of1VhXRAF/MMSPHCAAAAACgSdfJcEVwZUu/WBZXxmN/NE71kBswzdxAmUqoDcZECAAAABO6N7bW2/6L7pn2wn8ftnX0g817YKAloWfdo2yoCKYTCAAAAAHeh39L+6EVcvr51BtN0LV/R+hipelvhx7GtcDkdzrTCAAAAAuwkrW7TaDH8S/eTh+O7ABd0YHPARFEKhse56XTfoeUSAAAABE4GVxGVwJvrYwZmNtkBOA5tG7uLsheGpxTqsvRv72VCAAAAC7RdjBDQdrQ5qFQwk988idl1+EDA3POZbuPfF5VnB5FTAAAAC2n+thqjqGJ9xB94IevlYDSeSNdBMPybkbonMum++2m+RR3OyPFBIge3+7jc46NQIwAAAAeXNAcPWxN8wIJJ+pwjb9QzQ92Cw7LXOmy89bn+F8QChtJ6pxEwXdBcieCxv5sn0GMAAAAGcLhRgQY1kN0ed1P6l4QpPfANLTuzfxdtyoUXN6i1alR9L7hrRuNg6kHdkjk2+7ljAAAABvY4g6GakFBOPj5sS7WhhIduEc9+cPGcCh5lRMKD5yJ3/GALtNxOrTu6NPPUs+yZDTEiVhAAAAAA== HelloWorld2!
As result, you will get two blinded signatures, the public part of the blinding keypair, and the full blinding keypair. It should be similar to the following:
Blinded sig1: AzAAAACKQtWhoo5ElH+aXtTtir988qUvptfXJa0McGhFNLqt075yg/hrahTByuhB8SbCcxMwAAAAMsxbMH5o8N4AfBxfiNLS29BivOyzxfnch6wffWJp7kFNoofSF3WFQ6kGZVqvmgMOMAAAAOZyCLkjXipMwsvwfsU5j0u9c8Zp2K6D6HUY86DFsJr3bwEUEXKVBv9FP+3eWFQkDDAAAACrUjivlEuvW74FhseJBCTrPzN4iFmW91pu+Wwnai/70tdhTcEWCJliXN3Bv7r4ggUwAAAABlppgciLTdwDZmGrXxLwg3L8wlUH5AohOTZ4zDbSEvNq0YtdPEsqUvu1zxRgkHyH
Blinded sig2: AzAAAABz/5uQICrGWVb+S8uRVGQWIVnXzCPnywuO0ioPYbxZVEC+4MGbt5K4y1yK5UnK8wYwAAAAH17OH/fjPNMNnFr4Qqn/1l8y1PNWKnxNks8XYsh5AVFesmq7q8AzgjxkNM5FjgUXMAAAAI8mCmKUTkHiqN+qQwRMlXUco/wtMcu9wgQamphzAdRqa8a5GstuX4xlwBAct1rymTAAAAC/dkuyY+xGTpSlsfph/VjdSYntXJTbGCHCPdvm35rrz9evM57gt/QQCVRC1x0+14AwAAAAUkmguH3gB/mc3LFIL9IoQpOZkSfDX70+r59IH+ebnxXTAnwLnNjnXR0BEl0MaCcF
Blinding public key: AwMwAAAAfcnnGw62uKH1ukxrRcxSfk4dQtT7UqwRWSSSoBJzRqV66byP1h7HiO3G+uGcv/mUAAAAAA==
Blinding keypair: AwMwAAAAfcnnGw62uKH1ukxrRcxSfk4dQtT7UqwRWSSSoBJzRqV66byP1h7HiO3G+uGcv/mUIAAAACJv0p4fXeG1DfBgMT5YDG+TjLNXXMLFdnO5MAH4kNNC
With the blinded signatures, and public blindind key, we can already query the
converter, in the libgroupsig-rest container running at port 3001. The query
can be done with the Convert signatures call in Postman. There, in the body,
you have to specify the blinding key (only the public part!), which you can get
from the result of the blind.py script; and the blinded signatures that you
want to convert. For our example, it looks like this:
{
    "bldkey": "AwMwAAAAfcnnGw62uKH1ukxrRcxSfk4dQtT7UqwRWSSSoBJzRqV66byP1h7HiO3G+uGcv/mUAAAAAA==",
    "blindedSignatures": [
        "AzAAAACKQtWhoo5ElH+aXtTtir988qUvptfXJa0McGhFNLqt075yg/hrahTByuhB8SbCcxMwAAAAMsxbMH5o8N4AfBxfiNLS29BivOyzxfnch6wffWJp7kFNoofSF3WFQ6kGZVqvmgMOMAAAAOZyCLkjXipMwsvwfsU5j0u9c8Zp2K6D6HUY86DFsJr3bwEUEXKVBv9FP+3eWFQkDDAAAACrUjivlEuvW74FhseJBCTrPzN4iFmW91pu+Wwnai/70tdhTcEWCJliXN3Bv7r4ggUwAAAABlppgciLTdwDZmGrXxLwg3L8wlUH5AohOTZ4zDbSEvNq0YtdPEsqUvu1zxRgkHyH",
        "AzAAAABz/5uQICrGWVb+S8uRVGQWIVnXzCPnywuO0ioPYbxZVEC+4MGbt5K4y1yK5UnK8wYwAAAAH17OH/fjPNMNnFr4Qqn/1l8y1PNWKnxNks8XYsh5AVFesmq7q8AzgjxkNM5FjgUXMAAAAI8mCmKUTkHiqN+qQwRMlXUco/wtMcu9wgQamphzAdRqa8a5GstuX4xlwBAct1rymTAAAAC/dkuyY+xGTpSlsfph/VjdSYntXJTbGCHCPdvm35rrz9evM57gt/QQCVRC1x0+14AwAAAAUkmguH3gB/mc3LFIL9IoQpOZkSfDX70+r59IH+ebnxXTAnwLnNjnXR0BEl0MaCcF"
    ]

}
And the corresponding curl command is:
curl --location --request POST 'http://localhost:3001/v1/group/1/signature/convert' \
--header 'Content-Type: application/json' \
--data-raw '{
    "bldkey": "AwMwAAAAfcnnGw62uKH1ukxrRcxSfk4dQtT7UqwRWSSSoBJzRqV66byP1h7HiO3G+uGcv/mUAAAAAA==",
    "blindedSignatures": [
        "AzAAAACKQtWhoo5ElH+aXtTtir988qUvptfXJa0McGhFNLqt075yg/hrahTByuhB8SbCcxMwAAAAMsxbMH5o8N4AfBxfiNLS29BivOyzxfnch6wffWJp7kFNoofSF3WFQ6kGZVqvmgMOMAAAAOZyCLkjXipMwsvwfsU5j0u9c8Zp2K6D6HUY86DFsJr3bwEUEXKVBv9FP+3eWFQkDDAAAACrUjivlEuvW74FhseJBCTrPzN4iFmW91pu+Wwnai/70tdhTcEWCJliXN3Bv7r4ggUwAAAABlppgciLTdwDZmGrXxLwg3L8wlUH5AohOTZ4zDbSEvNq0YtdPEsqUvu1zxRgkHyH",
        "AzAAAABz/5uQICrGWVb+S8uRVGQWIVnXzCPnywuO0ioPYbxZVEC+4MGbt5K4y1yK5UnK8wYwAAAAH17OH/fjPNMNnFr4Qqn/1l8y1PNWKnxNks8XYsh5AVFesmq7q8AzgjxkNM5FjgUXMAAAAI8mCmKUTkHiqN+qQwRMlXUco/wtMcu9wgQamphzAdRqa8a5GstuX4xlwBAct1rymTAAAAC/dkuyY+xGTpSlsfph/VjdSYntXJTbGCHCPdvm35rrz9evM57gt/QQCVRC1x0+14AwAAAAUkmguH3gB/mc3LFIL9IoQpOZkSfDX70+r59IH+ebnxXTAnwLnNjnXR0BEl0MaCcF"
    ]

}'
The result of this query, should look as follows:
{
    "result": [
        "AzAAAAAX17wvQBHflF5/uoPTMz7g6KgV2K8+wwS/2F3acT70sLLY74DZxTJInutOPJOPBQowAAAAd7wYoVRpq229bVCVq085WTnHUryqRjqazAfiC3CG34aDtHlDEHkIrmTadMDVwVoFMAAAAAAAAAAAAAAAAAAAAAAAAAAAAAAAAAAAAAAAAAAAAAAAAAAAAAAAAAAAAAAAAAAAADAAAABz7nNZ8q/JjbxU8nmg3zxuaOkIraf9xLDuIYbtHOXlXJArJ1blL7OW8t1YlZ573AQwAAAAqUdxN1lyAosfEfhEs/QsY+FNSDjVzcUxEWq4OBLtOrXOhLu+68ejSAWK3bM4DkOK",
        "AzAAAAAUtNUGbTP58U3H9yh0LhBiCTJrRdFTmulRf1u1xhtCW3MDabEJ0PmVilW5lI5lUxEwAAAAUETpC2KgXME641iwSj0s1AGi92XhY6J7WOz/EjHGsWHuBMyzNkdcBOVDp+fzFlOHMAAAAAAAAAAAAAAAAAAAAAAAAAAAAAAAAAAAAAAAAAAAAAAAAAAAAAAAAAAAAAAAAAAAADAAAAB3R9XSIfdhdk5XiXYryaz0T8yneXRfx2QNXmiQQwWHUyj57oBkFFguM/iWK5C+pocwAAAA2nE1ZLb7tCVXyf6K+VG9eNB+ksywehPiF8to9uMp3EGqsTSXw3SshM4BGtwy1NYD"
    ]
}
That is, it gives back an array of blindly converted group signatures, that now we can unblind with our scripts.
The result given by the converter in the previous step, already includes converted (linked) signatures. But we have to unblind them. For that, we will need the blinding keypair (the full keypair, which also contains the private decryption key).
To do the unblinding, we can use the unblind.py script, which is also
located in the pygroupsig-cli container. The script expects the following
arguments:
-
<bldkey str>: The string representing the full blinding keypair. The one thatblind.pyprinted out as part of its ouptut. -
<csig1 str>: One of the blindly converted signatures returned by the converter in the previous query. -
<csit2 str>: The other blindly converted signature returned by the converter.
Your command should look like the following:
python unblind.py AwMwAAAAfcnnGw62uKH1ukxrRcxSfk4dQtT7UqwRWSSSoBJzRqV66byP1h7HiO3G+uGcv/mUIAAAACJv0p4fXeG1DfBgMT5YDG+TjLNXXMLFdnO5MAH4kNNC AzAAAAAX17wvQBHflF5/uoPTMz7g6KgV2K8+wwS/2F3acT70sLLY74DZxTJInutOPJOPBQowAAAAd7wYoVRpq229bVCVq085WTnHUryqRjqazAfiC3CG34aDtHlDEHkIrmTadMDVwVoFMAAAAAAAAAAAAAAAAAAAAAAAAAAAAAAAAAAAAAAAAAAAAAAAAAAAAAAAAAAAAAAAAAAAADAAAABz7nNZ8q/JjbxU8nmg3zxuaOkIraf9xLDuIYbtHOXlXJArJ1blL7OW8t1YlZ573AQwAAAAqUdxN1lyAosfEfhEs/QsY+FNSDjVzcUxEWq4OBLtOrXOhLu+68ejSAWK3bM4DkOK AzAAAAAUtNUGbTP58U3H9yh0LhBiCTJrRdFTmulRf1u1xhtCW3MDabEJ0PmVilW5lI5lUxEwAAAAUETpC2KgXME641iwSj0s1AGi92XhY6J7WOz/EjHGsWHuBMyzNkdcBOVDp+fzFlOHMAAAAAAAAAAAAAAAAAAAAAAAAAAAAAAAAAAAAAAAAAAAAAAAAAAAAAAAAAAAAAAAAAAAADAAAAB3R9XSIfdhdk5XiXYryaz0T8yneXRfx2QNXmiQQwWHUyj57oBkFFguM/iWK5C+pocwAAAA2nE1ZLb7tCVXyf6K+VG9eNB+ksywehPiF8to9uMp3EGqsTSXw3SshM4BGtwy1NYD
And the ouptuts, would be like follows:
Sig1:
	Nym: b'PG+LtyiP82gb1BDanem5GAjxA0/sT7KzqjGnHeEzZ/HlAeJ7BAq3NNe9K1csAy8G'
	Message: b'cFFyZjBCcUZQbnIrRGREUDZ2UmJ4bUdxMURxMmh3L2d4Sm5qWE9ndEo0MVdkZXhIT1FyYkVYbmFhUDVnY0Z3VA=='
Sig2:
	Nym: b'PG+LtyiP82gb1BDanem5GAjxA0/sT7KzqjGnHeEzZ/HlAeJ7BAq3NNe9K1csAy8G'
	Message: b'MGFab2hPNno0RmhZZVljL1VMa3cvYW1VYWFHWFAxbnc3aDFUdSsvUDAxSnZkQmdzU2lWanRQVWhIc0JFWSs2SQ=='
Of course, since in our example, the same signer produced both signatures, the
resulting Nym is the same. The messages shown are, rather than the messages
themselves, their hashes (which is what was encrypted in the blinding step).
Their presence is needed because the order in which the results are given by
the converter is not the same than the order in which the blinded
signature-message were passed -- they are permuted randomly, in order to
avoid third parties to learn extra information.
Feel free to try different examples: repeat the same query (several times) to check that the order is changed, try with signatures created by different signers, with more than two signatures...