How to create a task
This is intended to illustrate the steps you should/must follow to create a task with the necessary settings.
- Set Basic settings, here you have the following options:
- task name: we suggest to add a descriptive name as this is what all users are going to see.
- Context: this text area is intended to write the task description using the RST language. In order to help writing this context, you'll initially see a template to guide you trough this. This template must be modified with the corresponding task description. In case you want to understand more the RST language, there is a help button on the top with more information about it.
- Author: write your name as you are the author of this task.
- Submission mode: please keep this as 'individually'.
- Submission storage: here you are able to decide the amount of submissions to store. That means, if you put 5 then the last 5 submissions will be stored for each student.
- Submission limits: limits the number of submissions each student can do.
- Allow later submission: if this option is checked, the students will be able to do submissions after the deadline without affecting the grade. This is helpful for students that want to keep trying the problem to learn how to solve it.
- Accessible: here set the time frame the task will be accessible by students.
- 'random inputs' option is not used for our case, then do not modify the default values.
- Container setup:
Settings related to the sandbox and grading environment:
- Timeout limit: this is the CPU timeout in seconds to run all tests and give student a feedback. Do not set this value as it will be automatically calculated in a later process.
- Memory: is the maximum memory allowed in the submission. As well as in Timeout limit, do not set this value as it will be automatically calculated.
- Grading environment: select multiple_languages. This is the grading environment.
- No more settings are necessary.
-
Create a subproblem: This subproblem lets you pick the programming languages for the task among other settings.
-
Set the subproblem ID (this ID may be the same ID as the task ID or whatever you want).
-
Select the problem type, you should choose between Code multiple languages and Code file multiple languages. These problem types are explained below:
- Code multiple languages: This kind of task student must paste their code selecting the language.

- Code file multiple languages: for this type student is allowed to submit or send a project, this project is composed by multiple files (e.g. An ANTLR project).

Then you can click on 'add' button. As next step select the languages you want for your tasks, so the students can submit the code using the selected languages.
Note: If you change the Grading environment, the subproblem will be removed from the task and the Problem Type will change, so you will need to create a new one. This also occurs for Notebook tasks.
-
In case the subproblem type is Code file multiple languages, you should set the available extension files and the maxim file size. See How to submit a multilang code file task, as the files must have a specific extension and structure.
-
The Task files is the place where you put the necessary input/output files, files that will be used to assess the submissions. Following that, you can create a new file or upload one. Every input file will be a test case and an output file is used to compare with the output of student's code to check equality. We suggest to name these files as number_test_case.in for the case of input files (e.g. 1.in) and number_test_case.out (e.g. 1.out) as they automatically will be paired, reducing time in the next step.
However you are free to name them as you want. Also, it would be a good idea to upload the solution code for the task.
-
Create the Grader:
Here you must configure how the task is going to be assessed:
- Generate grader automatically: make sure it is checked as this will generate all configurations files to grade the code and give student the desired feedback.
- Maximum diff lines: is the maximum of difference lines the grader is going to compute.
- Show runtime errors: In case it is not checked, the student's result is either ACCEPTED or WRONG_ANSWER. If checked, it shows additional errors like RUNTIME_ERROR or TIME_LIMIT_EXCEEDED.
- Ignore Presentation error: In case it is checked, the presentation errors will be ignored when grading the student's submission. A PRESENTATION_ERROR is returned when the data in the output is correct, but it is not formatted in the proper way as in the expected output.
- Time limit test cases: Set the maximum time a test case can take to run the student's code. This determines when a TIME_LIMIT_EXCEEDED error occurs.
- Memory limit test cases: Set the maximum memory student's code can take for a every test case. This determines when a MEMORY_LIMIT_EXCEEDED error occurs.
- Output limit test cases: Set the maximum output the student's code can generate for every test case. This prevents the code to fill grader environment memory. This determines when a OUTPUT_LIMIT_EXCEEDED error occurs.
- Test cases section: Here you can add all the test cases to test the task. Every test case corresponds to an input/output files pair, being the files that you have added previously in Task files section. Once you add a test case you can set the weight; this the test case weight to calculate final grade. Also, you can check the option Show differences to show student more information when that test case is not succeeded, also you can write some custom feedback that will be shown to the students for each test case.
-
(Optional) Code template: in case you want to show the students an initial template so they can use it as a start point to solve the problem, use this tab. For that, you must select a language to add a template and select the file corresponding to that template. To upload a code template file, go to the Task files tab and upload it there. Once the file is uploaded, the file should be shown in the Code preview tab.
When the task is save and the student selects the language to do the submission, the code template will be shown.
-
(Optional) Task editorial: In the task editorial tab you can write a tutorial in RST language to help the students to understand the development of a possible solution to the task.
You can also add that solution by selecting a language from the previously chosen languages for the task subproblem, and the solution code in that language.
Both the tutorial and solution will be shown to the students when the task submission deadline ends.
-
(Optional) Task hints: You can create hints to help students to solve the problem and apply a penalty to the student's grade when he unlock the hints. You must set a title and content for the hints that you want to show to students.
Also, you can add a penalty for the hints if you want, which will be applied as a percentage of the final grade of the student, thus set a penalty from 0.0% to 100.0%.
-
Save the task and test!
This is a different type of task where students are given a Jupyter Notebook template to be solved. Then they upload a .ipynb file with their solution and receive feedback from the automatic grader. Check this Jupyter Notebook example to understand more about Notebook tasks and how to create the students' version of the notebook.
Follow next steps to create this type of tasks:
-
Container setup:
Settings related to the sandbox and grading environment:
- Timeout limit: this is the CPU timeout in seconds to run all tests and give student a feedback. Do not set this value as it will be automatically calculated in a later process.
- Memory: is the maximum memory allowed in the submission. As well as in Timeout limit, do not set this value as it will be automatically calculated.
- Grading environment: select Notebook as the grading environment.
- Allow Internet access inside the grading container? check this option in case the task requires to students Internet access, dataset download or other reasons.
-
Create a subproblem:
- Set the subproblem ID (this ID may be the same ID as the task ID or whatever you want).
- Select the problem type, you should choose between Notebook. Then 'add' the subproblem.
- Set maximum file size in case this is necessary, by default students can upload a 1 MB file.
-
Task files tab is the place where all configuration files are added. These files are created automatically in the next step.
-
Create the Automatic Grader:
Here you configure how the task is going to be graded and executed:
-
Generate grader automatically: make sure it is checked as this tells UNCode to automatically generate all configurations files to grade the code and give the student the desired feedback.
-
Show runtime errors: In case it is not checked, the student's result is either ACCEPTED or WRONG_ANSWER. If checked, it shows additional errors like RUNTIME_ERROR or TIME_LIMIT_EXCEEDED.
-
Datasets: In case your task requires additional files, such as datasets, it is necessary that the grading environment have access to these files. For that, you've got two options:
- Upload the file: In case the file is small (< 1 MB), you are able to upload the file in Task files tab.
- Set Dataset URL and Dataset filename fields so the file in the given URL is downloaded only once before grading the submission. For that it is necessary to set a name to the file so you will be able to loaded in the grading code.
-
Time limit test cases: Set the maximum time a test case can take to run the student's code. This determines when a TIME_LIMIT_EXCEEDED error occurs.
-
Memory limit test cases: Set the maximum memory student's code can take for a every test case. This determines when a MEMORY_LIMIT_EXCEEDED error occurs.
-
Tests section
In general, the way this kind of tasks are graded is using Python 3.6 code. You as instructor, must add some code that calls a functionality that students are asked to implement or solve (i.e. a function) and compare the result of calling this with an expected answer. This can be seen as Unit testing over the student's code. This code is parsed to a Doctest-like code where the code is executed like in a Shell of Python.
Additionally, bear in mind some modules might not be installed and available to grade submissions: Here is a list of available modules:
pandas numpy matplotlib scipy scikit-learn seaborn datascience plotly cufflinks bokeh tabulate nltk tensorflow Keras statsmodels. In case you might need an additional module, do not hesitate on reaching out for support.Here arises two concepts: a Test a way to divide the grading so every test in general groups a functionality to be tested; for instance, you asked students to implement a function that sums 2 numbers, thus, you'll have a Test to check and test the implemented function in the Notebook. A Test Case are smaller pieces that compose a Test where you add the different kind of cases the functionality must pass. Using the previous example, to test the sum function are some cases that must be accomplished: negative numbers, None values, positive number, large numbers, etc. Each one of these options can be seen as a separate case that compose a Test.
With that in mind, each field and option are explained bellow. Follow next steps:
-
Setup code for all tests: This is code that will be executed for all tests. That way you can reuse code and you won't copy the same code for all cases. For instance, the next code can be seen as setup code because it will be used for all cases where you read a dataset necessary for all tests:
import pandas as pd
import numpy as np
sal = pd.read_csv('salarios.csv')
-
Add a Test: This will open a modal window with all configuration fields for the Test:
- Test name: give a name to the Test, this name will be shown to students.
- Weight: weight test with respect the other Tests to calculate the partial grade.
- Custom feedback: optional value that shows to the students the feedback you want to show them to try helping them.
- Setup Code: this is the same reason of the previous setup code, the difference is that this Setup Code is executed for this specific Test. You can use all kind of Python 3.6 code. Useful to create functions or declare variables to be used in every case.
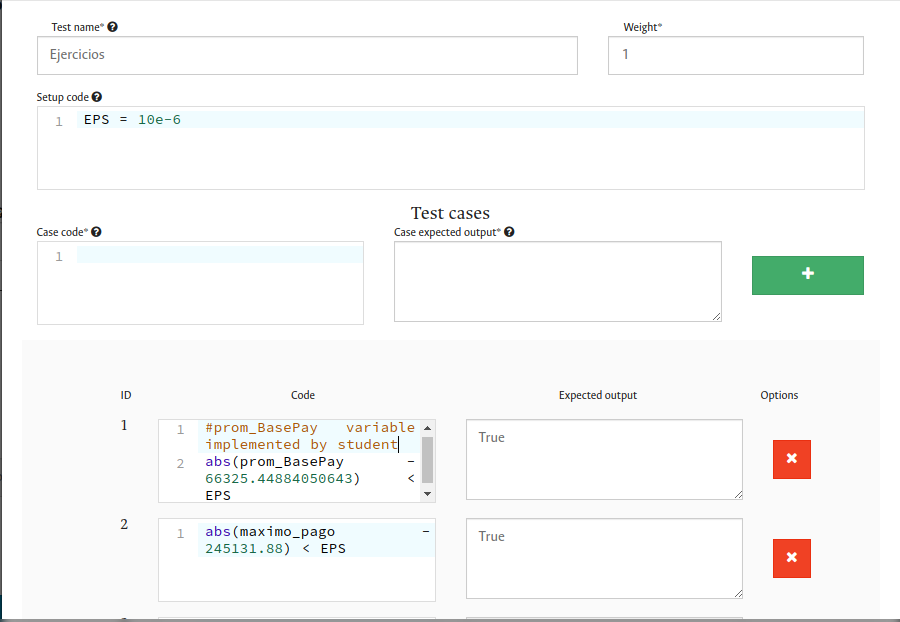
- Test Cases: as explained before, here you will add the different necessary cases to evaluate and correctly grade the submission. Here add the Case code and a Expected output to show students when they are wrong. Then click the '+' button to add it.
- After adding cases and settings, you can save the Test. This will be a appended in the Tests table where you can edit/delete them or select whether you want to show debug information to students. This will show the student the grader code in case their code failed.re
Here are some images of a already configured task:

-
-
-
(Optional) Task editorial: In the task editorial tab you can write a tutorial in RST language to help the students to understand the development of a possible solution to the task.
You can also add that solution by selecting a language from the previously chosen languages for the task subproblem, and the solution code in that language. To set the solution in a notebook task, you just need to choose a notebook file (.ipynb extension) from the task files you previously uploaded.
Both the tutorial and solution will be shown to the students when the task submission deadline ends.
-
(Optional) Task hints: You can create hints to help students to solve the problem and apply a penalty to the student's grade when he unlock the hints. You must set a title and content for the hints that you want to show to students.
Also, you can add a penalty for the hints if you want, which will be applied as a percentage of the final grade of the student, thus set a penalty from 0.0% to 100.0%.
-
Once you are done with the settings, save the task and test everything is correct and your solution code runs and gives the expected result.
Common problems: when testing, you may see that submission overflowed, this may be due to a too small memory limit in the setting so the sandbox container cannot start the grading.
This kind of tasks are similar to Multiple languages (Multilang) task but with some differences. Follow next steps to create this type of tasks:
-
Container setup:
Settings related to the sandbox and grading environment:
- Timeout limit: this is the CPU timeout in seconds to run all tests and give student a feedback. Do not set this value as it will be automatically calculated in a later process.
- Memory: is the maximum memory allowed in the submission. As well as in Timeout limit, do not set this value as it will be automatically calculated.
- Grading environment: select HDL. This is the grading environment for Verilog and VHDL tasks.
- No more settings are necessary.
-
Create a subproblem: This subproblem lets you pick the hardware description languages (Verilog or VHDL) for the task among other settings.
-
Set the subproblem ID (this ID may be the same ID as the task ID or whatever you want).
-
Select the problem type, you should choose between Code multiple languages and Code file multiple languages. These problem types are explained below:
-
Select Code multiple languages. Then you can click on 'add' button and select the hdl for the task. Currently, hdl tasks only support one kind of language per task.
Note: If you change the Grading environment, the subproblem will be removed from the task and the Problem Type will change, so you will need to create a new one.
-
The Task files is the place where you put the necessary input/output files, files that will be used to assess the submissions. Following that, you can create a new file or upload one. In the cases of HDL, we need two files. The testbench and the golden model, written in the same language of the task. The golden model file should be the solution of the task, and the testbench may contain the stimulus that will be applied to the golden model and to the student code. Besides the stimulus, to define what to compare, the testbench should include the code to write in the standard output, the inputs and outputs of each instant of time that should be the same in both codes. That output should have this format:
T, instant_of_time, INPUTS, input_1_name, input_1_value, ..., input_n_name, input_n_value, OUTPUT, output_1_name, _output_1_value, ..., output_n_name, output_n_value
This can be achieve using
$monitorand$displayin Verilog andreportin VHDL.For instance, following a example of testbench in Verilog and VHDL of a module call compXOR.
- Verilog:
module compXOR_TB;
    reg a;
    reg b;
    wire y;

    compXOR uut(a,b,y);
    initial
    begin

        a=0;b=0;#2
        a=0;b=1;#2
        a=1;b=0;#2
        a=1;b=1;#2
        $display("T, %d, INPUTS, a, %b, b, %b, OUTPUTS, y, %b",
                 $time, a, b, y);
        $finish;

    end
    initial begin
        $monitor("T, %d, INPUTS, a, %b, b, %b, OUTPUTS, y, %b",
                 $time, a, b, y);
    end
endmodule
- VHDL
-- Testbench for XOR gate
library IEEE;
use IEEE.std_logic_1164.all;

entity testbench is
-- Empty
end testbench;

architecture behavior of testbench is
  component compXOR is
    port (
      a: in std_logic;
      b: in std_logic;
      y: out std_logic);
  end component;
  signal a : std_logic;
  signal b : std_logic;
  signal y : std_logic_vector(0 downto 0);

  -- Change according with the inputs and outputs number
  function display(constant T: integer := 0; constant inp : std_logic_vector(1 downto 0);
                  constant otp : std_logic_vector(0 downto 0) ) return string is
    begin
      return "T, " & INTEGER'IMAGE(T) &
        ", INPUTS, a, " & std_logic'IMAGE(inp(1))(2) &
              ", b, " & std_logic'IMAGE(inp(0))(2) &
        ", OUTPUTS, y, " & std_logic'IMAGE(otp(0))(2) ;
    end function display;
  begin
    uut: compXOR port map (
      a => a,
      b => b,
      y => y(0)
    );

    stim_proc: process
    begin
      a <= '0'; b <= '0'; wait for 10 ns; report display(0, a & b, y);
      a <= '0'; b <= '1'; wait for 10 ns; report display(2, a & b, y);
      a <= '1'; b <= '0'; wait for 10 ns; report display(4, a & b, y);
      a <= '1'; b <= '1'; wait for 10 ns; report display(6, a & b, y);
      report display(8, a & b, y);
      wait;
    end process;
  end;
Also, it would be a good idea to create/upload a preview file to include the module/component name by defualt.
- Verilog:
-
Create the Grader:
Here you must configure how the task is going to be assessed:
- Generate grader automatically: make sure it is checked as this will generate all configurations files to grade the code and give student the desired feedback.
- Maximum diff lines: is the maximum of difference lines the grader is going to compute.
- Show runtime errors: In case it is not checked, the student's result is either ACCEPTED or WRONG_ANSWER. If checked, it shows additional errors like RUNTIME_ERROR or TIME_LIMIT_EXCEEDED.
- Entity (only on VHDL): When the task is set for VHDL, the name of the testbench entity should be set here.
Also, you need to select which file is the testbench and which one is the golden model.
-
(Optional) Code template: in case you want to show the students an initial template so they can use it as a start point to solve the problem, use this tab. For that, you must select a language to add a template and select the file corresponding to that template. To upload a code template file, go to the Task files tab and upload it there. Once the file is uploaded, the file should be shown in the Code preview tab.
When the task is save and the student selects the language to do the submission, the code template will be shown.
-
(Optional) Task editorial: In the task editorial tab you can write a tutorial in RST language to help the students to understand the development of a possible solution to the task.
You can also add that solution by selecting a language from the previously chosen languages for the task subproblem, and the solution code in that language.
Both the tutorial and solution will be shown to the students when the task submission deadline ends.
-
(Optional) Task hints: You can create hints to help students to solve the problem and apply a penalty to the student's grade when he unlock the hints. You must set a title and content for the hints that you want to show to students.
Also, you can add a penalty for the hints if you want, which will be applied as a percentage of the final grade of the student, thus set a penalty from 0.0% to 100.0%.
-
Save the task and test!
Tags tab is intended to create/assign tags to the task so that way you can categorize and organize every task or your students will see them.