Use mfgtool "uuu" to flash eMMC
MFGtool is the manufacturing tool provided by NXP. Here the mfgtool we use is mfgtools 3.0 - "uuu". This tool is able to be executed under windows and linux environment.
https://github.com/TechNexion/imx-mfgtools-tn
Download: prebuilt binary
(Note. libusb-1.0.dll is required for uuu to be excuted under MS windows. But it's absent in the link above.)
For more information about how to use uuu,
please refer to UUU.pdf in the link above.
- Install required packages for executing mfgtool
uuu
sudo apt-get install libusb-1.0.0-dev libzip-dev libbz2-dev
-
First, Set the boot jumpers to
Boot from serial download. Then, attach a USB Type-C peripheral cable to the board, and the other end to the host PC. -
Download Yocto release image from TechNexion FTP.
-
Extract xxx_yocto_xxx.zip, and there are
bootloader binaryandyocto imageinside.
-
Excute
uuuto start flashing process.
| Different instructions to flash image into eMMC |
|---|
| Burn image(.bz2) into eMMC |
sudo ./uuu/linux64/uuu -b emmc_img imx-boot-pico-imx8mm-sd.bin fsl-image-qt5-validation-imx-pico-imx8mm.sdcard.bz2/* |
| Burn image into eMMC |
sudo ./uuu/linux64/uuu -b emmc_img imx-boot-pico-imx8mm-sd.bin fsl-image-qt5-validation-imx-pico-imx8mm.sdcard |
| Burn whole image(.bz2) to eMMC and boot loader to eMMC boot area |
sudo ./uuu/linux64/uuu -b emmc_all imx-boot-pico-imx8mm-sd.bin fsl-image-qt5-validation-imx-pico-imx8mm.sdcard.bz2/* |
Note: The parameter 'emmc_all' would flash `fsl-image-qt5-validation-imx-pico-imx8mm.sdcard` to
eMMC and flash `imx-boot-pico-imx8mm-sd.bin` to boot0 partition of eMMC,
then enable boot partition of eMMC.
Wait few seconds to decompress, and it will start to flash to eMMC.

Here,
imx-boot-pico-imx8mm-sd.bin is the bootloader.
fsl-image-qt5-validation-imx-pico-imx8mm.sdcard.bz2 is the sdcard image compressed with .bz2 format.
- Once the flash process completes. Set the boot jumpers to
Boot from eMMCand reset the board to boot from eMMC.
-
First, Set the boot jumpers to
Boot from serial download. Then, attach a USB Type-C peripheral cable to the board, and the other end to the host PC. -
First, attach a USB Type-C peripheral cable to the board, and the other end to the host PC. Then, Set the boot jumpers to serial download mode.
-
Download Yocto release image from TechNexion FTP.
-
Excute
Windows Powershellorcmdwith administrator permission. -
Extract xxx_yocto_xxx.zip, and there are
bootloader binaryandyocto imageinside.
-
Excute
uuuto start flashing process.
.\uuu\windows64\uuu.exe -b emmc_all imx-boot-pico-imx8mm-sd.bin fsl-image-qt5-validation-imx-pico-imx8mm.sdcard.bz2/*
| Different instructions to flash image into eMMC |
|---|
| Burn image(.bz2) into eMMC |
.\uuu\windows64\uuu.exe -b emmc_img imx-boot-pico-imx8mm-sd.bin fsl-image-qt5-validation-imx-pico-imx8mm.sdcard.bz2\* |
| Burn image into eMMC |
.\uuu\windows64\uuu.exe -b emmc_img imx-boot-pico-imx8mm-sd.bin fsl-image-qt5-validation-imx-pico-imx8mm.sdcard |
| Burn whole image(.bz2) to eMMC and boot loader to eMMC boot area |
.\uuu\windows64\uuu.exe -b emmc_all imx-boot-pico-imx8mm-sd.bin fsl-image-qt5-validation-imx-pico-imx8mm.sdcard.bz2\* |
Note: The parameter 'emmc_all' would flash `fsl-image-qt5-validation-imx-pico-imx8mm.sdcard` to
eMMC and flash `imx-boot-pico-imx8mm-sd.bin` to boot0 partition of eMMC,
then enable boot partition of eMMC.
Wait few seconds to decompress, and it will start to flash to eMMC.

Here,
imx-boot-pico-imx8mm-sd.bin is the bootloader.
fsl-image-qt5-validation-imx-pico-imx8mm.sdcard.bz2 is the sdcard image compressed with .bz2 format.
- Once the flash process completes. Set the boot jumpers to
Boot from eMMCand reset the board to boot from eMMC.
- After starting
uuu, the board should enter tofastbootmode and wait for request from host PC:
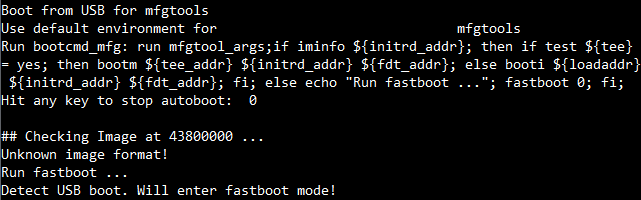
If it stops in fastboot mode, it might need to install USB driver under MS windows.
Please refer to Use zadig to install winusb driver chapter in UUU.pdf in MFGtool github)

- Enter shell mode is helpful to check
uuufails on what step. Add-sto enter shell mode. uuu.inputlog record all input commands you can use "uuu uuu.inputlog" next time to run all commands
.\uuu\windows64\uuu.exe -s -b emmc_all imx-boot-pico-imx8mm-sd.bin fsl-image-qt5-validation-imx-pico-imx8mm.sdcard.bz2/*