Our project is a set of Dilated Neural Net models that detects facial image manipulations including facial warping, skin tone editing, and skin smoothing. The goal was to produce strong models capable of detecting these three manipulations to improve and speed up the fact checking process on social networks. With the rise of misinformation online, we particularly direct our efforts to low-tech image manipulations or “CheapFakes” because of their greater use in online misinformation. While DeepFakes have been gaining prominence and notoriety, CheapFakes still remain the most popular form of media manipulation online. In particular, the MIT Technology Review wrote in 2020 that despite the lower quality of CheapFakes, “The cheapfake is now at the heart of a major international incident.”.
To combat facial CheapFakes, we have produced one comprehensive model aimed to detect all three of these manipulations, as well as three separate models geared towards detecting each specific manipulation. We base our product off existing work by Wang et al. which is referenced at the bottom of this document. You can run our models on this website interface.
Throughout this project, we were advised by FakeNetAI, a Berkeley startup commited to detecting manipulated media. We thank them for their support and for helping us build our end product.
There are three folders in this repo. The Data Generation folder contains the contents of our data generation process. In this is the Script.jsx file that we used to script facial warps in Photoshop, and the open-source Skin-Tone Editing algorithm that we used to create our data.
In order to automate the facewarp scripting process, you must first open Photoshop. Then open the "Actions" tab under Window, and select the option to create a new action. Define your action settings, and press record. While recording, select File -> Scripts -> Browse, and then open the Script.jsx file. Press the stop record buton on the Actions tab, and the script will be saved as a Photoshop action. To apply this action on a large dataset, select File -> Automate -> Batch. This will prompt a screen. Under action, select the action you saved the script as and then select the source folder where your unedited photos are located. Finally, select the destination folder you would like to save the edited images to, and press ok. For reference on how to use Photoshop's batch editing feature, see this video.
To replicate our skin tone changing data generation, open the Skintone Script.ipynb file. In the second cell, set "unedited_path" to the file path of the folder of images you would like to edit in the following format: "Demo/Training Set/Unedited/". Then, in the same format, set "edited_path" to the file path of the folder you would like to save edited photos in. Note that the algorithm does not always work, and any photos that do not process correctly are deleted from the unedited path to ensure a balanced dataset.
To produce our skin smoothing dataset, we used more manual commands in Photoshop, and do not have a script to be uploaded here.
To view and download the datasets used to generate our models, you can go to this link.
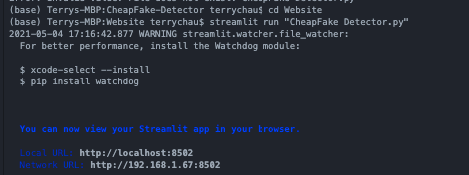
The Website file is what we use to run the model for our user interface. Note that much of the code in this file used to detect faces and input images into our model is taken from the aforementioned researcher’s github repo. However, we have made minor modifications such that the code works with our specific model types. Furthermore, the CheapFake_Detector.py file is the code we produced to link our model to the user interface via a python UI package called streamlit. In order to use the user interface locally, first pip install all requirements in requirements.txt. Then, simply run “Streamlit run ‘CheapFake Detector.py’ ” in the terminal when in the Website folder, and the Streamlit module will open a local version of the website:
In order to run the interface, we also have our model weights under the models folder.
As for how our solution works, we have our model training code in the “Training folder”. Like the reference research paper, we also use the DRN model written by Yu et al. While they included a basic pytorch training loop, we expanded on that in regards to data augmentation and more sophisticated lr scheduling. In order to run training yourself, create a dataset folder containing a train and val folder, each of which should contain two folders of Edited and Unedited images. Now, you can run Train.ipynb, although you may need to update the dataset location in the python command. By default, it points to ~/datasets/.
For reference, we have included approximately 2,000 training photos, and 500 validation photos in the Demo folder located within the Training folder.
Reference Paper: https://peterwang512.github.io/FALdetector/
DRN source code: https://github.com/fyu/drn
Skin-tone Editing code: https://github.com/cirbuk/skin-detection
Flickr Face Dataset: https://www.kaggle.com/arnaud58/flickrfaceshq-dataset-ffhq
Yonsei University Real and Fake Face Detection dataset: https://www.kaggle.com/ciplab/real-and-fake-face-detection
