Containers
On iOS, the view controller is an essential concept to help you cleanly separate your code into units with well-defined boundaries and responsibilities. When adding a screen to an application, you namely start by creating a view controller and install it somewhere within the view controller hierarchy. Managing the view controller hierarchy is (and should be) achieved using containers, which guarantee that the view controllers they present can reliably know when they are appear, disappear or rotate.
UIKit sadly only offers a limited number of containers. When you want to display a view controller in a way that is not implemented by any of the UIKit containers, you are on your own. This is why iOS 5 introduced a containment API whose purpose is to help you write containers easily.
To relieve you from the intricacies of view controller containment, CoconutKi introduces a set of container view controllers which have been carefully implemented, and with which you will be able to manage your view controller hierarchy like never before. If this does not suffice, CoconutKit also offers a rich containment API with which you will be able to easily implement your own containers.
If you think for a while, you realise that the simplest forms of view controller containment are:
- Composition: One or several view controllers are embedded within a container view controller, which displays them simultaneously. An example is
UISplitViewController - Stacking: A stack of view controllers is managed by a container view controller. View controllers are added or removed from the stack, and interaction is restricted to the topmost view controller. An example is
UINavigationController
CoconutKit introduces two generic containers, one for composition, the other one for stacking. Those can be easily combined, even with UIKit containers, letting you create complex view controller hierarchies.
Basically, UITabBarController is a container made of:
- A large view where a single view controller is displayed
- A tab bar which toggles between the view controllers managed by the tab bar controller
A UITabBarController is therefore a container embedding one child view controller (even if an array of view controllers is provided, in practice only one view controller is part of the view hierarchy at any time). Similarly, UISplitViewController is a container displaying two view controllers simultaneously, side by side.
Both containers are concrete examples of view controller composition. They suffer from several limitations, though, most notably the fact you cannot display more than two view controllers simultaneously, and that you cannot easily customise how view controllers are presented.
CoconutKit HLSPlaceholderViewController is a generic container class for view controller composition. It can display an arbitrary number of view controllers simultaneously, while letting you customise the container view as you want. HLSPlaceholderViewController is not mean to be instantiated directly. As for UIViewController, you must subclass it to create its view layout, either using a xib file, or programmatically by implementing the -loadView method.
When you want to navigate between screens of content, you usually use a UINavigationController container. HLSStackController can be seen as a generic navigation controller, which allows you to push and pop view controllers with any kind of transition animation. CoconutKit stack container provides advanced view hierarchy management: You can namely insert or remove a view controller anywhere in the stack, and instantly pop to a specific view controller. As for UINavigationController, HLSStackController is not meant to be subclassed, but rather instantiated as is.
CoconutKit containers can be used with storyboards, which are a way to design your interface entirely using Interface Builder. They can be used to quickly create part of the view controller hierarchy, or even its entirety.
Each CoconutKit container has an associated set of segue classes:
-
HLSPlaceholderViewControllerprovidesHLSPlaceholderInsetSegueto set the view controller to be displayed at some index. The source view controller of anHLSPlaceholderInsetSeguecan either be a child view controller, or the container itself -
HLSStackControllerprovidesHLSStackPushSegueto push a view controller. Popping can either be made programatically or through segue unwinding, available since iOS 6.
As usual, segue customisation is achieved by having the source view controller implement the -prepareForSegue:sender: method. This is how you set the transition animations and durations for CoconutKit container segues.
CoconutKit containers sadly cannot benefit from the same tight integration with Interface Builder as built-in UIKit containers. For example, when you drop a UINavigationController onto a storyboard, there is automatically an associated root view controller. For custom containers, we only can drop standard view controllers and bind them using segues, no such mechanism is therefore available. Instead, CoconutKit containers introduce a set of reserved segue identifiers:
-
HLSPlaceholderInsetSegue: To preload a view controller at some indexN, bind the placeholder view controller with it using a segue bearing the reserved identifierhls_preload_at_index_N. Due to implementation constraints,Nmust be an index between 0 and 19, which should be sufficient in practice -
HLSStackPushSegue: To set the root view controller of a stack controller, bind it with a segue bearing the reserved identifierhls_root
By combining placeholder view controllers as well as stack controllers (and also UIKit containers if you want), you can build your view controller hierarchy entirely using storyboards. For example, the CoconutKit demo contains an example where a placeholder view controller is displayed within a stack controller:

When run, the stack controller displays a placeholder view controller, whose left child is already loaded:

By clicking on the 1 and 2 buttons on the left, other view controllers can be displayed on the right. Two buttons at the bottom can be used to push another view controller on top of the placeholder view controller, either using a push animation or a cover animation.
- Storyboards let you add a special kind of view called Container View, which directly embeds a view controller:

- Custom segues also appear in Interface Builder:

CoconutKit implements a set of transition animation classes (see HLSTransition.h), which you can use when adding a view controller to a CoconutKit container. All transitions are subclasses of HLSTransition. If none of them suits your needs, you can subclass HLSTransition yourself and implement the animation you exactly want.
Subclasses must implement the following mandatory method:
+ (NSArray *)layerAnimationStepsWithAppearingView:(UIView *)appearingView
                                 disappearingView:(UIView *)disappearingView
                                           inView:(UIView *)view
                                       withBounds:(CGRect)bounds
This method must return an array of HLSAnimationStep objects describing the animation to be used when adding a view controller to a container. They can optionally implement a method to explicitly set the reverse animation to be played when removing a view controller from the container (if this method is not implemented, the insertion animation is simply played backwards):
+ (NSArray *)reverseLayerAnimationStepsWithAppearingView:(UIView *)appearingView
                                        disappearingView:(UIView *)disappearingView
                                                  inView:(UIView *)view
                                              withBounds:(CGRect)bounds
Autorotation behaviour has changed with iOS 6. Prior to iOS 6, UIKit containers checked their visible child view controller to know whether rotation could occur or not. This is not the case anymore on iOS 6, and containers are now free to rotate without asking their child view controllers.
CoconutKit introduces on all UIKit and CoconutKit containers an autorotationMode property, with which you can set the behaviour you want:
-
HLSAutorotationModeContainer: The default UIKit behaviour is used (as said before, this differs between iOS versions). This is the default value -
HLSAutorotationModeContainerAndNoChildren: The container only decides -
HLSAutorotationModeContainerAndTopChildren: The container and its top children decide -
HLSAutorotationModeContainerAndAllChildren: The container and all its children decide
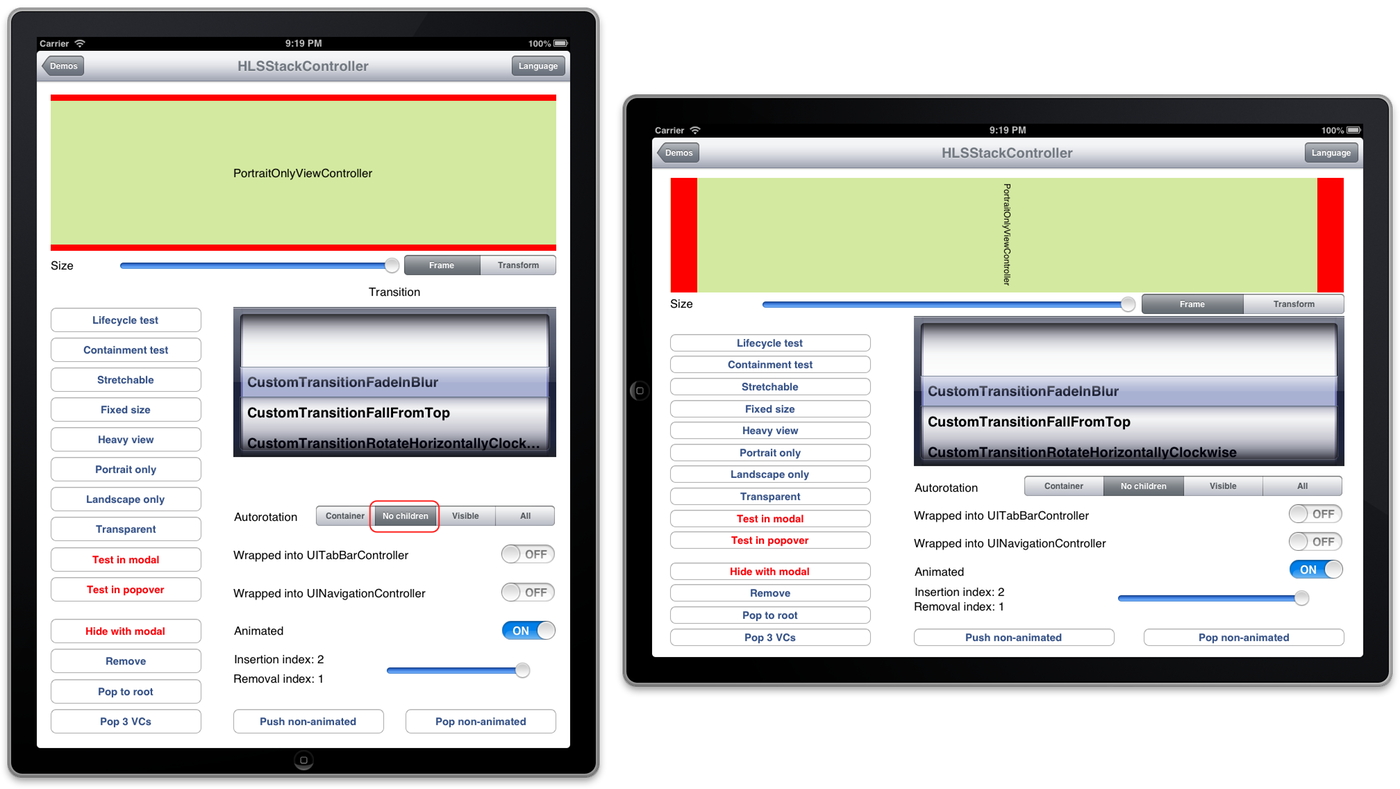
When children are involved, all must support the new orientation so that autorotation can occur. If children are not involved, the container will decide alone. When a CoconutKit container rotates, all child view controllers which do not match the new orientation keep an orientation they support. In the example below (taken from the CoconutKit demo project), a view controller supporting only the portrait orientation is pushed into a stack container in portrait orientation, but which can freely rotate. When the stack container is rotated into landscape orientation, the child view controller remains in portrait orientation: