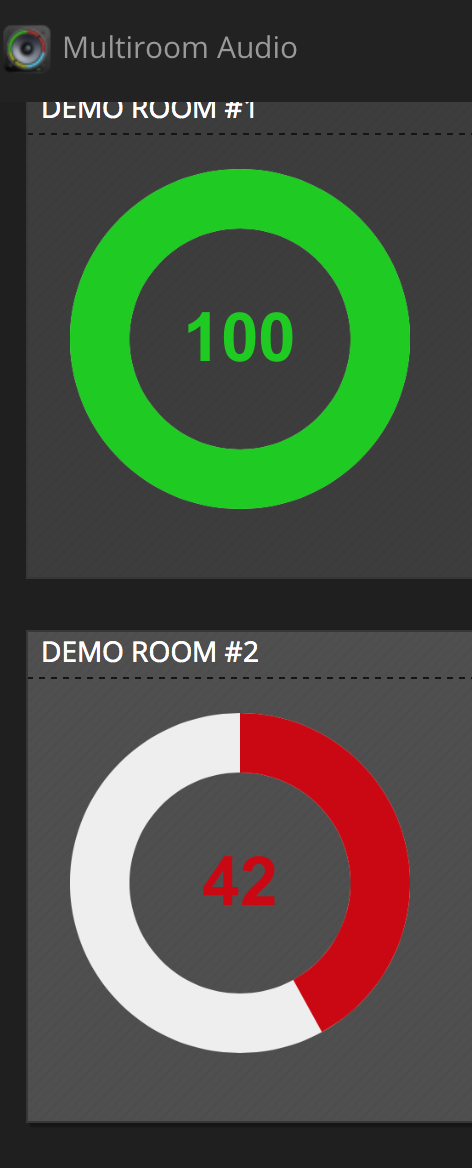
This is a simple Snapcast webapp designed to control volume of any snapcast clients connected to a specific server, using the JSON::RPC API.
This app is powered by Perl & Dancer2, and uses a bootstrap theme to be more user friendly on any devices: phone, table, computer...
Synchronous audio player
Snapcast is a multi-room client-server audio player, where all clients are time synchronized with the server to play perfectly synced audio. It's not a standalone player, but an extension that turns your existing audio player into a Sonos-like multi-room solution.
The server's audio input is a named pipe /tmp/snapfifo. All data that is fed into this file will be send to the connected clients. One of the most generic ways to use Snapcast is in conjunction with the music player daemon (MPD) or Mopidy, which can be configured to use a named pipe as audio output.
This is using the JSON-RPC API, to first get the list of all connected clients, and display a volume dial for each of them.
Desktop screenshot:
Phone screenshot:
Warning: snapcast JSON RPC API is still under development, so depending on the snapcast version you are using you would need to use the correct branch. Recent snapcast upgrade to version 0.11 introduced the concept of groups which is not available before. So you need to be sure to use the correct branch depending on your snapcast version.
- v0.12: please use branch snapcast/v0.12
- v0.11: please use branch snapcast/v0.11
- v0.10: please use branch snapcast/v0.10.0
- the master branch is used for tracking current development
This webui is using perl and Dancer2. You can install it on any server: where the snapcast server is running, or on a snapcast client server or any other server :-)
- It is recommended to use perlbrew and a recent version of perl (5.22 or later, this should work with any perl >= 5.14).
- install cpanm (you can directly use perlbrew command line for this)
- then run 'install.sh' which is for now an alias to 'cpanm --installdeps .'
- copy
config.yml.sampletoconfig.ymland edit it to set your own snapcast server IP & colors (view Configuration section) - you can then use plack or any other webserver to run the server, './devel-server' should run a webserver on port :5000
- then you can access to your WebUI using http://127.0.0.1:5000/ (replace 127.0.0.1 by your server IP if hosted on a different server than your client)
Note: the devel-server is nice to use during development & configuration to get errors on the command line, in production it's recommended to use the production environment.
plackup -E production -p 5005 ./bin/app.psgi
If you are using a linux server with systemd, then you can customize the service in systemctl/snapcast-ui.service to match your settings, then run the makefile target to install it.
cd systemctl && sudo make all
Before running the webserver you should edit the configuration file
Set your snapcast server hostname/ip and port (optional, using 1705 by default):
snapcast:
  server:
     host: 'your.snapcast.server.ip'
     port: 1705
This is optional, but you can set a label & color to each room using the rooms sections: By default all connected clients are going to be listed using their mac address.
rooms:
    'b8:27:eb:f3:23:f0':
       color: '#0C0'
       name:  'Mezzanine'
    'b8:27:eb:4c:27:87':
       color: '#C00'
       name:  'Game Room'
If you do not want to display some clients you can ignore them:
  ignore:
    - 'b8:27:eb:a6:76:a5'
    - 'b8:27:eb:a6:76:a6'
If you are interested by this project, this probably means that you have already set multiple snapcast clients on different servers. Then you might like the idea of using one accent colored icon for each of your client, if they are using RuneUI or other.
You should check this project https://github.com/atoomic/runeui-color-icons to create a webapp with a nice icon for each clients
An alternate way to install snapcast-volume-ui webapp is to use a Docker container. # Thanks @mdef Here is a recipe for one Ubuntu 16.04 based container
docker pull mdef/snapcast-volume-ui
mount your config to /snapcast-volume-ui/config.yml
How-to run
docker run --net=host --workdir=/snapcast-volume-ui mdef/snapcast-volume-ui /snapcast-volume-ui/devel-server
The app is accessible on port 5000
Q: The servers are listed but the sound control does not work
A: make sure to use the correct branch for your snapcast server version: v0.12, v0.11 or v0.10 depending on the version you use
Q: I'm using snapcast client v0.12 on multiple raspberry pi but the UI control did not work
A: It appears that snpacast server is not able to identify all clients without setting the hostid
update your snapcast client configuration file /etc/default/snapclient
START_SNAPCLIENT=true
SNAPCLIENT_OPTS="-d -h X.X.X.X --hostID myuniqueservernameusinglowercase"
where X.X.X.X should be replaced by the IP of the server hosting snapcast server and myservernameusinglowercase are unique names you want to give to each of your client. This name should be unique for each client, and only use lowercase.
You can then replace the mac address by the hostID in the snapcast UI configuration file
snapcast:
  demo: 0
  server:
     host: 'localhost'
     port: 1705
  rooms:
    '[mac address or hostID]':
       color: '#0C0'
       name:  'YourCustomName'
    '[mac address 2 or hostID2]':
       color: '#C00'
       name:  'Your second custom name'
    '[myuniqueservernameusinglowercase]':
       color: '#CCC'
       name:  'Your Custom Name for this hostID'
Note: view issue atoomic#12 for more details
Unordered list of features
- Basic UI use JSON-RPC API to change client volume, responsive with mobile devices
- UI use bootstrap for the UI to adjust the size for each device, color improvements
- Quick Access mute or set the volume to 50% or 100% for all rooms, with one action in the menu
- Doc Improve doc & installation process
- More control mute, ...
- Code cleanup factorize js, css...
- Configuration extract the configuration from the source code
- AutoSetup auto setup using the UI ??
- Menu Links add direct link for each rooms

