
- Train and deploy Transformer model using PyTorch on Amazon SageMaker to classify non-coding RNA
The paper ‘Attention Is All You Need’ describes transformers and what is called a sequence-to-sequence architecture. Sequence-to-Sequence (or Seq2Seq) is a neural net that transforms a given sequence of elements, such as the sequence of words in a sentence, into another sequence. The Transformer architecture follows an encoder-decoder structure, but does not rely on recurrence and convolutions in order to generate an output. Here, we hypothesis that we can predict if DNA/RNA fragments have the potential to form circRNAs solely by the sequence. We believe that by feeding the transformer model enough circRNAs and lincRNAs sequences, the model can learn to distinguish these two class by the DNA/RNA sequences. And the size of these Transformer models are often too large to train on local computers, cloud computing platforms (e.g. GCP, AWS, Azure) are commonly used. Here, I would like to demonstrate how to train and deploy a transformer model from scratch for circRNA classification using Amazon SageMaker, streamlit and docker.
Transformers are the building block of the current state-of-the-art NLP architecture. It is impossible to explain how transformers work in one paragraph here, but to sum it up, transformers uses a "self-attention" mechanism that computes a representation of a sequence by "learning" the relationship between words at different positions in a sentence. A typical transformers design contains two parts, encoder and decoders, both working as vectorized representation of word relationships.
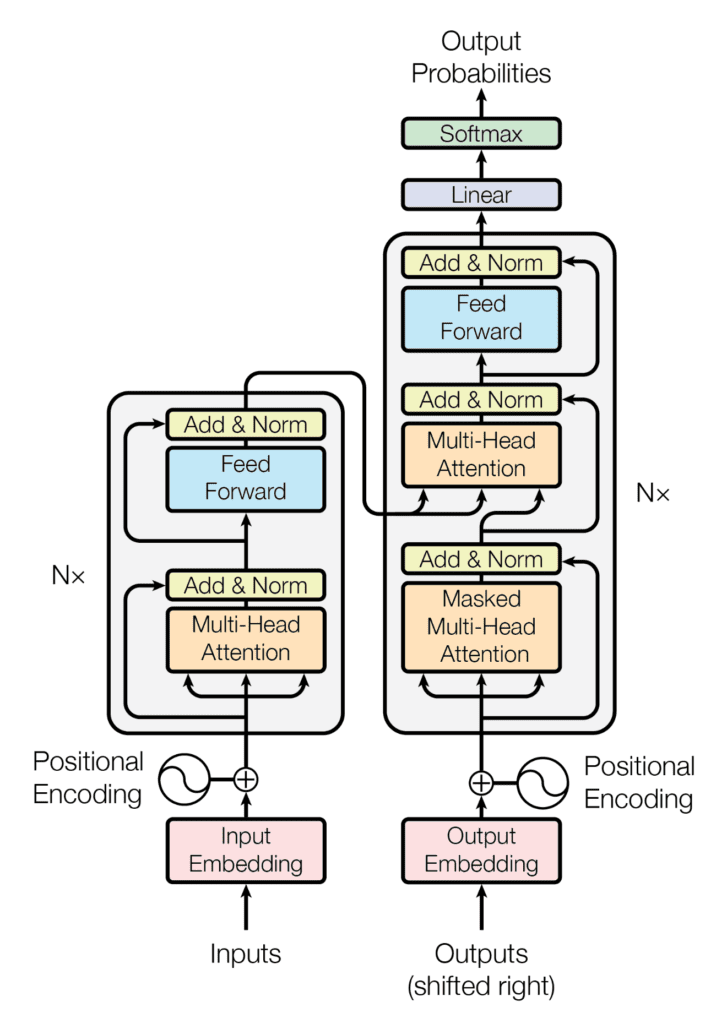
The Encoder-Decoder Structure of the Transformer Architecture
Taken from on "Attention Is All You Need"
The Transformer architecture follows an encoder-decoder structure, but does not rely on recurrence and convolutions in order to generate an output. In a nutshell, the task of the encoder, on the left half of the Transformer architecture, is to map an input sequence to a sequence of continuous representations, which is then fed into a decoder.
The decoder, on the right half of the architecture, receives the output of the encoder together with the decoder output at the previous time step, to generate an output sequence.
Amazon SageMaker SageMaker provides every developer and data scientist with the ability to build, train, and deploy machine learning models quickly. Within minutes, you can build, train and deploy a model in a Jupyter Notebook.
Circular RNAs are diverse RNA species that are found in all live forms from archaea to humans. Although, circRNAs have been discovered over 20 years ago they were initially dismissed for having low abundance or resulting from splicing errors. However, recent advancements in high throughput sequencing revealed the presence of circRNAs in mammalian cells, across various cell lines and many transcripts are abundant and stable. CircRNAs are generated through a mechanism known as back-splicing “tail” to “head” whereby an exon at the 3′end of a gene is back-spliced to an exon at the 5′end of the gene resulting in a circular RNA form. CircRNAs are dispersed throughout the genome. They can arise mainly from exons but circRNAs deriving from inter- or intragenic, and intronic regions as well as antisense sequences have been reported.
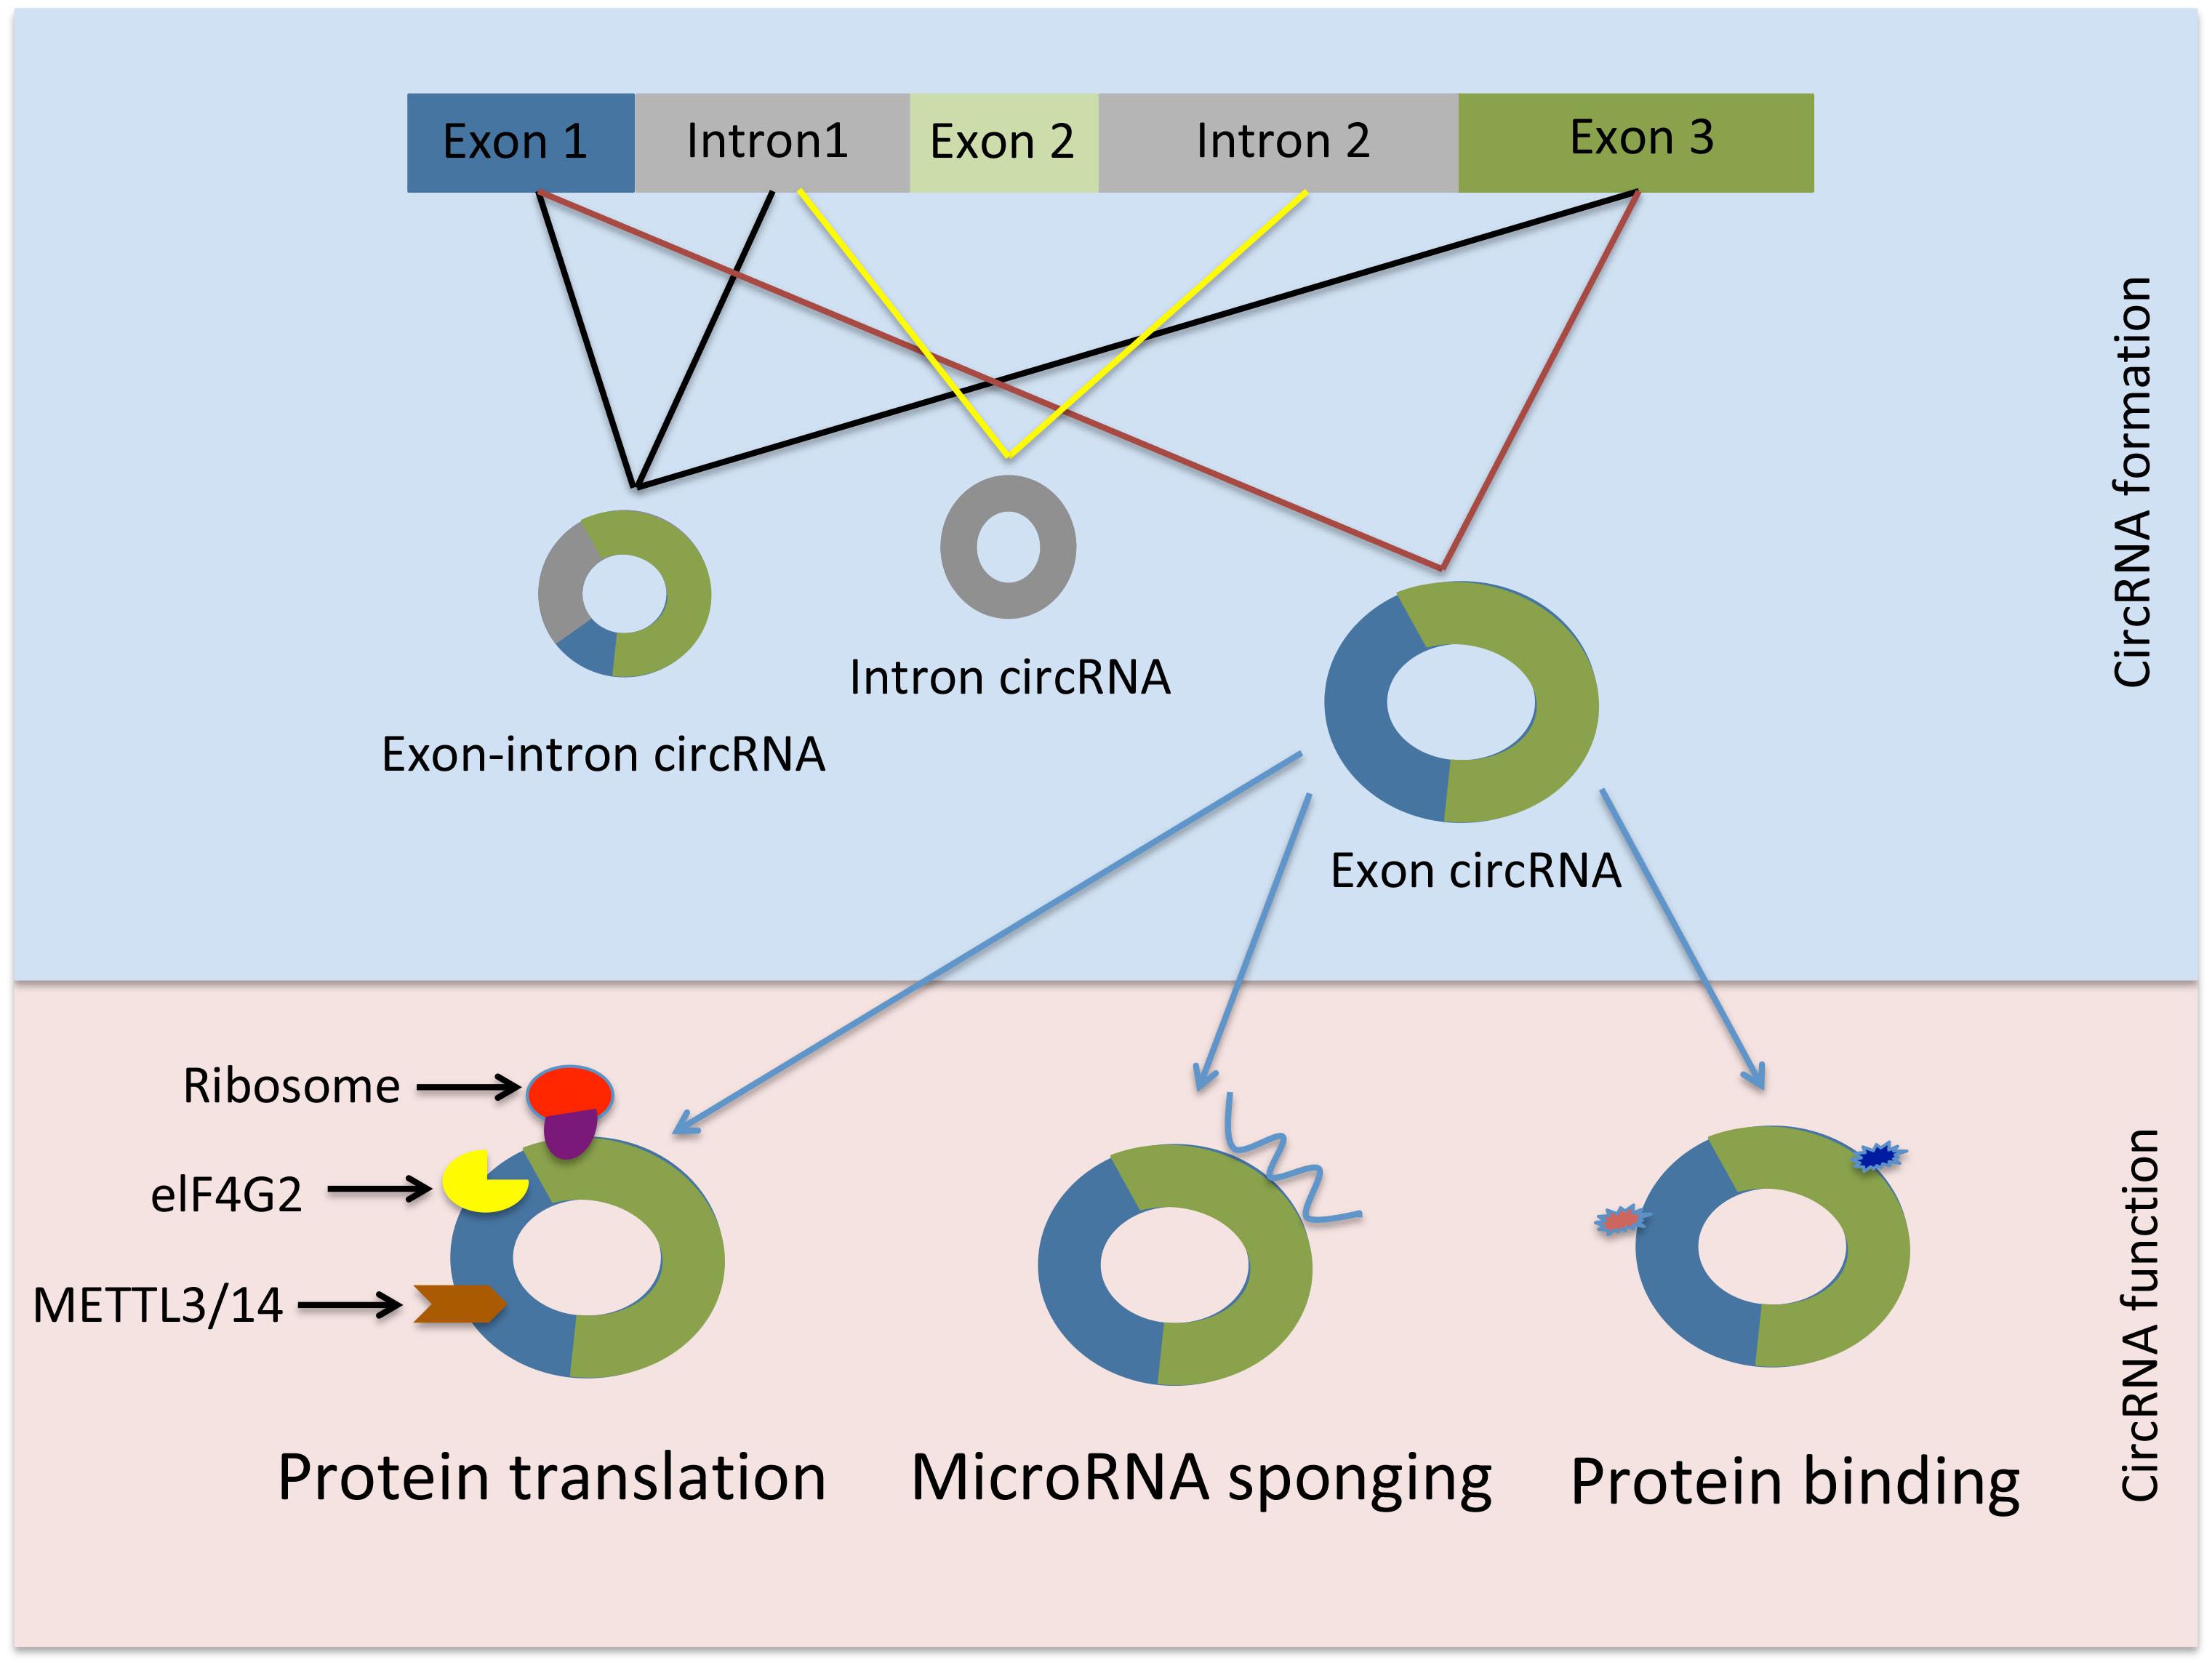
Schematic representation of circRNAs generation and function. from https://doi.org/10.3389/fphar.2019.00428
The dataset we are going to use in this project is from here.
CircRNAs sequences were extracted from the circRNADb database and other lncRNAs sequences were extracted from the GENCODE database (lincRNA, antisense, processed transcript, sense intronic, and sense overlapping), respectively. After removing sequences shorter than 200 nucleotides, got 31,939 circRNAs and 19,722 other lncRNAs.
I built an Online circRNA Classifier using Streamlit running the trained model. You can input or paste any noncoding RNA sequence, the online app will predict if the noncoding RNA is a circRNA or not.

Image by Author
Follow this hands-on tutorial from AWS to create an Amazon SageMaker notebook instance. Use "transformer" as the instance name, and "ml.t3.medium" as the instance type.

Image by Author
Run this notebook on SageMaker to train and deploy the transformer model. Read through it to get more details on the implementation.
Since we are building and training a PyTorch model in this project, it is recommended by SageMaker Python SDK to prepare a separate train.py script to construct and store model functions used by SageMaker. Since all the pretrained model are not suitable for DNA/RNA sequence analysis, we will write our own model.
# Define the padding function to pad all sequences to max length
def pad_sequences(seqs,max_length=400,unk_index=64):
    pad_seqs=[]
    for seq in seqs:
        if len(str(seq))<max_length:
            pad_seqs.append(str(seq) + "0" * (max_length - len(str(seq))))
        if len(str(seq))>=max_length:
            pad_seqs.append(seq[0:max_length])
    return pad_seqs

# Define the function to build kmers
def build_kmers(sequence, ksize):
    kmers = []
    n_kmers = len(sequence) - ksize + 1
    for i in range(n_kmers):
        kmer = sequence[i:i + ksize]
        kmers.append(kmer)
    return kmers

def Kmers(sequence):
    Kmers=[]
    for seq in sequence:
        Kmers.append(build_kmers(seq,5))
    return Kmers
The pad_sequences function will pad all the input sequence into the same length (max_length), the build_kmers and Kmers functions will be used to build the vocabulary. A DNA sequence can be viewed as a collection of k-mers by breaking the sequence into nucleotide substrings of length k, as illustrated in the Figure.

Schematic representation of kmers. from (https://bmcgenomics.biomedcentral.com/articles/10.1186/s12864-019-5467-x)
The TextTransformer class in train.py is responsible for building a classifier from the scratch. Instead of a positional encoding, I did a positional embedding here. So this model has two embedding steps: word embeddings and position embeddings.
# Construct transformer model using nn.Module
class TextTransformer(nn.Module):
  def __init__(self):
        """
        Text Transformer model.

        Args:
            vocab_size (int): Size of the vocabulary.
            seq_len (int): Sequence length.
            pos_emb_size (int): Size of the position embeddings.
            word_emb_size (int): Size of the word embeddings.
            device (torch.device): Device to run the model on.
        """
    super(TextTransformer,self).__init__()
    self.wordEmbeddings = nn.Embedding(vocab_size,seq_len)
    self.positionEmbeddings = nn.Embedding(seq_len,posEmbSize)
    self.transformerLayer = nn.TransformerEncoderLayer(seq_len+posEmbSize,2)
    self.linear1 = nn.Linear(seq_len+posEmbSize,  64)
    self.linear2 = nn.Linear(64,  1)
    self.linear3 = nn.Linear(seq_len,  16)
    self.linear4 = nn.Linear(16,  1)

  def forward(self,x):
    positions = (torch.arange(0,seq_len).reshape(1,seq_len) + torch.zeros(x.shape[0],seq_len)).to(device)
    # broadcasting the tensor of positions
    sentence = torch.cat((self.wordEmbeddings(x.long()),self.positionEmbeddings(positions.long())),axis=2)
    attended = self.transformerLayer(sentence)
    linear1 = F.relu(self.linear1(attended))
    linear2 = F.relu(self.linear2(linear1))
    linear2 = linear2.view(-1,seq_len) # reshaping the layer as the transformer outputs a 2d tensor (or 3d considering the batch size)
    linear3 = F.relu(self.linear3(linear2))
    out = torch.sigmoid(self.linear4(linear3))
    return out
The model_fn,input_fn,predict_fn,output_fn,save_model functions in train.py will be responsible for the communications to the AWS sagemaker APIs to load the model weights/parameters, encode input, make predictions, output the predict results and save model weights/parameters.
# define function to load the saved model data
def model_fn(model_dir):
    device = torch.device("cuda" if torch.cuda.is_available() else "cpu")
    model = myTransformer.to(device)
    with open(os.path.join(model_dir, "model.pth"), "rb") as f:
        model.load_state_dict(torch.load(f))
    return model.to(device)

# define function to convert input json data to torch tensor
def input_fn(input_data, content_type= 'application/json'):
    input = json.loads(input_data)
    seq = input["text"]
    seq = seq.upper().replace("U","T")
    kmers = build_kmers(seq,5)
    src_vocab = get_vocab(
    'https://sagemaker-us-east-2-411668307327.s3.us-east-2.amazonaws.com/circRNA/vocab.csv')
    tokens=[src_vocab[kmer] for kmer in kmers]
    return torch.tensor(tokens, dtype=torch.float32).to(device)

# Perform prediction on the deserialized object, with the loaded model
def predict_fn(input_object, model):
    with torch.no_grad():
        return model(input_object.unsqueeze(0).to(device))

# Serialize the prediction result into the desired response content type
def output_fn(prediction, accept="text/plain"):
    result = np.round(prediction.cpu().item())
    return str(result)

# save model
def save_model(model, model_dir):
    logger.info("Saving the model.")
    path = os.path.join(model_dir, "model.pth")
    torch.save(model.cpu().state_dict(), path)
When the traning is finished. You will see the following:

Image by Author
Then deploy the trained model into the inference endpoint.
Create an AWS lambda function predict_circRNA_transformer to invoke the inference endpoint. Below is the code for the lambda handler:
# import libraries
import os
import io
import boto3
import json
import csv

# grab environment variables
ENDPOINT_NAME = os.environ['ENDPOINT_NAME']
runtime= boto3.client('runtime.sagemaker')

def lambda_handler(event, context):
    print("Received event: " + json.dumps(event, indent=2))
    response = runtime.invoke_endpoint(EndpointName=ENDPOINT_NAME,
                                       ContentType='application/json',
                                       Body=json.dumps(event))
    result=response['Body'].read().decode()
    print(result)
    predicted_label = 'circRNA' if result == 1 else 'lincRNA'
    return predicted_label
Use AWS REST API predict_circRNA to create an application program interface (API) that uses HTTP requests to access and use data.

Image by Author
Now i have everything on AWS, next is to test the HTTP requests to do the prediction. Usually we use Postman to do the test.

Image by Author
Docker is an open platform for developing, shipping, and running applications. Docker enables you to separate your applications from your infrastructure so you can deliver software quickly. With Docker, you can manage your infrastructure in the same ways you manage your applications. By taking advantage of Docker’s methodologies for shipping, testing, and deploying code quickly, you can significantly reduce the delay between writing code and running it in production. Here I also deployed the trained transformer model using Docker on Amazon EC2 instance.
Follow this tutorial from AWS to create and launch an Amazon EC2 instance. A few customized settings for this project:
- In Step 1: Choose an Amazon Machine Image (AMI), choose the Deep Learning AMI (Ubuntu) AMI. Using this image does introduce a bit of extra overhead, however, it guarantees us that git and Docker will be pre-installed which saves a lot of trouble.
- In Step 2: Choose an Instance Type, choose t2.medium to ensure we have enough space to build and run our Docker image.
- In Step 6: Configure Security Group, choose Add Rule and create a custom tcp rule for port 8501 to make our streamlit app publicly available.
- After clicking Launch, choose Create a new key pair, input "ec2-transformer", and click "Download Key Pair" to save
ec2-transformer.pemkey pair locally.
After launching the EC2 instance, use SSH to connect to the instance:
ssh -i ec2-transformer.pem ec2-user@your-instance-DNS-address.us-east-1.compute.amazonaws.comThen, copy my code into the cloud using git:
git clone https://github.com/vveizhang/transformer_predict_circRNA.gitAfterwards, go into the ec2-docker folder to build and run the image:
cd ec2-docker/
docker image build -t streamlit:circRNA-transformer .
The Dockerfile is:
# base image
FROM python:3.7.4-slim-stretch

# exposing default port for streamlit
EXPOSE 8501

# making directory of app
WORKDIR /streamlit:circRNA-transformer

# copy over requirements
COPY requirements.txt ./requirements.txt

# install pip then packages
RUN pip3 install -r requirements.txt

# copying all files over
COPY . .

# download model file
RUN apt-get update
RUN apt-get  -qq -y install wget
RUN wget -O ./model/transformer-model.pth "https://www.dropbox.com/s/dazbgx8igqdgew5/model.pth?dl=1"

# cmd to launch app when container is run
CMD streamlit run ./src/app.py

# streamlit-specific commands for config
ENV LC_ALL=C.UTF-8
ENV LANG=C.UTF-8
RUN mkdir -p /root/.streamlit
RUN bash -c 'echo -e "\
[general]\n\
email = \"\"\n\
" > /root/.streamlit/credentials.toml'

RUN bash -c 'echo -e "\
[server]\n\
enableCORS = false\n\
" > /root/.streamlit/config.toml'
Then run the container from the build image:
docker container run -p 8501:8501 -d streamlit:circRNA-transformerNow, you can access the Streamlit app at Here(EC2 public IP address can be found under "IPv4 Public IP" in the AWS console)!
All source code can be found in this Github Repo: https://github.com/vveizhang/transformer_predict_circRNA
The structure of this Github Repo shows here
├── Readme.md                            # main notebook
├── sagemaker                            # AWS Sagemaker folder
│   ├── source_dir
│   │    ├── requirements.txt            # libraries needed
│   │    ├── lambda_handler.py           # AWS lambda function
│   │    └── train.py                    # PyTorch training/deployment script
│   └── AWS_circRNA_Transformer.ipynb    # AWS Sagemaker notebook
|
└── ec2-docker                           # Streamlit app folder
    ├── Dockerfile                       # Dockerfile for the app (container)
    ├── requirements.txt                 # libraries used by app.py
    ├── model
    |   └── download_model.sh            # bash code to download the trained model weights
    └── src
        ├── func.py                      # utility functions used by app.py
└── app.py # main code for the Streamlit app-
Transformers: https://jalammar.github.io/illustrated-transformer/
-
k-mers: Estimating the total genome length of a metagenomic sample using k-mers
-
Introduction of Circular RNAs: Biogenesis and Function of Circular RNAs in Health and in Disease
-
Train and deploy models on AWS SageMaker: https://medium.com/@thom.e.lane/streamlit-on-aws-a-fully-featured-solution-for-streamlit-deployments-ba32a81c7460
-
Deploy Streamlit app on AWS EC2: https://medium.com/usf-msds/deploying-web-app-with-streamlit-docker-and-aws-72b0d4dbcf77
- Author: Wei Zhang
- Email: [email protected]
- Github: https://github.com/vveizhang
- Linkedin: https://www.linkedin.com/in/wei-zhang-76253523/