IRKit device and IRKit SDK lets you control your home electronics from your iOS devices. IRKit device has a Infrared LED and receiver, and a WiFi module inside. Internet connected devices can make IRKit send IR signals for you.
Buy on amazon.co.jp
Basically, it's a Arduino Leonardo fork with following modifications:
- added a WiFi module ( GainSpan 's WiFi module ).
- added Infrared Receiver, Infrared LED, some LEDs, and a microphone.
It's basically a normal Arduino sketch.
See IRKit.ino


See Case
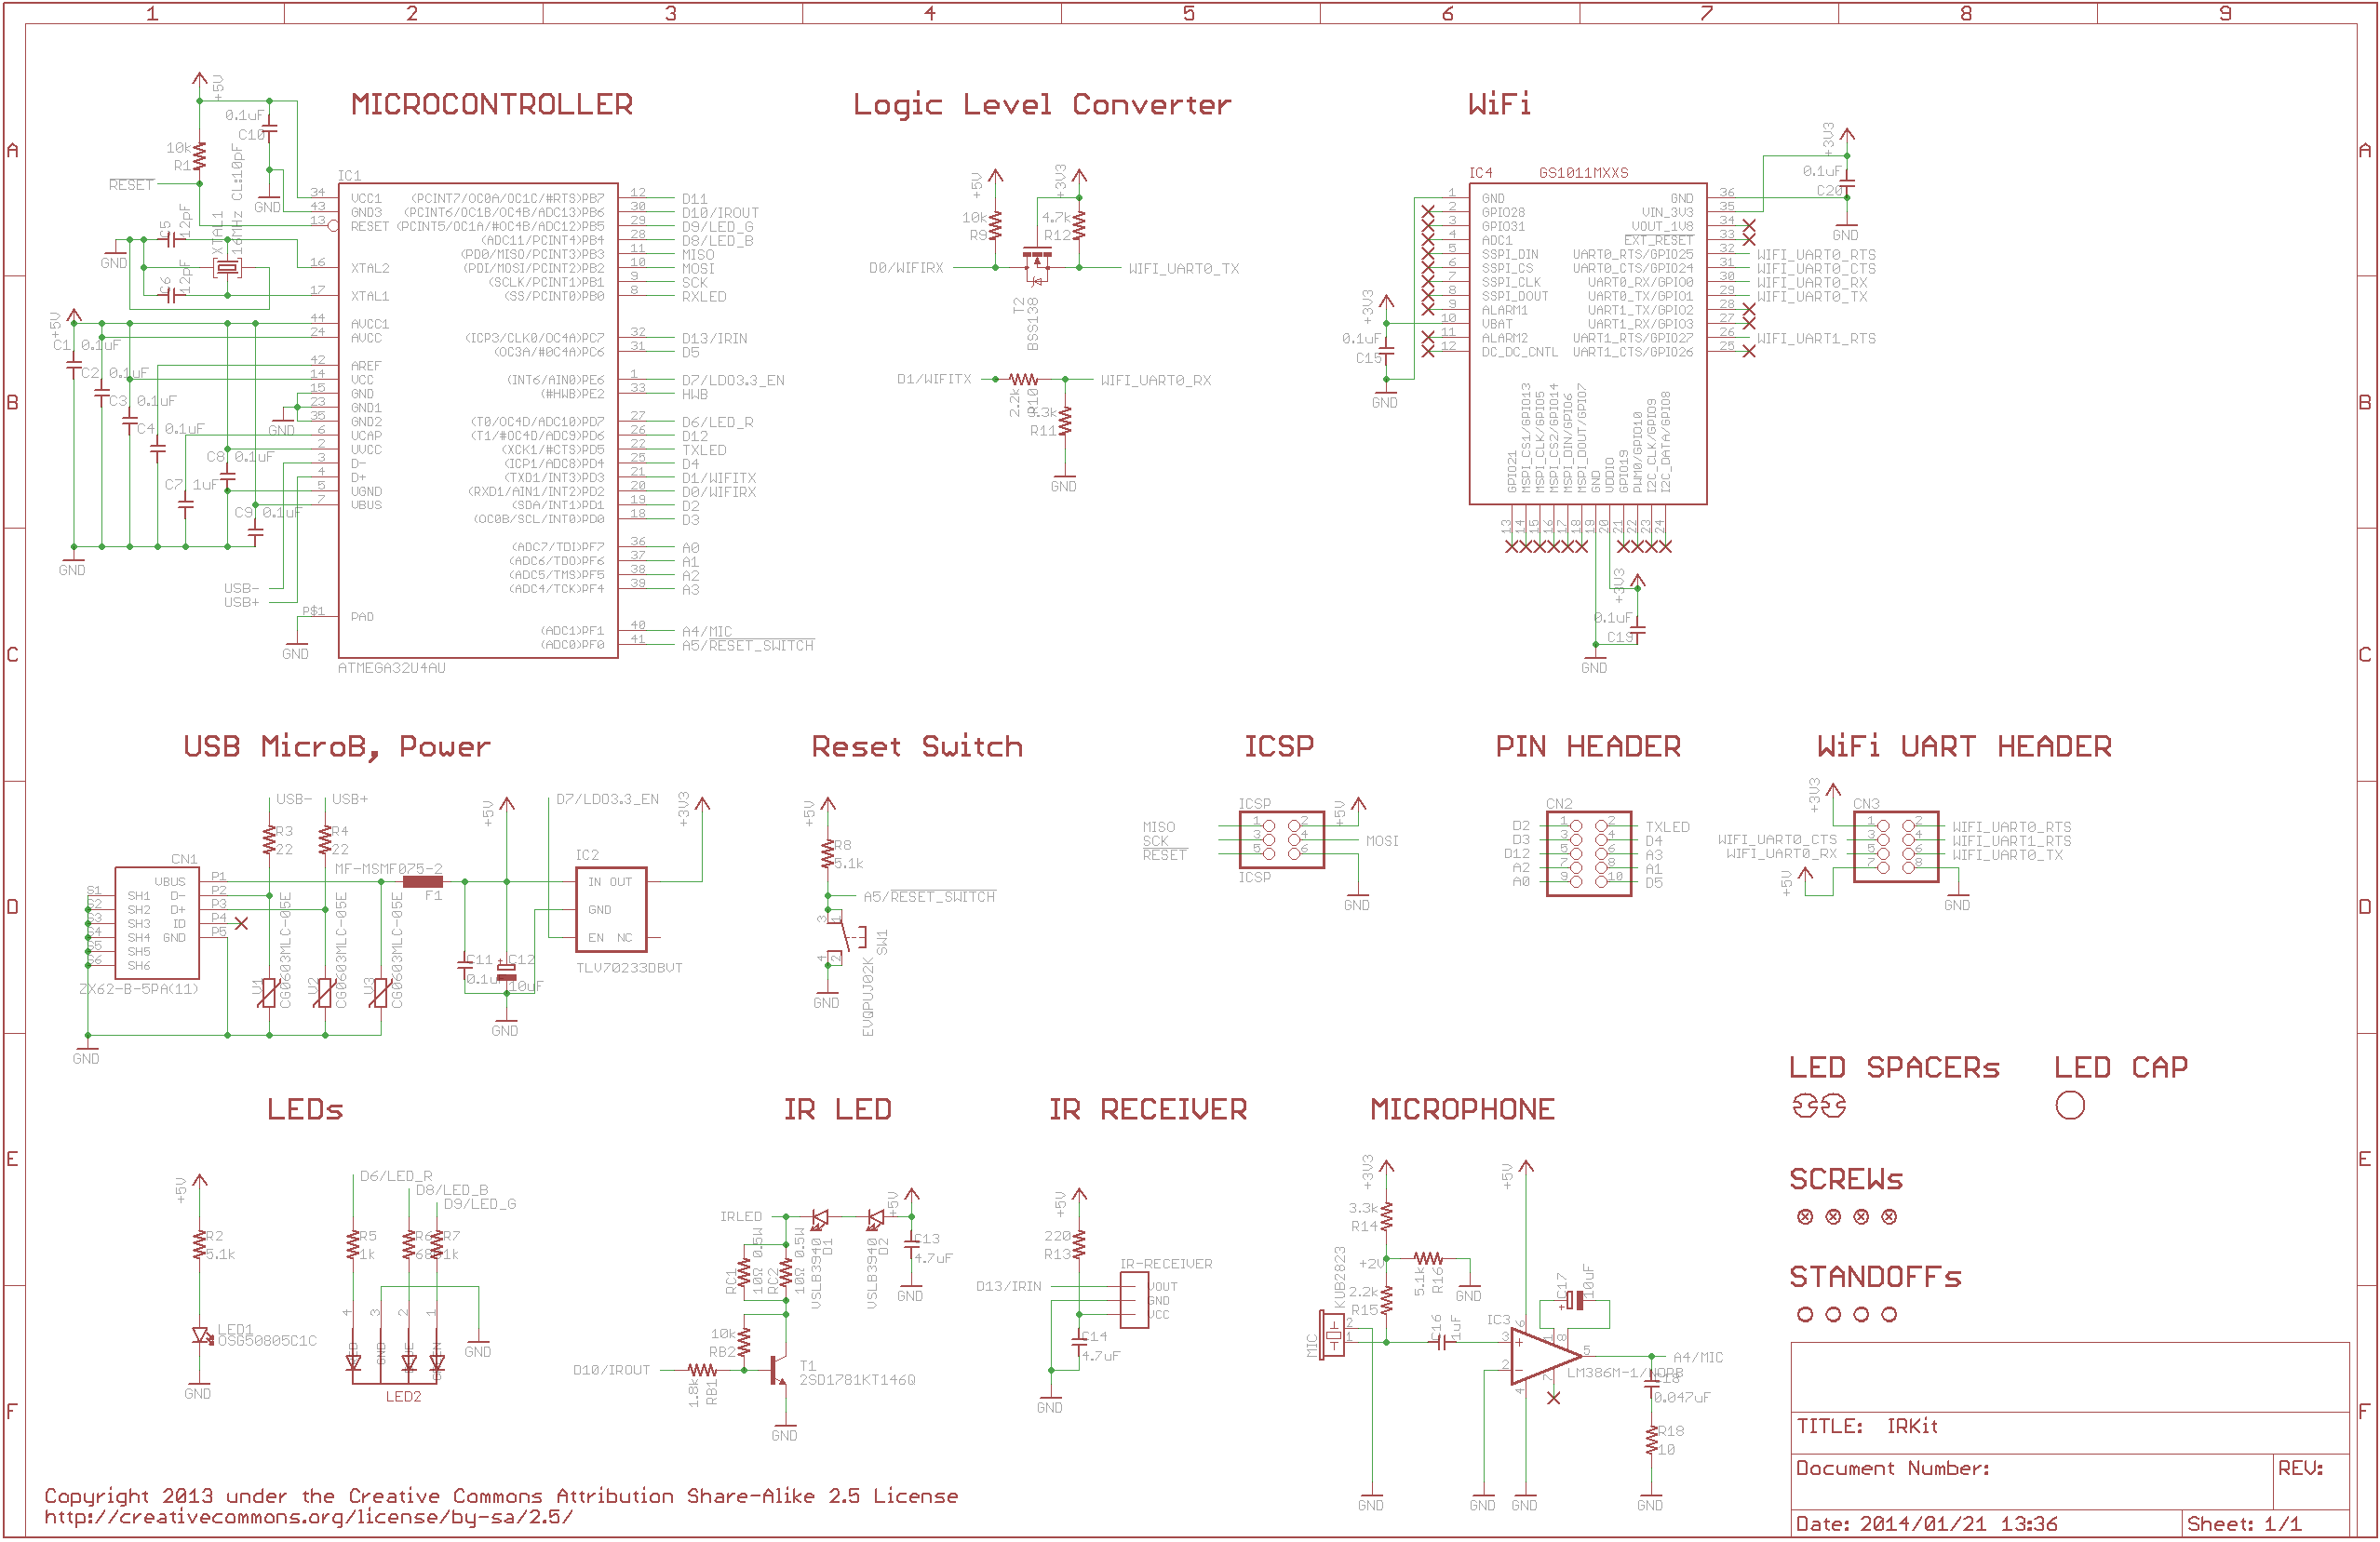
Following Arduino pins are pulled out for you.
- D2,D3,D4,D5,D12,TXLED
- A0,A1,A2,A3
See IRKit.sch, eagle schematic file 's CN2
You can use Arduino IDE to write IRKit's firmware.
Follow this procedure (for MacOS).
-
Download, install and run Arduino IDE
-
Connect IRKit using USB Micro-B cable to Mac.
-
Navigate to Arduino IDE Menu and select Tools -> Board -> "Arduino Leonardo".
-
Navigate to Arduino IDE Menu and select Tools -> Serial Port -> "/dev/tty.usbmodemXXXX".
XXXX part should differ on your environment.
-
Download latest zip file from IRKit device tags.
-
Unzip it and open
firmware/src/IRKit/directory. -
Rename
version.templatetoversion.c.FYI. Product version is embedded here in official builds.
-
Double click
IRKit.inoin the same directory. -
Navigate to Arduino IDE Menu and click File -> Upload, to write into IRKit.
-
All Done!
IRKit logs what it's doing to USB serial, and you can use Arduino IDE to see it.
Follow this procedure (for MacOS).
-
Download, install and run Arduino IDE
-
Connect IRKit using USB Micro-B cable to Mac.
-
Navigate to Arduino IDE Menu and select Tools -> Serial Port -> "/dev/tty.usbmodemXXXX".
XXXX part should differ on your environment.
-
Navigate to Arduino IDE Menu and select Tools -> Serial Monitor.
-
Change new window's right-bottom settings to "No line ending" and "115200 baud", and close the window.
-
Reconnect IRKit and immediately start Serial Monitor again.
This is to collect logs as soon as IRKit startups.
-
Copy and send logs to IRKit developer, thanks!
IRKitのファームウェアは、 Arduino IDE を使って書き込むことができます。
出荷時のファームウェアバージョンによって、どのファームウェアバージョンまでアップデートできるかが変わります。
以下の手順で現在のバージョンを確認し、対応するバージョンを使用してください。
| 現在のバージョン | 対応する最新のバージョン |
|---|---|
| 1.3.3以下 | 1.3.3 |
| 1.3.4以上 | 最新 |
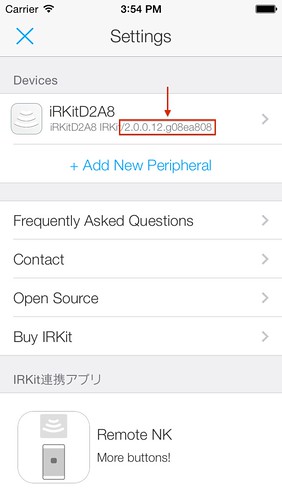
IRKitシンプルリモコン を起動し、左上のボタンから設定画面を開くと、以下の画像の赤の四角のようにファームウェアバージョンを表示します。
以下がファームウェアのアップデート方法です(MacOS編)。
-
Arduino IDE をダウンロードしてインストール後、起動します。
-
IRKitをUSB Micro-Bケーブルを使ってMacに接続します。
-
Arduino IDEのメニューから ツール -> マイコンボード -> "Arduino Leonardo" を選びます。
-
Arduino IDEのメニューから ツール -> シリアルポート -> "/dev/tty.usbmodemXXXX" を選びます。
環境によってXXXXの部分やその前後が異なる場合があります。
-
ファームウェアをダウンロードし、zipファイルを解凍します。
-
解凍したディレクトリ内にある
firmware/src/IRKit/ディレクトリを開きます。 -
同ディレクトリ内の
version.templateをversion.cにリネームします。参考) 製品版ではIRKitのバージョン情報をここに埋め込んでいます。
-
同ディレクトリ内の
IRKit.inoをダブルクリックして Arduino IDE で開きます。 -
Arduino IDEのメニューから ファイル -> マイコンボードに書き込む を押してIRKitに書き込みます。
-
完了!
IRKitのマイコン ATmega32U4 はプログラムメモリを 32kB 積んでいますが、
IRKitのファームウェアでそのほぼ全てを使用しています。
ファームウェアに改造を行い、機能追加する場合には、
不必要な機能のログ出力や機能自体を削ってください。
log.hの22-26行目 辺りをコメントアウトすることで、ログ出力を止めることができます。
IRKitは、USB Micro-Bを使いパソコンまたはMacに接続すると、動作ログを取得することができます。
以下の手順でログを取得します(MacOS編)。
-
Arduino IDE をダウンロードしてインストール後、起動します。
-
IRKitをUSB Micro-Bケーブルを使ってMacに接続します。
-
Arduino IDEのメニューから ツール -> シリアルポート -> "/dev/tty.usbmodemXXXX" を選びます。
環境によってXXXXの部分やその前後が異なる場合があります。
-
Arduino IDEのメニューから ツール -> シリアルモニタ を選びます。
-
新しく開いたウィンドウの右下の設定を "改行なし" "115200baud" に変更し、一度ウィンドウを閉じます。
-
IRKitのUSB Micro-Bケーブルを外し、再度接続した直後に、上記同様に シリアルモニタ を開きます。
IRKit起動直後からのログを取得するためです。
-
ウィンドウに表示される文字列をコピーして開発者へメールしてください。ありがとうございます!
Firmware is licensed under GPLv2 or later.
See details in firmware/LICENSE.
Schematics are licensed under Creative Commons Attribution Share-Alike license.
See details in hardware/LICENSE.
Case is licensed under Creative Commons Attribution NonCommercial Share-Alike license.
See details in case/LICENSE.