01 Getting started with KitraGTI
Check the datasheet for details
- KitraGTI board
- 12V/24V power supply
- 1 micro-usb cable
- 1 PC
- Wi-Fi access point with internet connection
Windows:
- Latest KitraGTI image (http://rushup.tech/kitraGTI/)
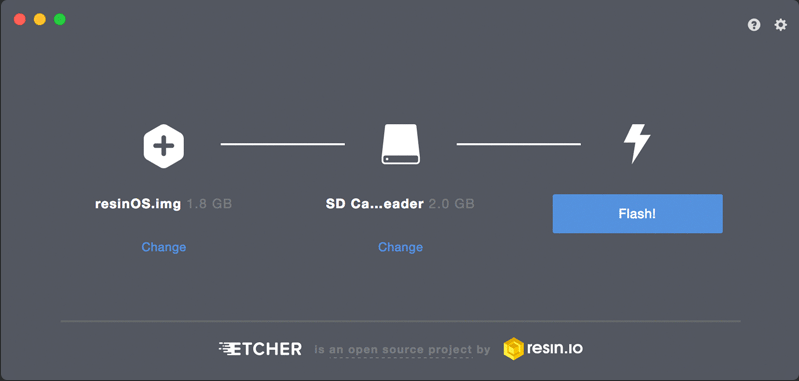
- Etcher or equivalent software to flash the image into a micro-SD card
- Tera Term Serial port terminal (https://osdn.net/projects/ttssh2/releases/) or equivalent
Linux (Ubuntu):
- Latest KitraGTI image (http://rushup.tech/kitraGTI/)
- Etcher or equivalent software to flash the image into a micro-SD card
- Screen (apt-get install screen)
-
Be sure that the board is powered off and disconnected from any power supply
-
Flash a micro-SD card with the downloaded image
-
Insert the micro-SD card into the board
-
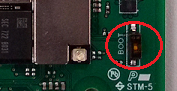
Set the BOOT switch pin ON
-
Plug the antennas
-
Caution: Do not apply power (enable) the radio chips before connecting antennas or damage to the chip may result.
-
5GHz Wi-Fi prescription: In the frequency band 5150-5350 MHz, the use of the KitraGTI with Wi-Fi wireless communications are restricted to indoor use only.
-
-
As a simple example of UART to USB converter you can use one of these:
Simply connect
- BLACK to pin #4 (GND).
- WHITE to pin #3 (TX of ARTIK and RX of USB converter).
- GREEN to pin #2 (RX of ARTIK and TX of USB converter).

-
Open the serial terminal on the PC and select the COM port of the device.
Windows:
Control Panel->Device Manager

Select Serial COMX in Tera Term with baudrate set to 115200.
Linux:
dmesg | grep ttyscreen /dev/ttyUSBX 115200 -
Turn on the power supply (12V/24V)
For more information on how to supply the board check the datasheet)
-
The board will turn on automatically
When you seen the following in the serial port:

That means the flashing has finished.
If you are using an HDMI monitor, you won't see anything, just wait 10 minutes.
-
Unplug the power supply
-
Set the all BOOT switch pins to OFF
-
Turn on the board

User and password are root by default.
Image version < 1.1 use connman as default connection manager. The lastest use NetworkManager.
Check the following commands: LINK
Connect to your Wi-Fi network:
Using connection manager:
Run:
connmanctl
You will get a new '>' prompt.
>scan wifi
>agent on
>services
>connect wifi_xxxx
>quit
Once the Wi-Fi is configured, you can connect with ssh from your PC. You can check your ip address with:
ifconfig wlan0
If you need to set a static ip:
connmanctl config wifi_xxxx --ipv4 manual <ip> <subnet> <gateway>
connmanctl config wifi_xxxx --nameservers 8.8.8.8
At next reboot the board will connect to the network by itself.
Manual configuration:
Do not do this if you already connected with a connection manager.
systemctl stop connman
systemctl disable connman
systemctl enable wpa_supplicant
wpa_passphrase <SSID> <PASSWD> >> /etc/wpa_supplicant/wpa_supplicant.conf
systemctl restart wpa_supplicant
# wait some seconds
iwconfig # check if <SSID> was joined
dhclient wlan0 #Get valid ip address
At next reboot you will only need to run dhclient wlan0.
$ apt-key add /var/lib/apt/keyrings/artik-platform-keyring.gpg

$ echo "deb http://repo.artik.cloud/artik/bin/pub/artik/ubuntu xenial main" > /etc/apt/sources.list.d/artik-e2e-sources.list

$ apt-key adv --keyserver keyserver.ubuntu.com --recv-keys 55955AEB

$ apt update
You may also be interested in changing kernel configuration. You can find the kernel source code HERE
Check the other wiki pages for additional information and tutorials: LINK
Detailed information for sensor and hardware can be found inside the datasheet: LINK
Products and specifications discussed herein are for reference purposes only. All information discussed herein is provided on an "AS IS" basis, without warranties of any kind. This document and all information discussed herein remain the sole and exclusive property of Rush Up. No license of any patent, copyright, mask work, trademark or any other intellectual property right is granted by one party to the other party under this document, by implication, estoppel or other-wise. Rush Up products are not intended for use in life support, critical care, medical, safety equipment, or similar applications where product failure could result in loss of life or personal or physical harm, or any military or defense application, or any governmental procurement to which special terms or provisions may apply. For updates or additional information about Rush Up products, contact Rush Up office. All brand names, trademarks and registered trademarks belong to their respective owners.