05 LORA
- KitraGTI with LoraWan Concentrator PCIE Card
- STM32l072 LoraWan discovery kit (device node)
Lora requires two kind of devices to work:
- Gateway
- Devices
Devices only require the Lora radio to communicate with gateways.
Gateways manage the different devices that join the Lora network. Open source tools to act as a gateway are available, but they are designed to work in a Linux system with network capabilities.
Those are the tools required in a Gateway running on Linux:
- Lora-server + lora-app-server:
Provide a backend with a WebUI to configure the different devices on the network.
This backend handles the decrypting of the payload from devices.
This application can run on the gateway or on another device (computers, remote server), since it allows to design different gateways. The detailed guide will be using an external remote server in a Virtual Machine.
Each Lora device must be created in the WebUI providing security keys for each devices.
Receive and forwards data through MQTT to the lora-gateway-bridge.
All the payload showed on the WebUI are in Base64 format, so they must be manually converted to see the real payload: https://www.base64decode.org/
- Lora-gateway-bridge:
Must run on the gateway, it receives data from the Lora server via MQTT, and forwards them on an UDP port. UDP port will be handled by another application that works on low level Lora radio.
It also receives incoming data from UDP and forwards them via MQTT.
- lora_pkt_fwd
Handles the radio driver, and forwards payloads to the lora-gateway-bridge via UDP.
UDP port can be configured with a .json file.
The server-side operations covered in this article are performed in a VMware virtual machine with the operating system Ubuntu 16.0.4.
The following software is required for the Lora server:
- MQTT broker -- A publish/subscribe protocol that allows users to publish
information under topics that others can subscribe to. A popular implementation of the MQTT protocol is Mosquitto.
-
Redis - A database used to store relatively transient data.
-
PostgreSQL - The long-term storage database used by the open source packages.
In the terminal of Ubuntu, enter the following command and press Y to confirm it will be automatically installed. The network problem may be wrong in the middle. The "ctrl + c" key combination ends the current operation and the newest command is executed.
sudo apt update
sudo apt install mosquitto mosquitto-clients redis-server redis-tools postgresql
Mosquitto, as the main conduit for messaging between the gateways and the LoRa servers and the applications receiving LoRa data, should be secured to prevent third party access to the data. To set up Mosquitto security: sudo mosquitto_passwd -c /etc/mosquitto/pwd loraroot # Create a root user. After entering this command, you will be allowed to set and confirm a password. In this experiment, the passwords related to mosquitto are all 62374838.
sudo mosquitto_passwd /etc/mosquitto/pwd loragw # Create a user named “loragw” for
use with lora-gateway-bridge
sudo mosquitto_passwd /etc/mosquitto/pwd loraserver # This user is used by
"loraserver"
sudo mosquitto_passwd /etc/mosquitto/pwd loraappserver # This user uses
"lora-app-server"
sudo chmod 600 /etc/mosquitto/pwd # Pwd file encryption
After setting the user name and password, you need to tell “Mosquitto” where these user password configuration files are located.
sudo nano /etc/mosquitto/conf.d/local.conf # Open the local.conf file with the nano editor, add the following content to it and save and exit;

allow_anonymous false
password_file /etc/mosquitto/pwd
After saving this configuration, restart Mosquitto with the new settings:
sudo systemctl restart mosquitto
sudo -u postgres psql # Enter the postgres database command line mode
# set up the users and the passwords (note that it is important to use single quotes
and a semicolon at the end!)
create role loraserver_as with login password 'dbpassword';
create role loraserver_ns with login password 'dbpassword';
# create the database for the servers
create database loraserver_as with owner loraserver_as;
create database loraserver_ns with owner loraserver_ns;
\q #exit PostgreSQL# Add the loraserver related package to Ubuntu's apt library
sudo apt-key adv --keyserver keyserver.ubuntu.com --recv-keys 1CE2AFD36DBCCA00
sudo echo "deb https://repos.loraserver.io/ubuntu xenial testing" | sudo tee /etc/apt/sources.list.d/loraserver.list
sudo apt update
sudo apt install loraserver #Install loraserverThe installation process generally does not have any special problems. After the installation is complete, the loraserver needs to be configured. Its configuration file is in the /etc/loraserver/loraserver.toml path. After opening it with the nano editor,
there are many parameters. With the configuration options, you can also explore its features in detail through the comments in the file. This article explains only a few places that must be modified. Others can be kept as default:
postgresql.dsn -- The URL to the postgres database, should look like the following:
dsn="postgres://loraserver_ns:dbpassword@localhost/loraserver_ns?sslmode=disable"

# Be careful with this setting. It is easy to get wrong, and can produce a number of different error messages.
[network_server.band.name The ISM band to use. E.g.
name="EU_863_870"
# network_server.gateway.backend.mqtt.username and network_server.gateway.backend.mqtt.password,since the MQTT server is publicly accessible (so LoRa Gateway Bridge instances can send data), it is best to have a username and password for the server here.
username="loraserver"
password="62374838"

# JWT secret … fill in the encrypted information here, must

jwt_secret="openssl rand -base64 32"
sudo systemctl start loraserver
Verify the operation of loraserver with the following command.
journalctl –u loraserver -f
sudo apt install lora-app-server
Similarly, the lora app server needs to be configured. The configuration file is in the path of "/etc/lora-app-server/lora-app-server.toml". After opening it with the nano editor, there are many configuration options for the parameters. You can also explore its features in detail by using the comments in this file. This article explains only a few places that must be modified. Others can be kept as default:
postgresql.dsn -- The URL to the postgres database, should look like the following:
dsn="postgres://loraserver_as:dbpassword@localhost/loraserver_as?sslmode=disable"
# application_server.integration.mqtt.username and application_server.integration.mqtt.password since the MQTT server is publicly accessible (so LoRa Gateway Bridge instances can send data), it is best to have a username and password for the server here.
username="loraappserver"
password="62374838"
# application_server.external_api.bind -- The port that serves up the api server. This should be localhost:8001 as LoRa Server is on the same system.
bind="localhost:8080"
#JWT secret …encrypted information here
jwt_secret="openssl rand -base64 32"
sudo systemctl start lora-app-server
Use the following command to verify the operating status of lora-app-server.
journalctl –u lora-app-server -f
Finally check the status of all the services:
sudo systemctl status mosquitto # Check if mosquitto is running
sudo systemctl status loraserver #Check if loricaserver is running
sudo systemctl status lora-app-server # Check if lora-app-server is running
Open a browser on the VM on:
127.0.0.1:8080
You must see the Lora App Server WebUI.
If you are using VMWare you also need to enable bridge mode from Network Settings, so that the virtual machine will take a new ip address, as if it was a different machine.
apt-get update
apt-get install git
git clone https://github.com/Lora-net/picoGW_hal.git
git clone https://github.com/Lora-net/picoGW_packet_forwarder.git

cd picoGW_hal
make clean all
/util_chip_id/util_chip_id -d /dev/ttyACM0
# Write down the returned ID
cd ..; cd picoGW_packet_forwarder
make clean all
# Replace configuration with EU region
cp cfg/global_conf_PicoV1p0_EU.json global_conf.json
vi global_conf.json
# Replace the gateway_ID with the returned chip id you writted down before
# Save and exit
apt-key adv --keyserver keyserver.ubuntu.com --recv-keys 1CE2AFD36DBCCA00

sudo echo "deb https://artifacts.loraserver.io/packages/1.x/deb stable main" | sudo tee /etc/apt/sources.list.d/loraserver.list
apt-get update

apt-get update
apt-get install lora-gateway-bridge # Install lora-gateway-bridge
systemctl start lora-gateway-bridge # start lora-gateway-bridge
systemctl enable lora-gateway-bridge #Set lora-gateway-bridge autorun
The function of “packet_forwarder” is to forward the received lora packet to a fixed IP address and port. The role of “LoRa-gateway-bridge” is to pack the data sent by “packet_forwarder” into json format, and upload to server.
“Packet_forwarder” will send the received packet to “lora-gateway-bridge” which is installed in the KitraGTI, so the forwarding address of “packet_forwarder” is set to localhost, the port is 1680, “packet_forwarder” by reading the file of “global_conf. Json” to load the configuration information, which contains the basic settings for each band, the address and port of the packet forwarding, etc., in front of the driver In the installation section, there have been orders to copy it to the proper path.
vi /etc/lora-gateway-bridge/lora-gateway-bridge.toml

As shown the IP address in the red box should be changed to the address of the lora server (the virtual machine), port 1883 remains unchanged, username and password are filled in the user created for lora-gateway-bridge.
Check the status of the bridge with:
systemctl status lora-gateway-bridge
If all is ok, run:
./lora_pkt_fwd
This will start the gateway to act as a LoraWan concentrator.
After connecting the evaluation board, open a Serial terminal on 9600 bps, and send:
AT+DEUI=?
AT+APPKEY=?
Write down the two information, we'll be used when adding the new device on Lora server.
Open a browser on the VM on:
127.0.0.1:8080
The default login and password are both admin. Go to the configuration page, first complete the following initialization configuration:
-
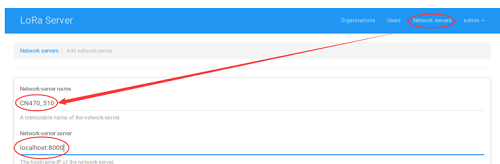
In Network servers, fill in the working frequency band of your own Lora gateway. The name in Network-server name can be set arbitrarily, but it is recommended to correspond to the regional frequency to facilitate differentiation.
-
Enter the name of the company/organization/individual you want in the Organization.

-
In the Service profile, set service name.
-
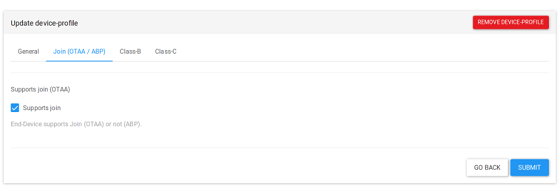
Device profile, fill in node device information:
- Device profile name – In order to achieve the "see name and meaning", the name here is generally used to describe the function of the node device, such as "Temperature sensor", "Alarm node" and so on. Do not fill in double-byte characters such as Chinese, Korean, and Japanese.
- LoRaWAN MAC version – This field should be filled in the code running on your node device, the version of the LoRaWAN protocol. As of the writing date of this document, the nodes that we can use to run the LoRaWAN protocol are all running the 1.0.2 version. (For the experiments we have done so far, the higher version of the LoRaWAN protocol is compatible with the lower version. You can directly select the highest version, but this is not recommended and may cause unknown errors and problems).
- Join (OTAA / ABP) item, check "Supports join".
- Keep other items as default.
Register a gateway in the server: "Gateways → CREATE GATEWAY". Note that the Gateway name can only be filled with letters, numbers, and dash! The MAC address is filled with the Gateway_ID obtained in the previous text.
"Applications → CREATE APPLICATION" creates an application class that is one of your many applications. For example: if you try lora technology to monitor the status of a greenhouse, then you should create a The application of "greenhouse-status" is to add nodes such as temperature, humidity, carbon dioxide, and other sensors under this application. The arbitrariness of this part of the set is relatively high, it is still recommended to know the name in the Application name, such as "greenhouse-status", "Alarm" and so on (supports only letters, numbers and dash ).
Leave 'Payload Codec' to None.
Now go to
"CREATE DEVICE" need to be in the application where the application the node to be added belongs. The place where you need to pay attention is Device EUI and Application key we got before.

CONNECT DEVICE TO GATEWAY:
On the ST's evaluation board, run:
AT+JOIN
AT+NJS=?
If it prints '1' connection was established.
AT+SEND=2:Hello
Sends 'Hello' on port 2.
AT+RECV=?
Receives incoming data.
IMPORTANT: Incoming data can be received only after a send.
Send data (base64 format) to device (from lora-server):
mosquitto_pub -t "application/1/node/{DevEUI}/tx" -m '{"reference": "abcd", "confirmed": true, "fPort":7, "data": "aGVsbG8="}' -u loraroot -P 62374838 -d
See received data:
mosquitto_sub -v -t "application/1/node/{DevEUI}/rx" -u loraroot -P 62374838